React / Next.js に algolia を導入して検索機能を追加しよう
2021/06/01
はじめに
概要
React や Next.js を採用して Web アプリケーションを開発していく際に必ず欲しくなる検索機能ですが、自前での実装は意外と困難です。
その一方で、algolia や Elastic Search を用いることで比較的用意に実装が可能かつある一定量までは無料で使用できるため、初期のプロダクトへの導入がオススメです。 今回は fwywd(フュード) のページへの検索機能を追加する具体的な手順を解説します。
その一方で、algolia や Elastic Search を用いることで比較的用意に実装が可能かつある一定量までは無料で使用できるため、初期のプロダクトへの導入がオススメです。 今回は fwywd(フュード) のページへの検索機能を追加する具体的な手順を解説します。
成果物
今回は以下のように fwywd(フュード) 内の記事を検索して遷移できる機能を実装していきます。

バージョン情報
- Node.js:15.11.0
- React:17.0.2
- Next.js:10.2.2
- remove-markdown:0.3.0
- algoliasearch:4.0.0
- react-instantsearch-dom:6.10.0
- instantsearch.css:6.10.0
- @algolia/client-search:4.9.1
- @headlessui/react:1.2.0
algolia
algolia とは?

algolia は簡単に検索機能を実装することができるサービスです。
Contentful や microCMS といったヘッドレス CMS とも相性が良く、手軽なブログサービスで algolia が利用されている場面を多く見かけます。
Contentful や microCMS といったヘッドレス CMS とも相性が良く、手軽なブログサービスで algolia が利用されている場面を多く見かけます。
基本的な検索機能以外にも、AI によるパーソナライズ機能なども用意されているようです。
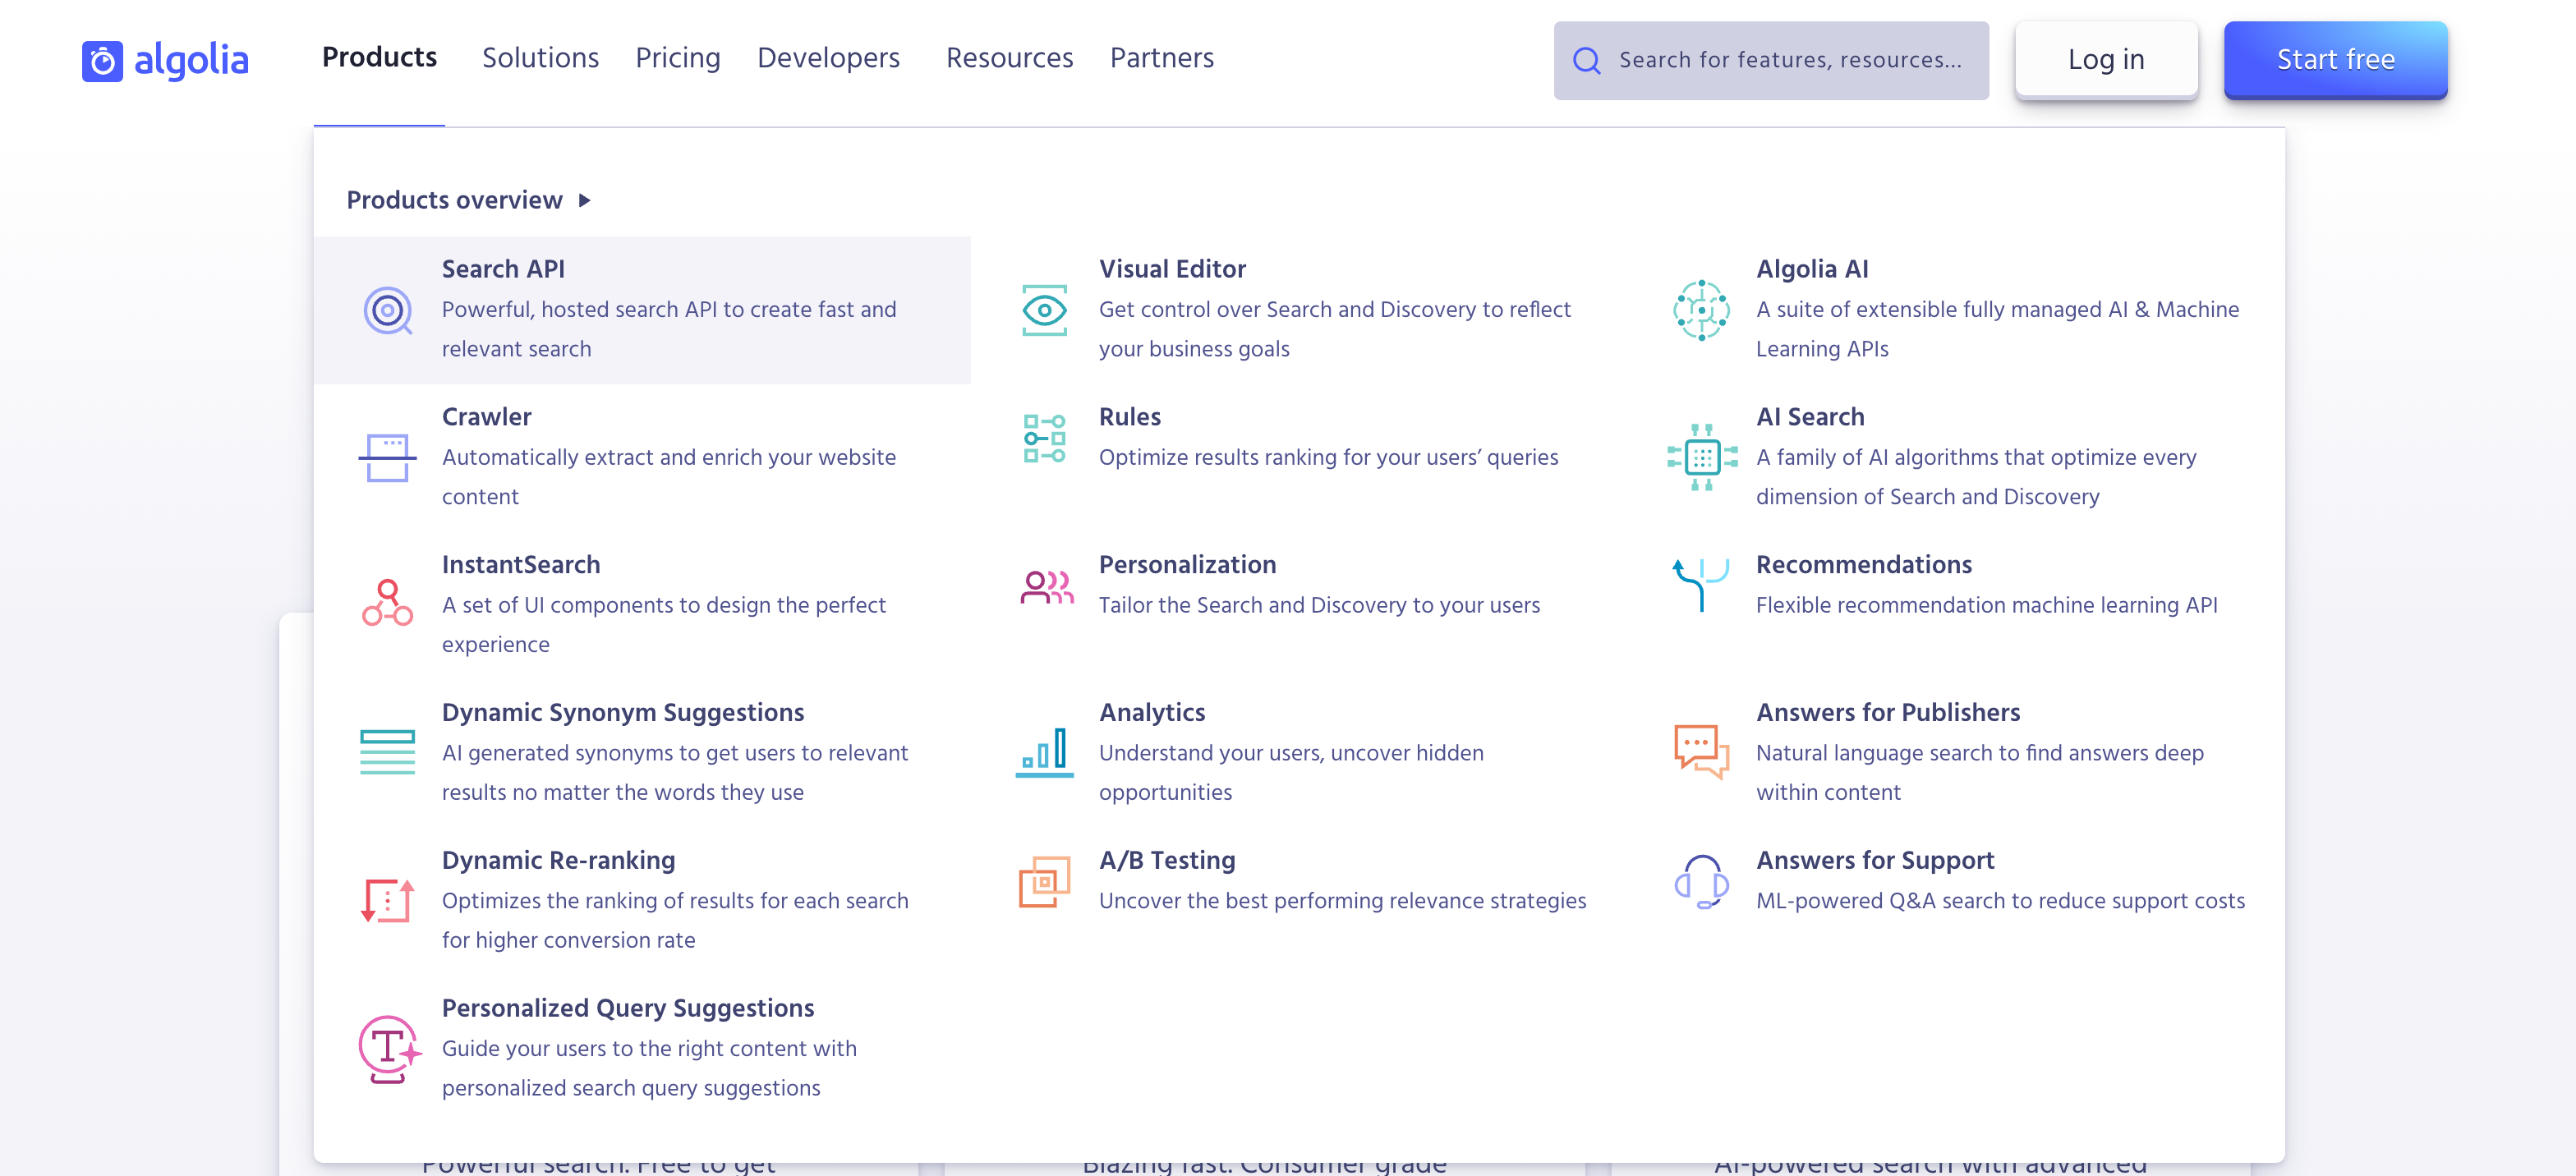
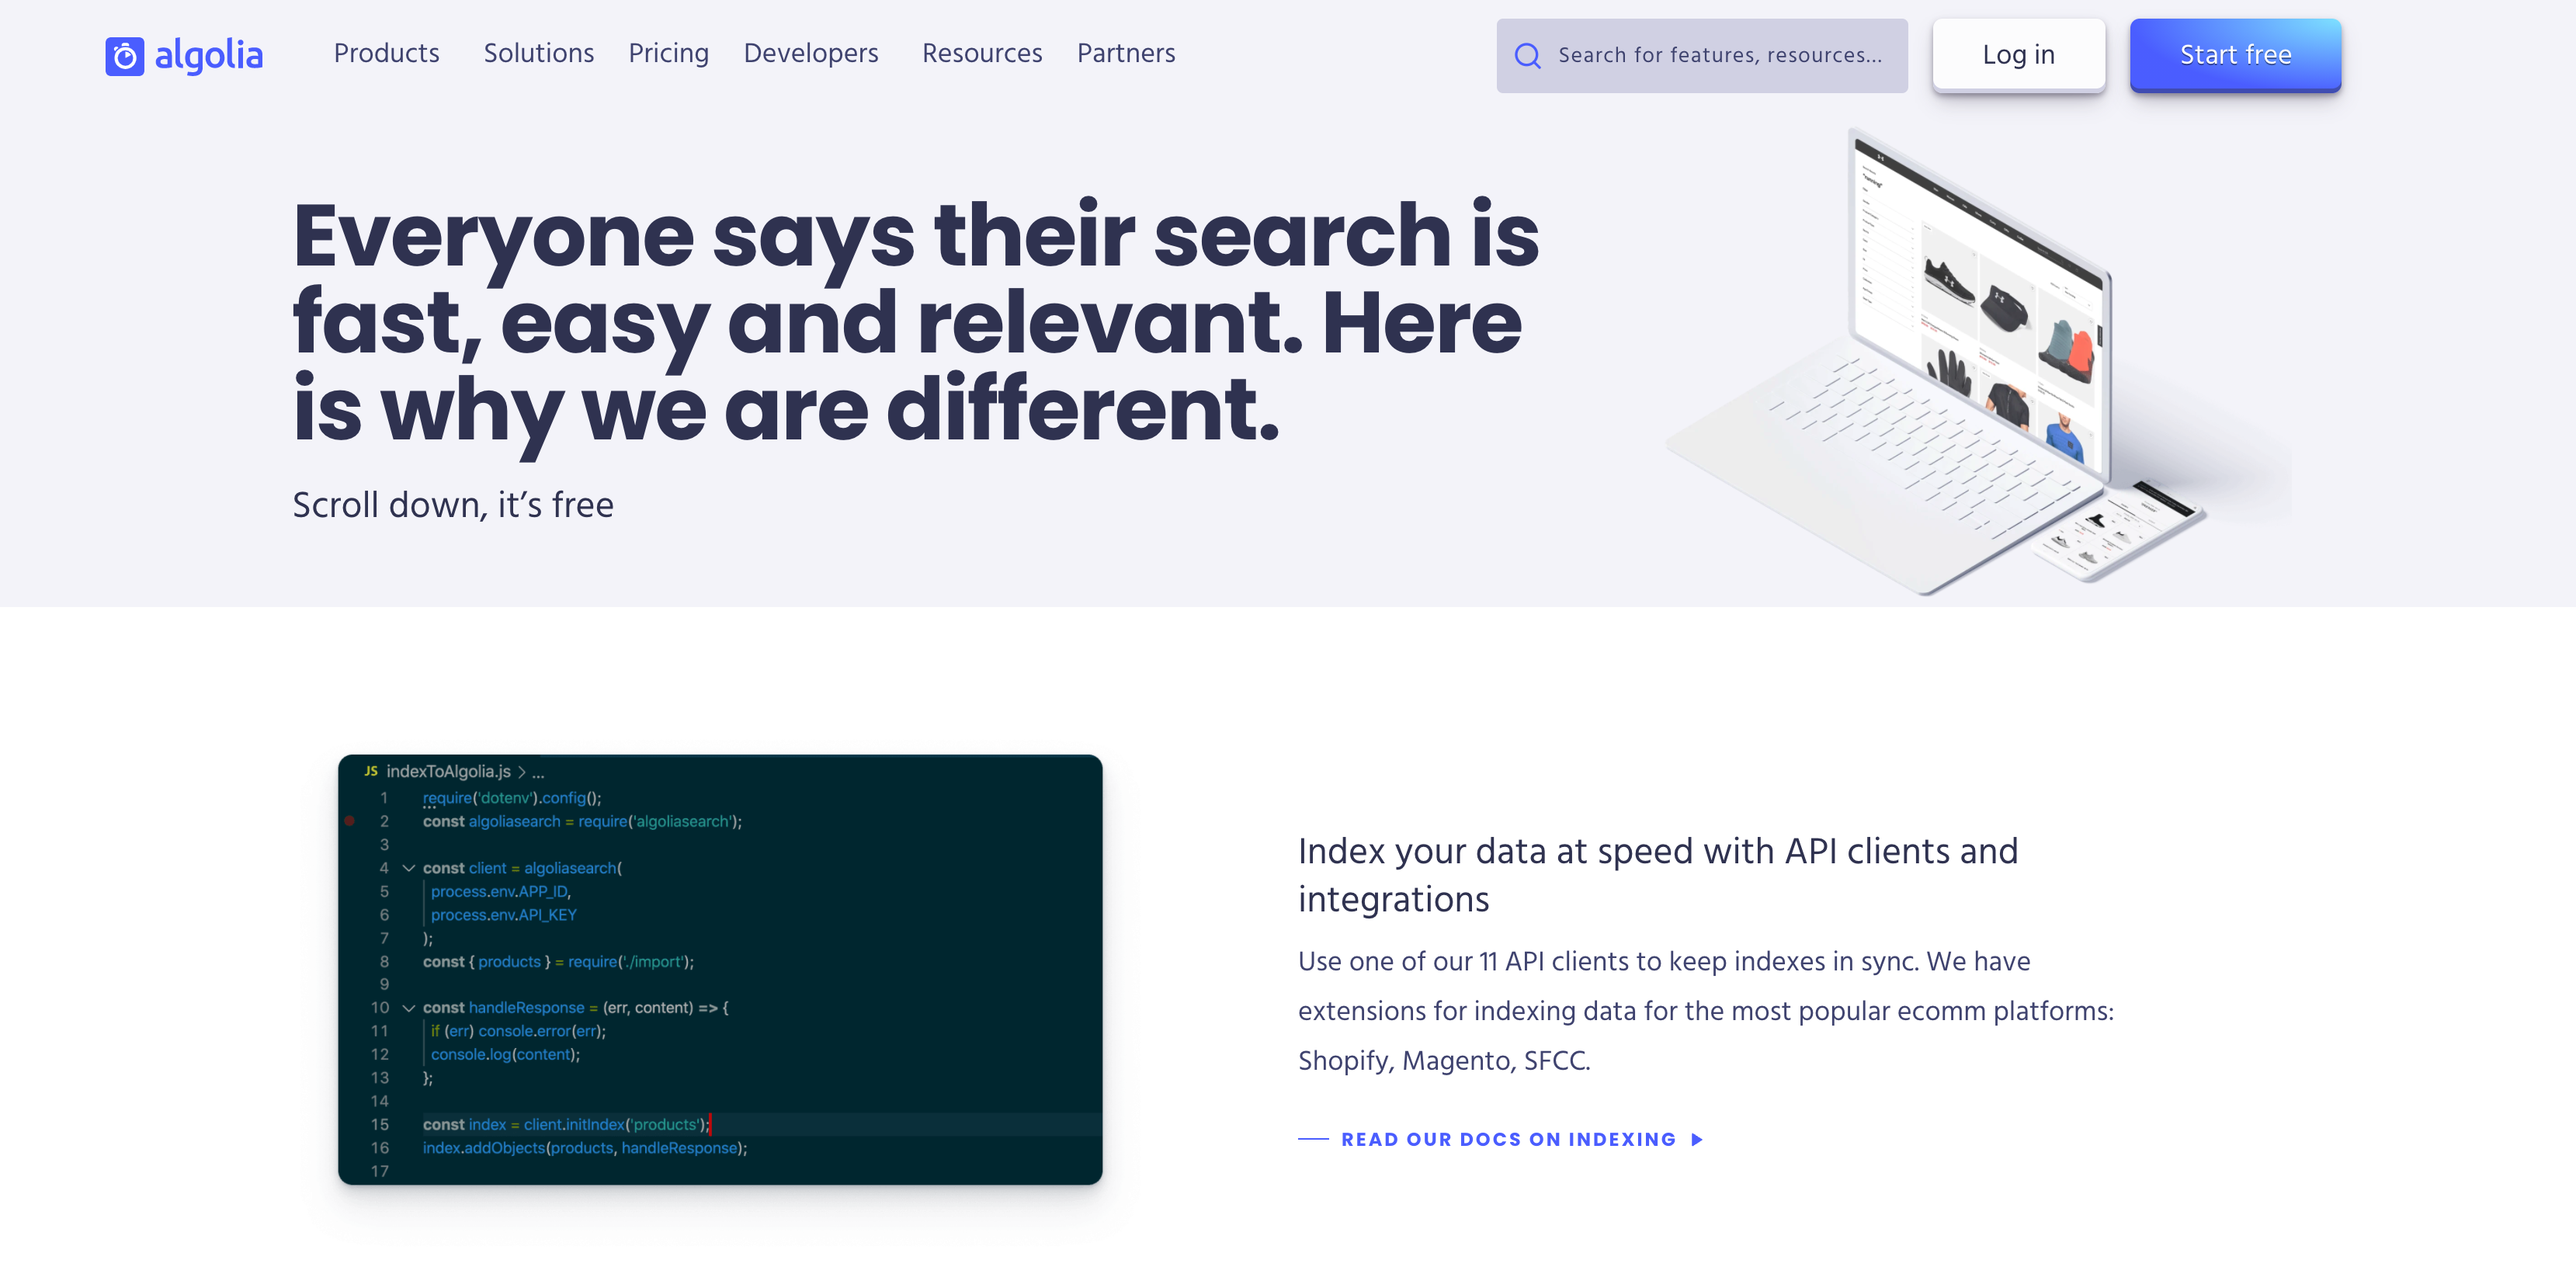
開発者目線では、ドキュメントが豊富に用意されていることと、JavaScript/TypeScript 以外のプログラミング言語でも利用できるため汎用性が高いことの2点が魅力的だと思います。
algolia 以外のサービスと比較
検索系のサービスは他にもありますが、今回 algolia を採用した一番の理由は Tailwind CSS の公式ページ で採用されていたためです。

algolia の比較対象としては Elasticsearch があるようです。
これらのサービスを比較している記事があり内容を抜粋すると以下のように選ぶと良さそうです。
これらのサービスを比較している記事があり内容を抜粋すると以下のように選ぶと良さそうです。
- 検索対象数が少なく手軽に実装したい時は algoria
- 検索の質を重視したい場合は Elasticsearch
Algolia は運用コストが低く、日本語の検索や各種高度な機能にもかなり対応しているなと思いました。 検索対象数がそれほど多くない場合や、検索はあくまで補足的な機能ということであれば Algolia で十分だなと思いました(若干値段は高いと思いますが)。
一方で、より検索の質を重視したい・幅広い要件に対応したい・検索機能の優劣がサービスの競合優位性になりうるということであれば自由度の高い Elasticsearch を使うのが良さそうと思いました。
今回はまず手軽に検索機能を実装したいという要件ですので algolia の方が良さそうです。
また、将来的な話をしておくと、fwywd(フュード) では algolia から Azure Cognitive Search へ検索機能を移行していく予定です。
検索ではインデックス付けという検索対象のデータを渡す過程があり、fwywd ではデータベース(Azure Cosmos DB)を含めたバックエンドを Microsoft Azure で構築していきます。
Cosmos DB から自動的にインデックス付けをほぼ実装なしで GUI 操作により行うことができ、データ保存から検索までの連携がシームレスであることが大きな理由です。
検索ではインデックス付けという検索対象のデータを渡す過程があり、fwywd ではデータベース(Azure Cosmos DB)を含めたバックエンドを Microsoft Azure で構築していきます。
Cosmos DB から自動的にインデックス付けをほぼ実装なしで GUI 操作により行うことができ、データ保存から検索までの連携がシームレスであることが大きな理由です。

ただし、最初のデータベースの設計など開発コストがかかりますので、この移行や手順については後々に紹介していきます。
Microsoft Azure というベンダーロックインも生まれますので、そういったケースを避けたい方は algolia を使い続けることも有力だと思います。
Microsoft Azure というベンダーロックインも生まれますので、そういったケースを避けたい方は algolia を使い続けることも有力だと思います。
この点を付け加えると、以下の方に algolia はオススメです。
- 検索対象数が少なく手軽に実装したい時は algoria に加えて
- ベンダーロックインしたくない
- データベースでなくローカルファイルやヘッドレス CMS からデータを取得している
algolia を使う上で知っておきたいこと
一番気になることは費用ですよね。
初期のプロダクトや個人開発レベルではおそらく無料で使用できる範囲内だと想定しています。
初期のプロダクトや個人開発レベルではおそらく無料で使用できる範囲内だと想定しています。

10 units という単位まで無料で、1unit が 1000 回の検索リクエストであるため、10,000 回の検索までは無料ということになります。
1 日に 3000 回の検索があったとしても無料の範囲内ですので、個人のブログや小規模なプロダクトでは余裕で大丈夫ではないでしょうか。
1 日に 3000 回の検索があったとしても無料の範囲内ですので、個人のブログや小規模なプロダクトでは余裕で大丈夫ではないでしょうか。
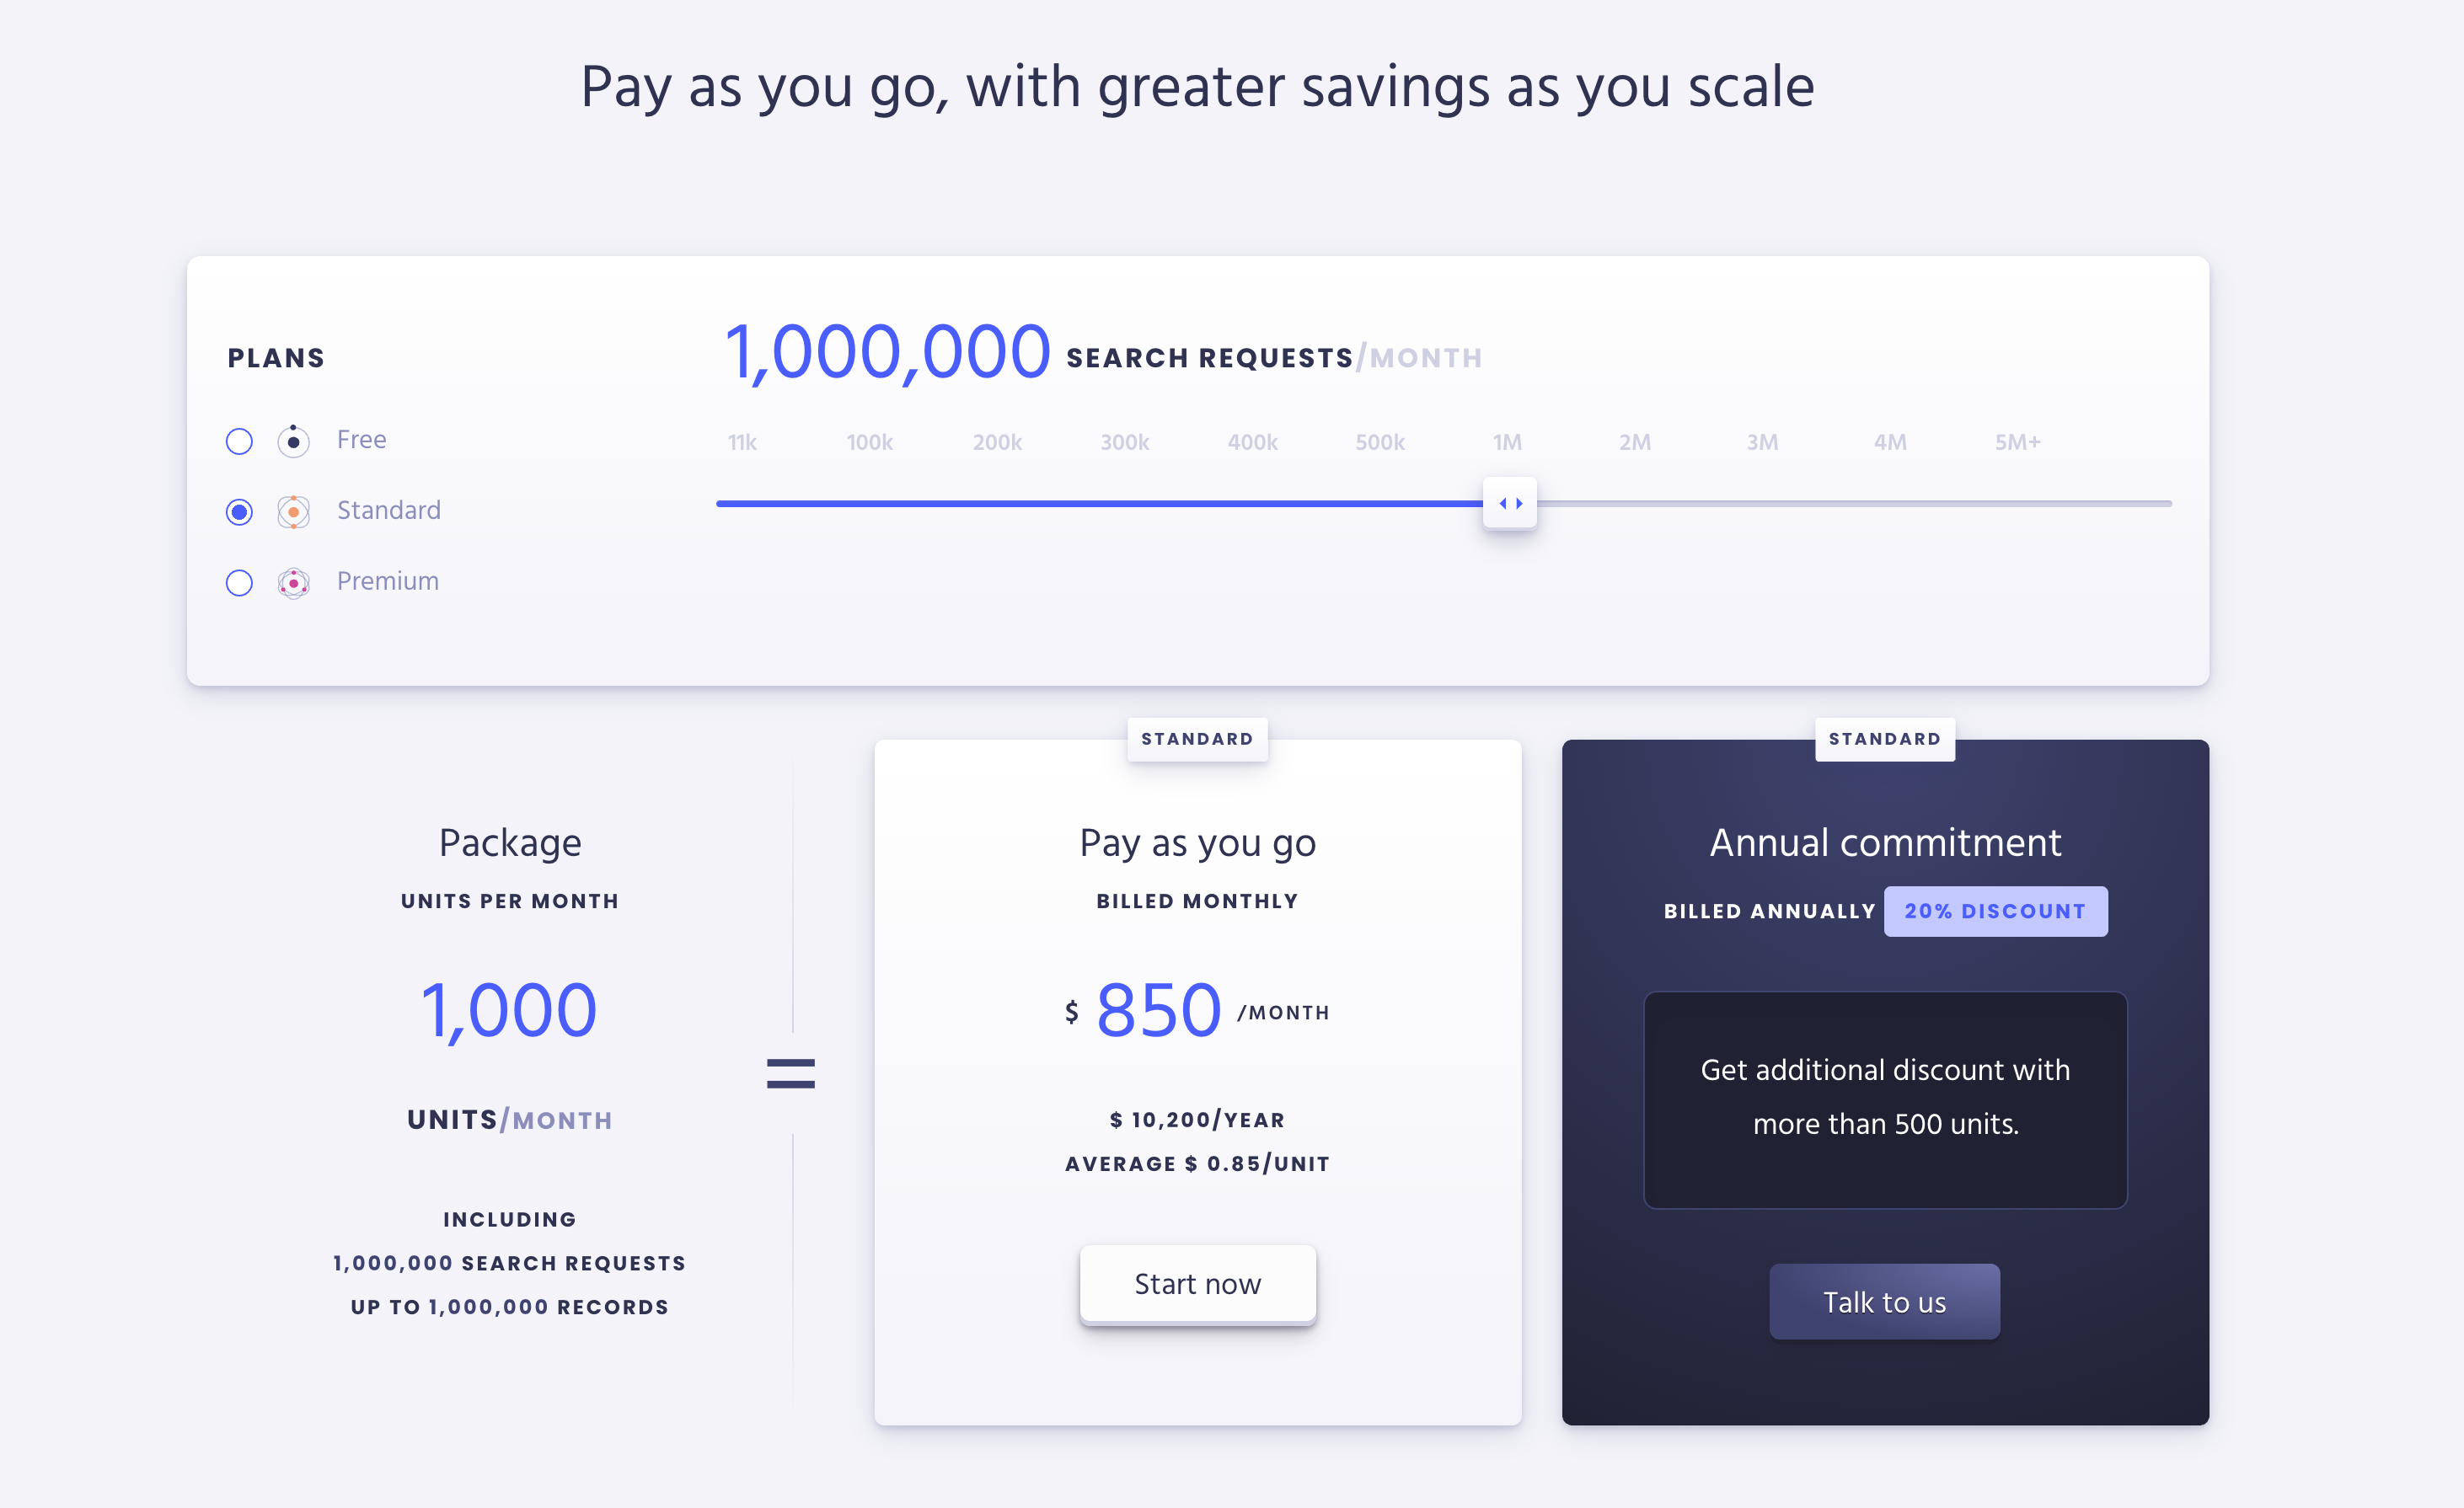
そこから先も見据えた時に、月間 100 万回(約 33,000 回/日)の検索リクエストがあった場合の費用を確認してみると上記の通りで約 93,000 円(3,100 円/日) です。
月間 100 万回の検索があるようなサービスは相当大規模かと予想されますので、それでもこのぐらいの費用感だということは規模が大きくなっても使い続けられるサービスであることもわかります。
月間 100 万回の検索があるようなサービスは相当大規模かと予想されますので、それでもこのぐらいの費用感だということは規模が大きくなっても使い続けられるサービスであることもわかります。
プランは Free, Standard, Premium とあり、10 units までは Free, それ以上は Standard, Personalization などの機能を追加したい場合は Premium と選択は簡単そうです。
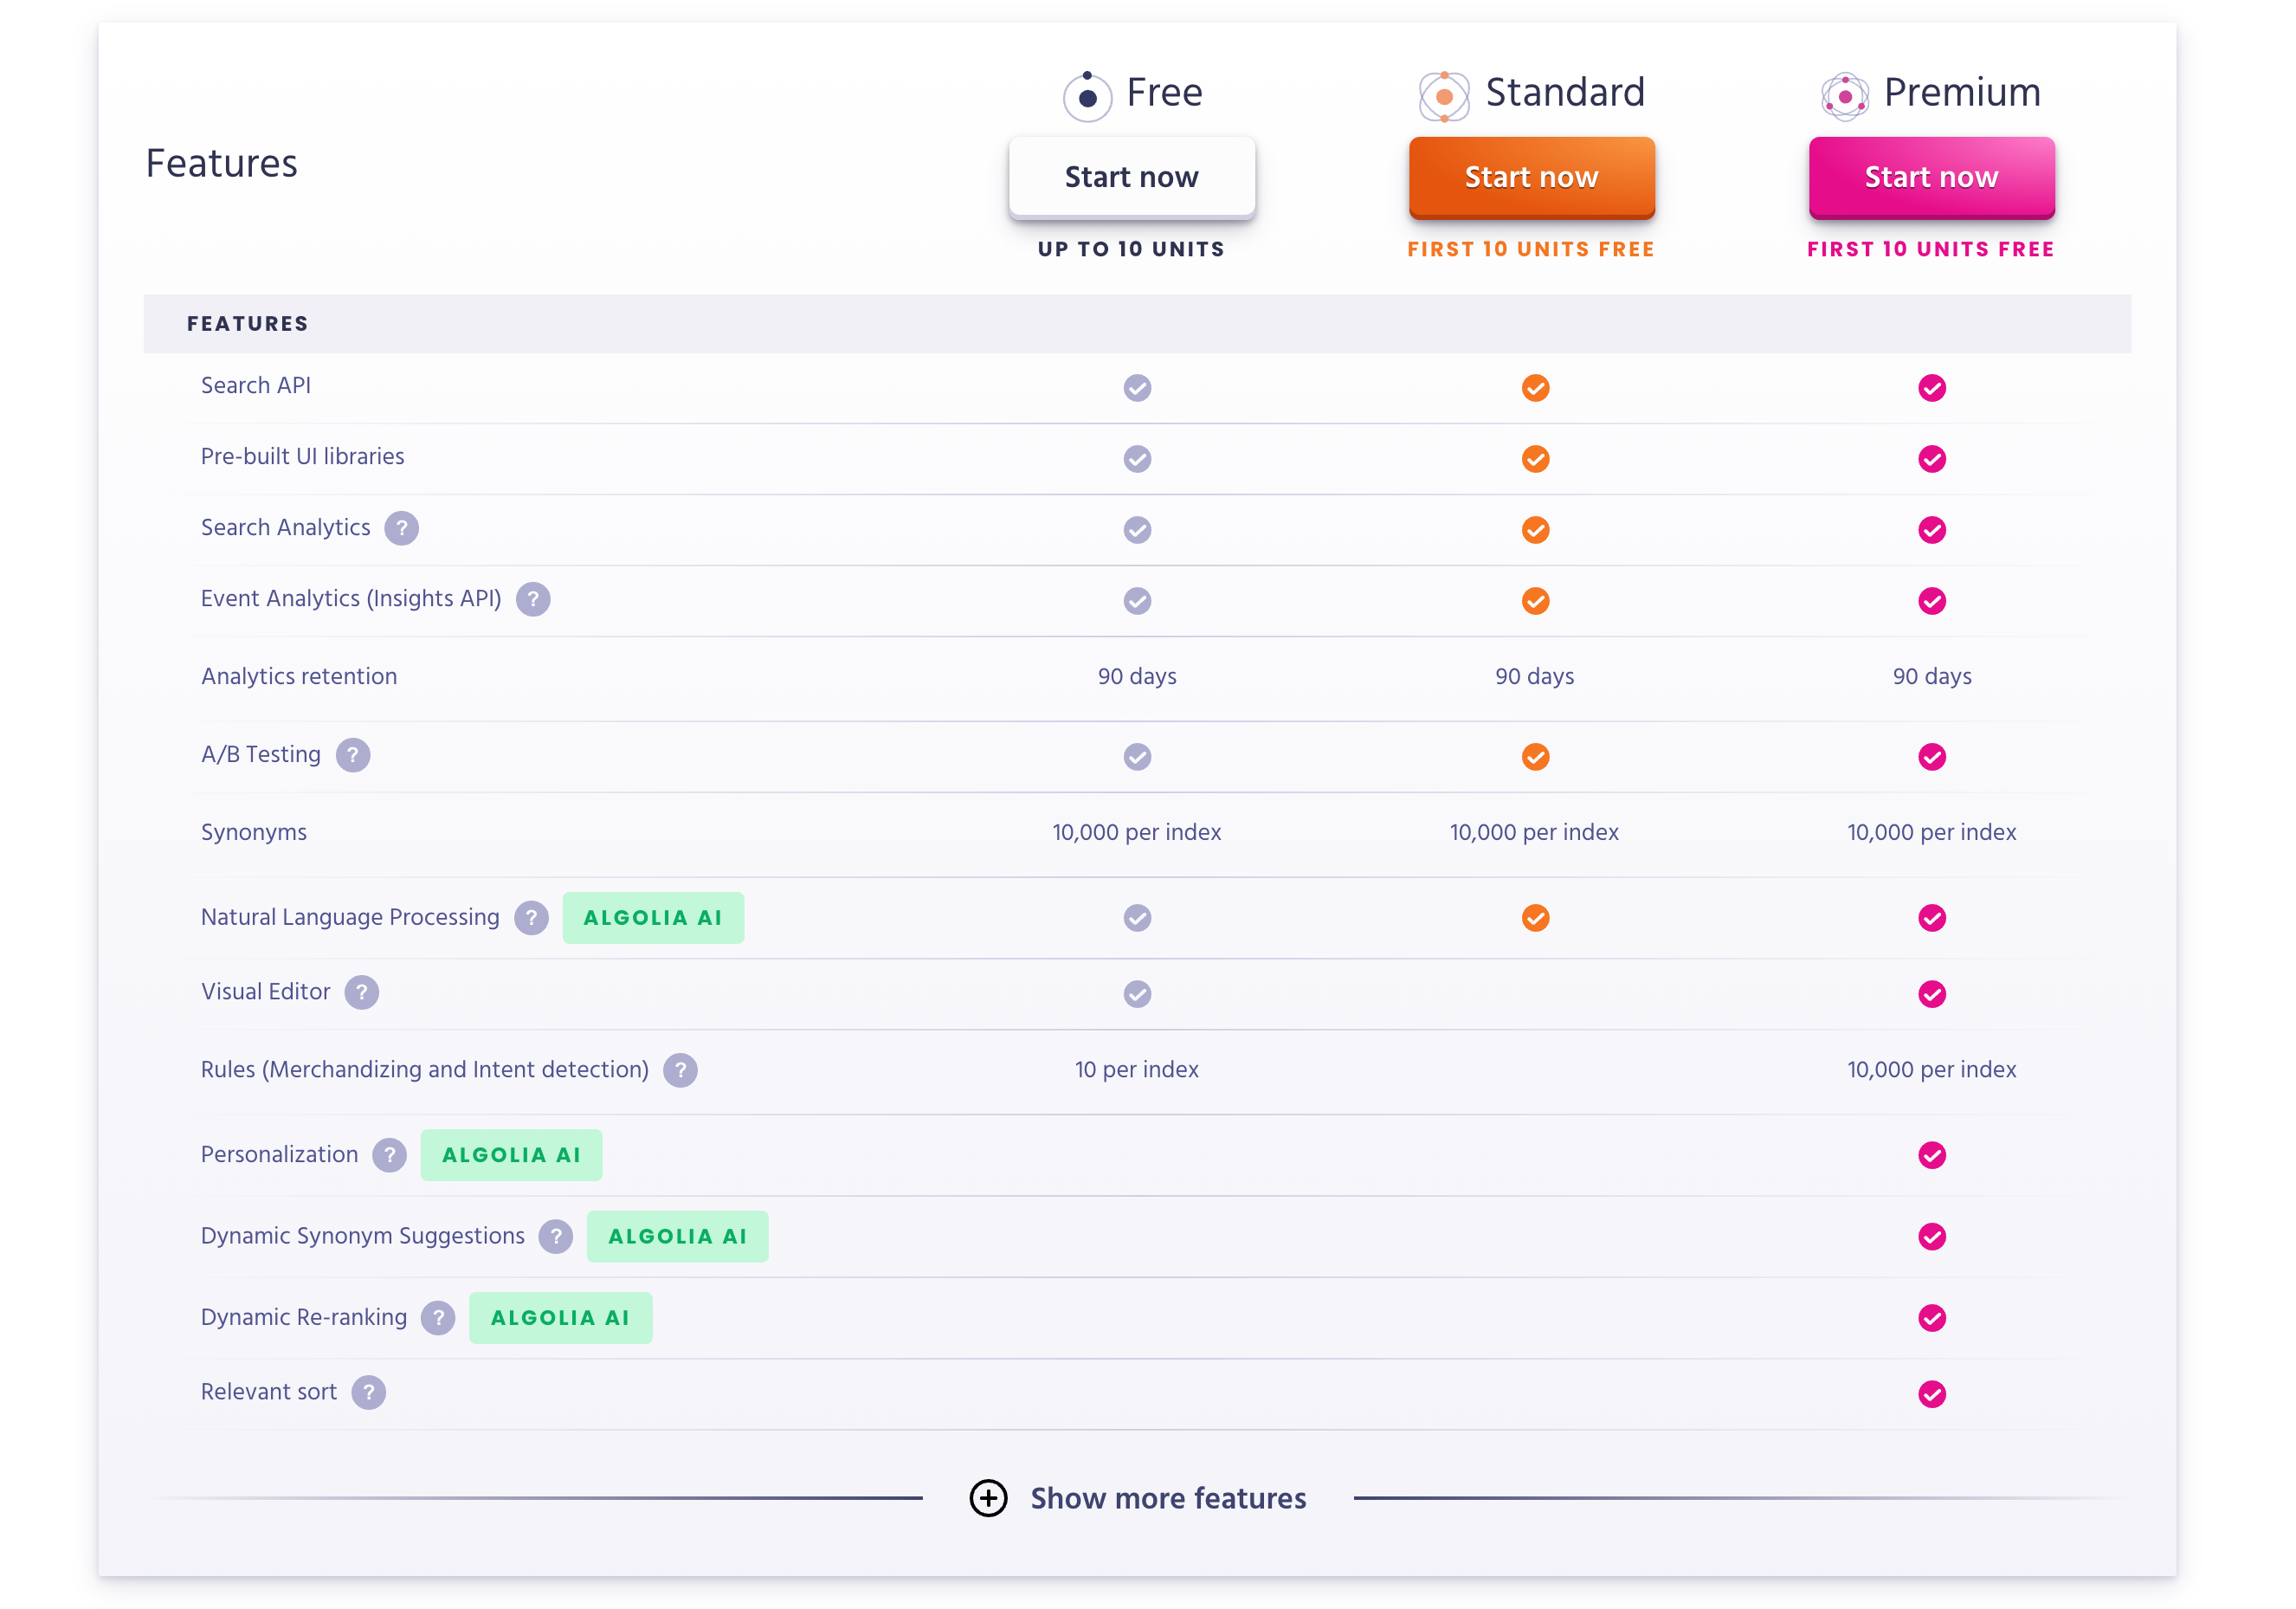
おそらく途中でプランのアップグレードやダウングレードができると思われますので、まずは Free から始めていきましょう。
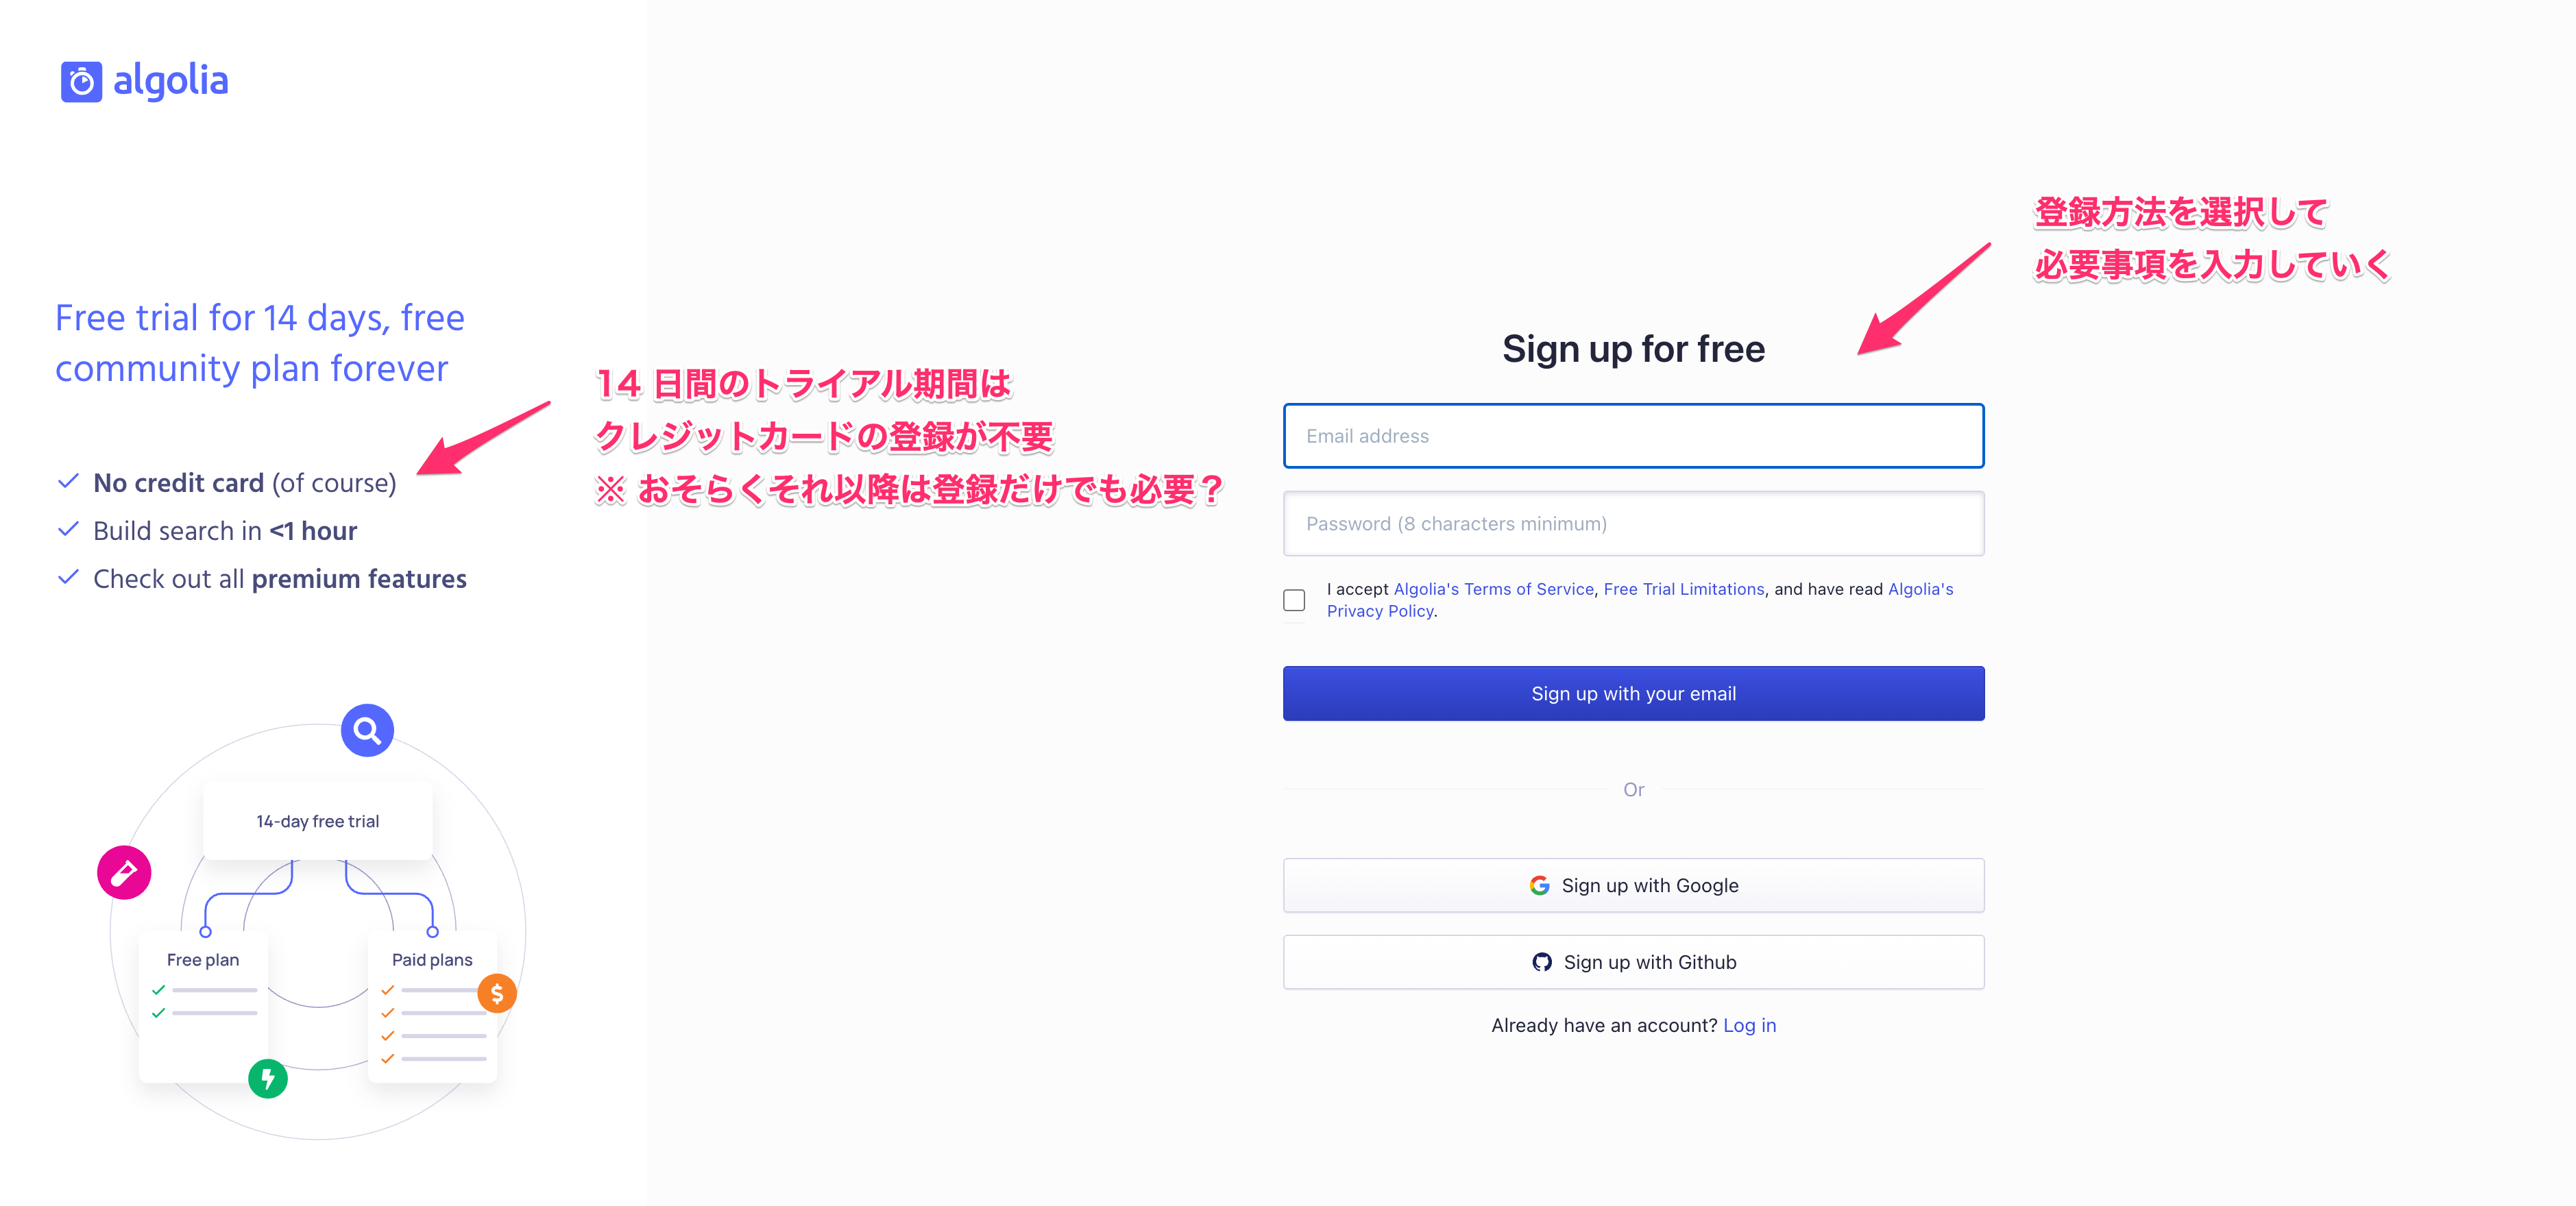
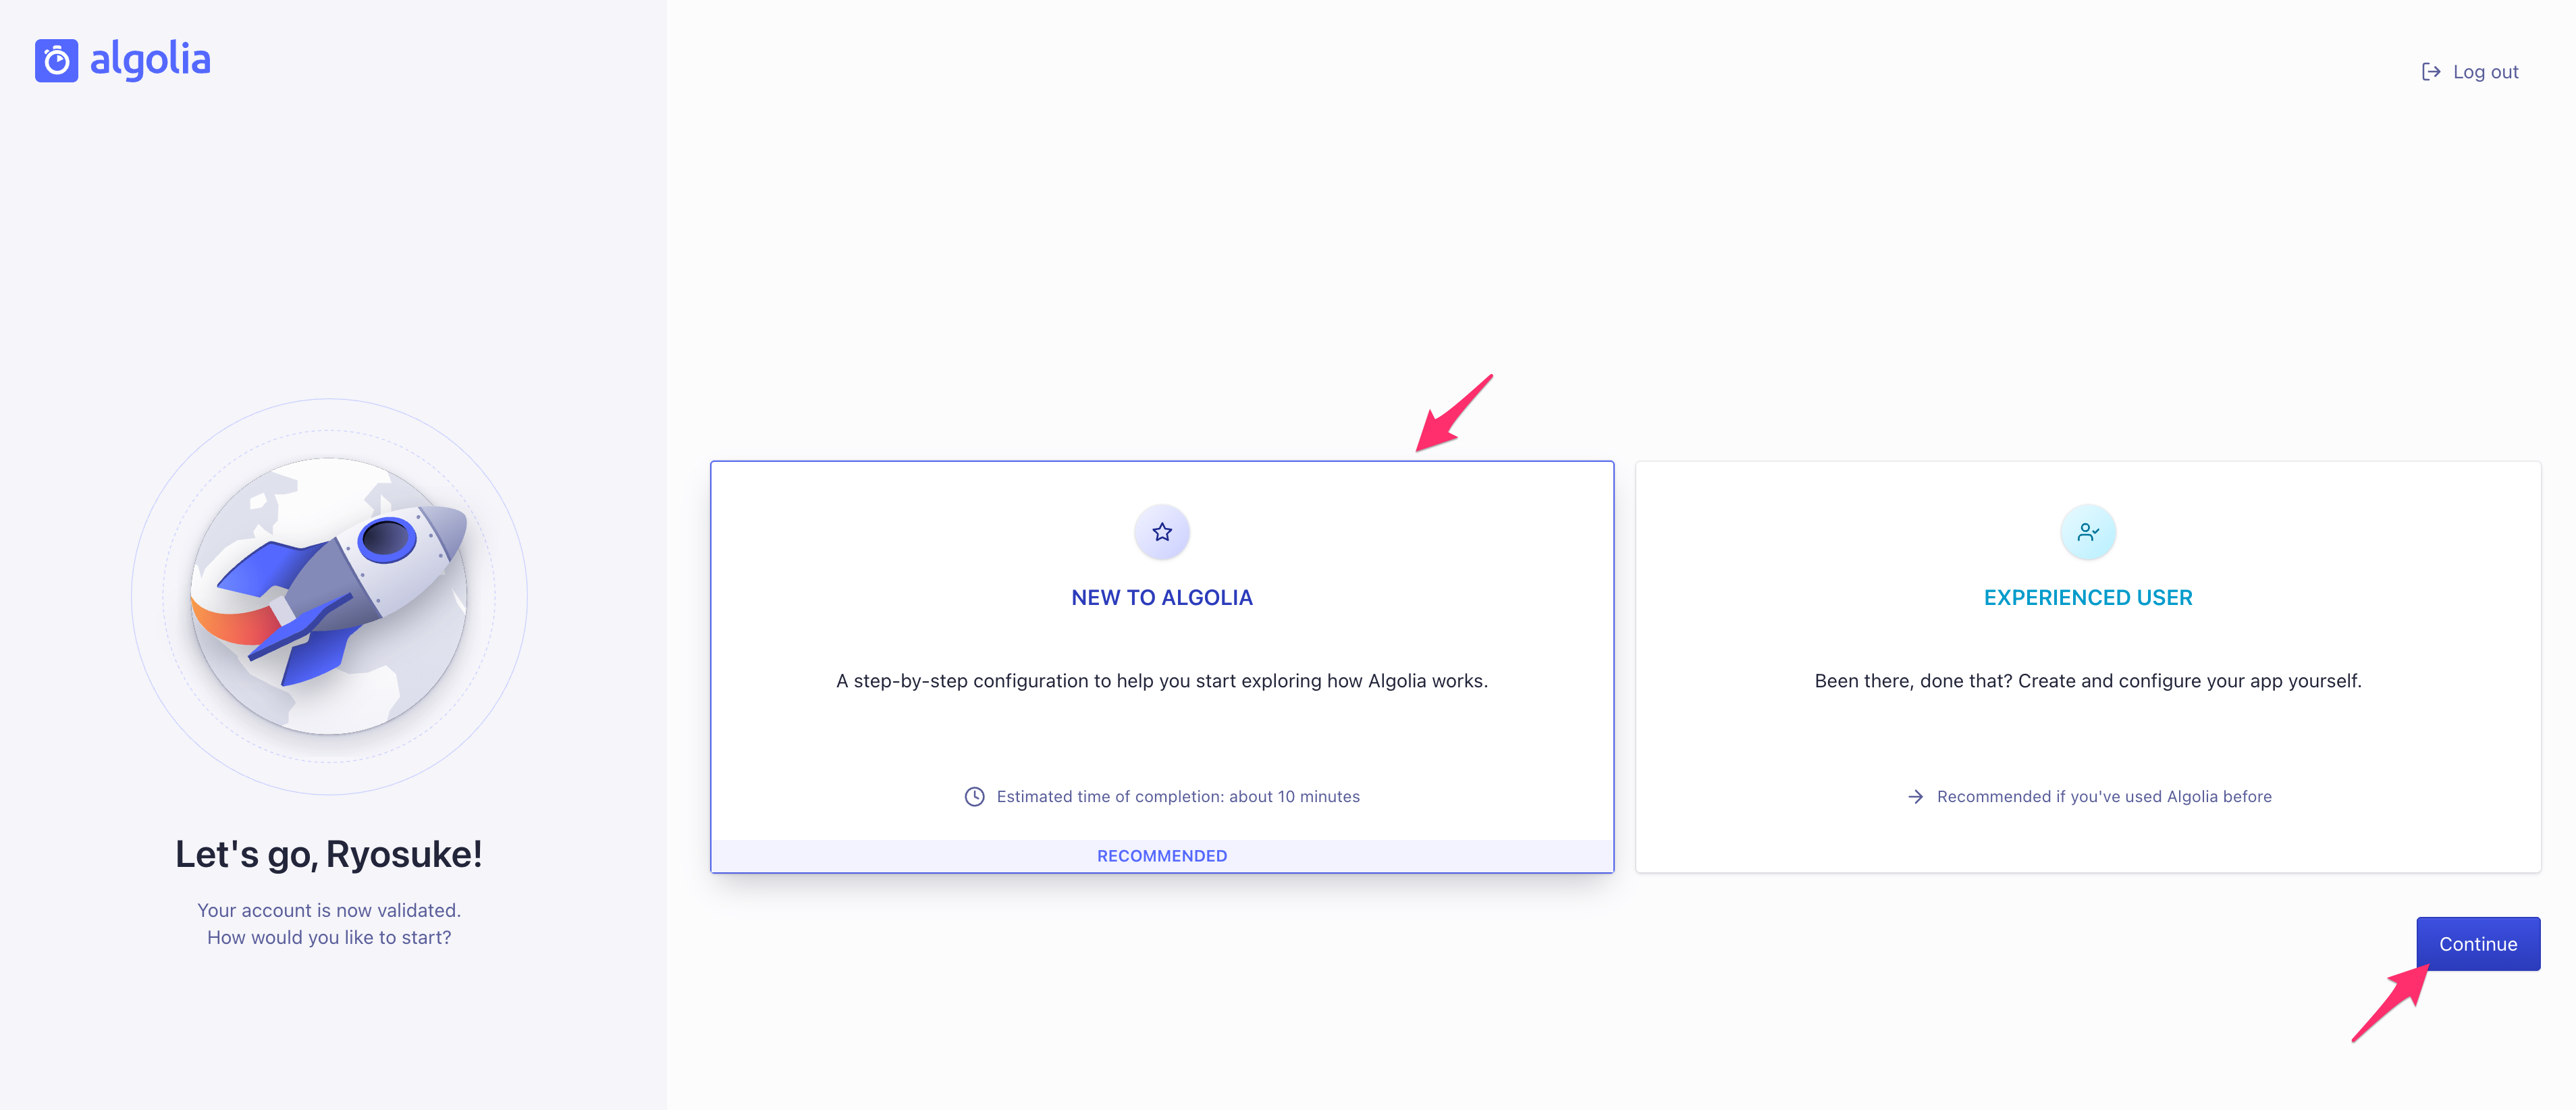
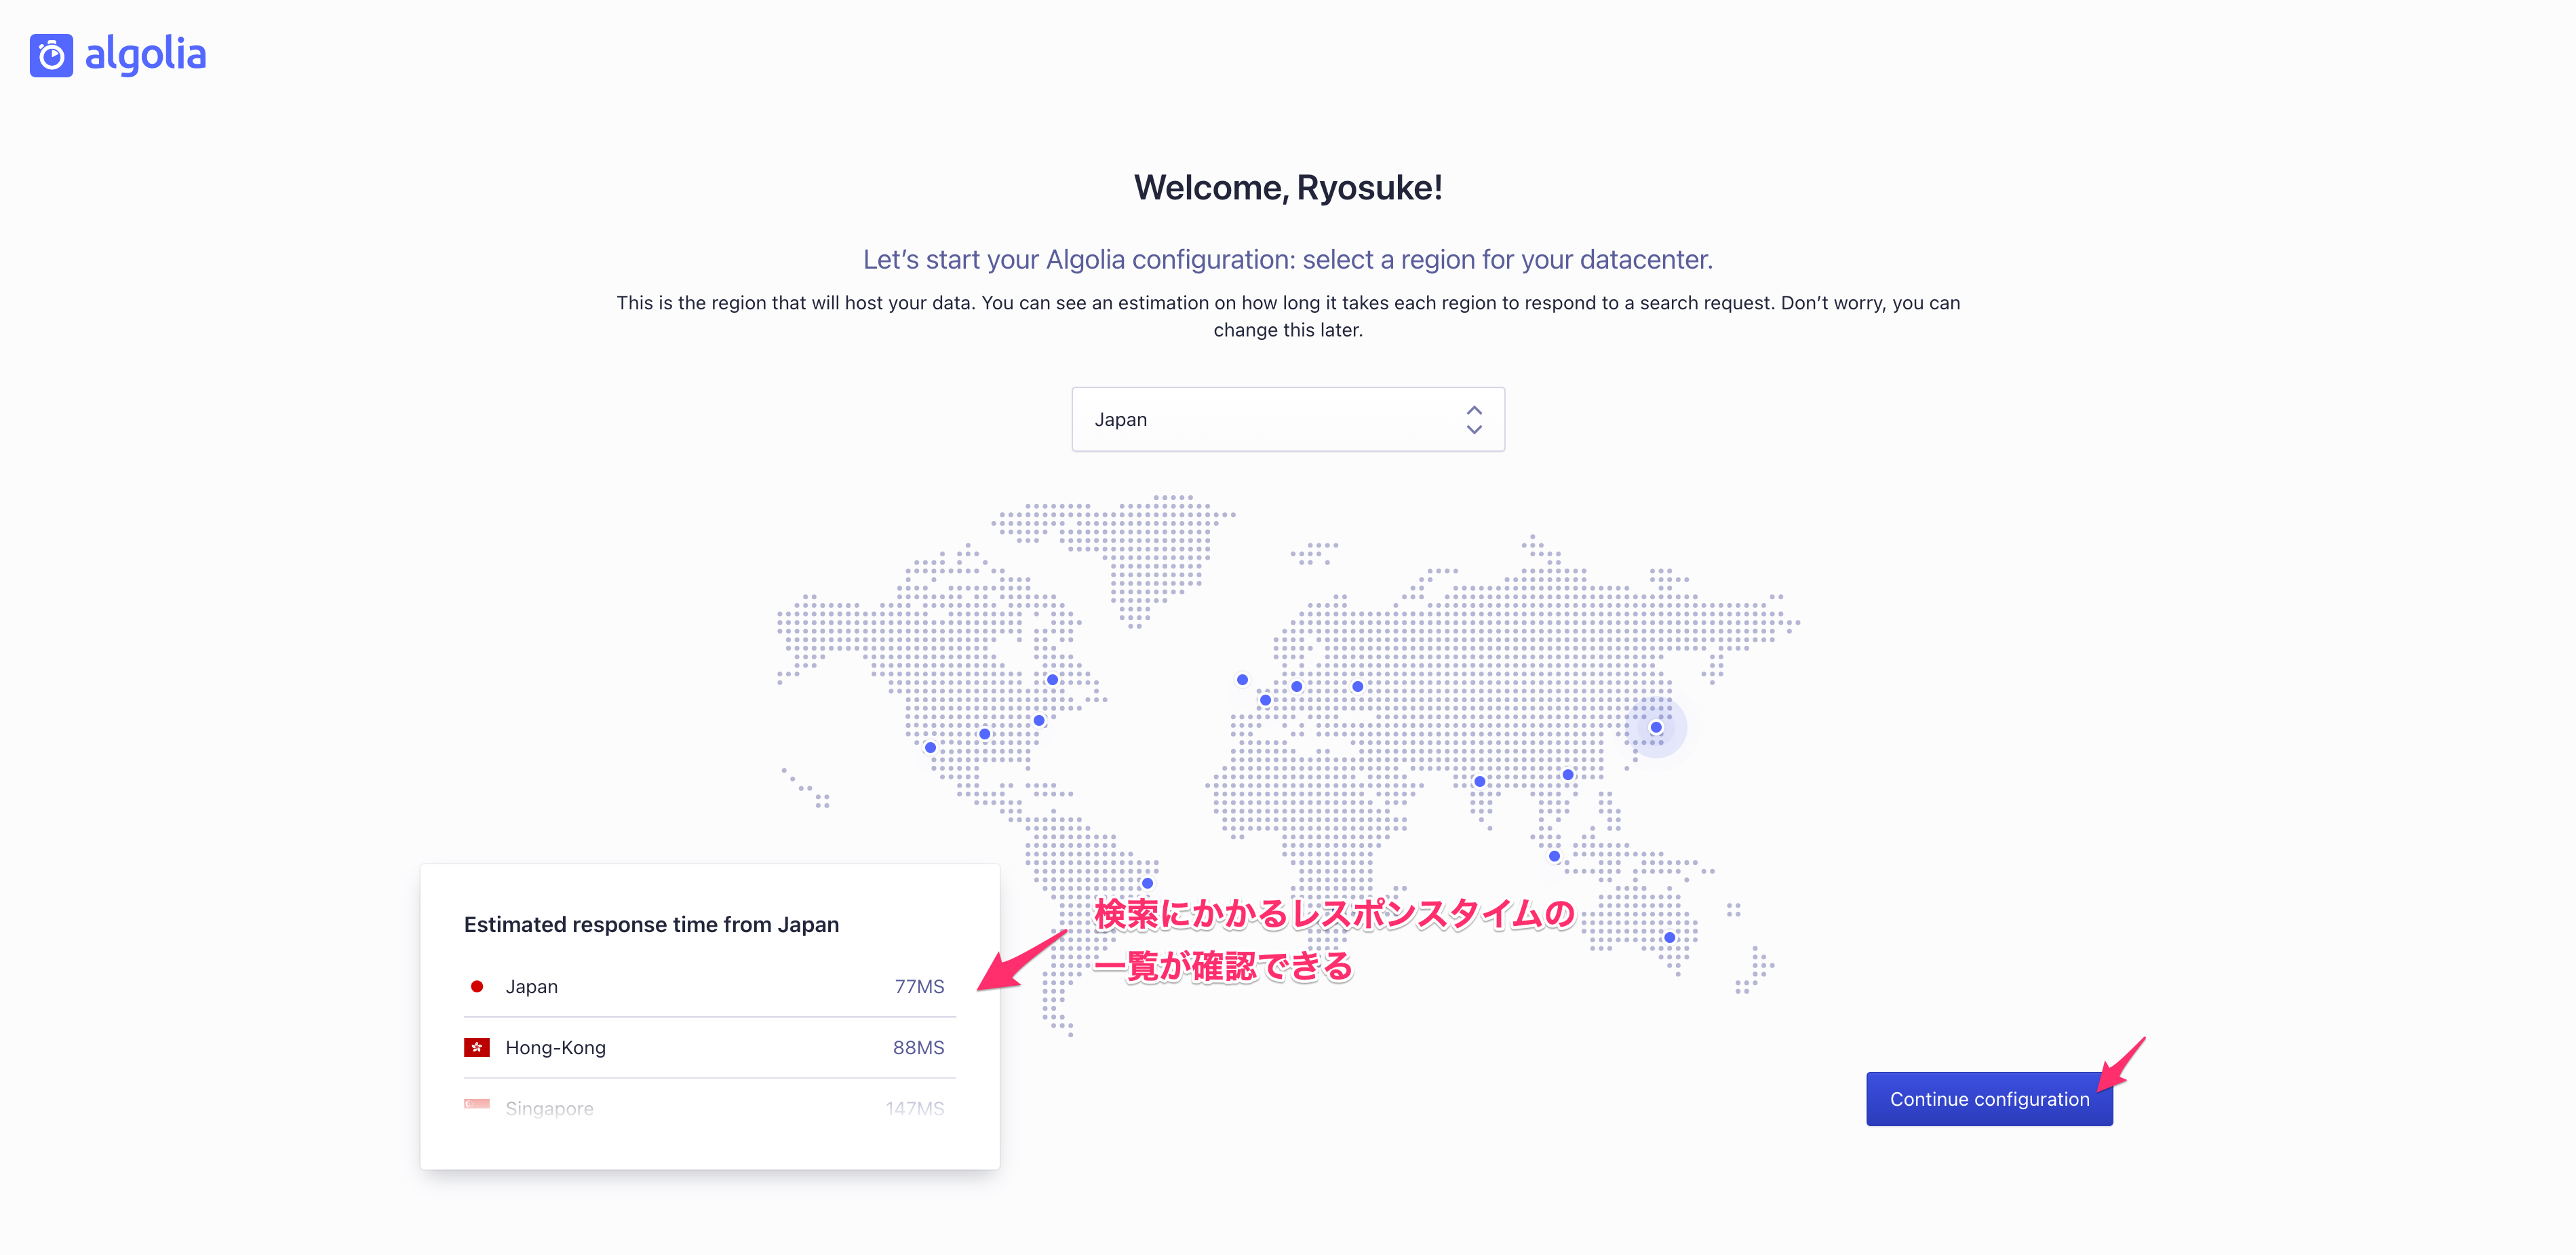
ユーザー登録
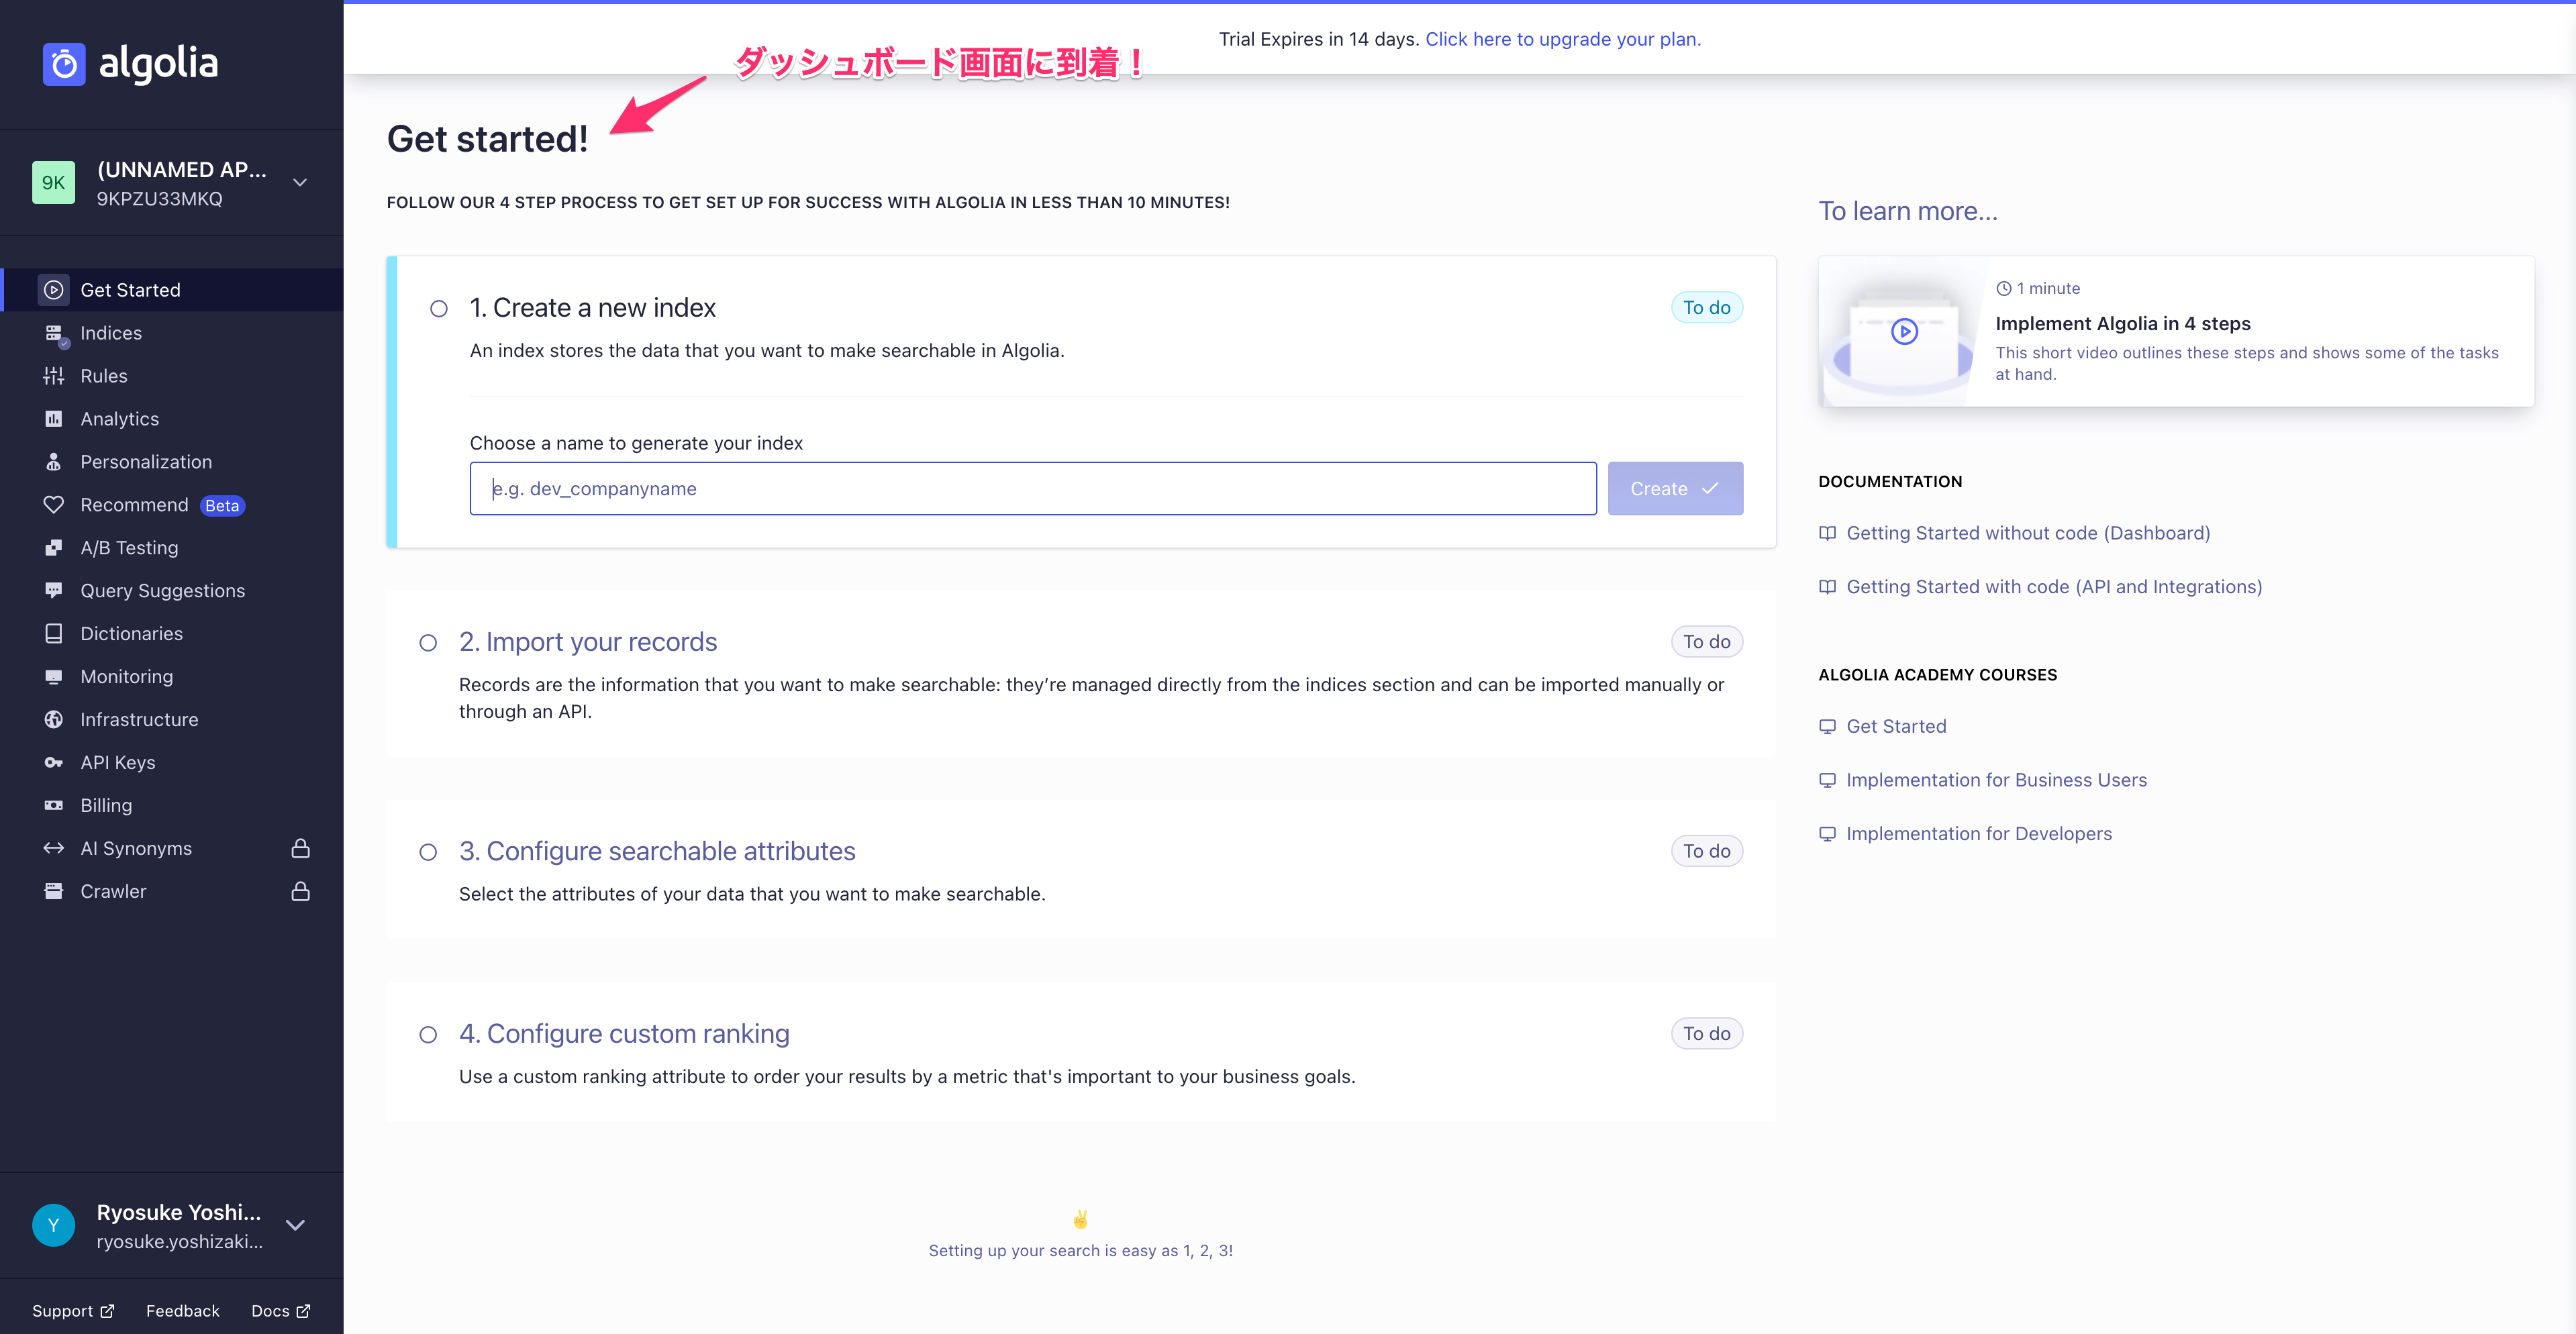
algolia 公式ページ から始めましょう。
特に変わった操作はありませんので、表示される指示にしたがって進めましょう。
特に変わった操作はありませんので、表示される指示にしたがって進めましょう。

インデックス
前提
fwywd(フュード) では現状ヘッドレス CMS を使用せず、記事のデータはローカルファイルを参照しています。
Contentful などのヘッドレス CMS を利用する場合は以下の記事も参考にしながら進めると良いでしょう。
Contentful などのヘッドレス CMS を利用する場合は以下の記事も参考にしながら進めると良いでしょう。
インデックスの作成
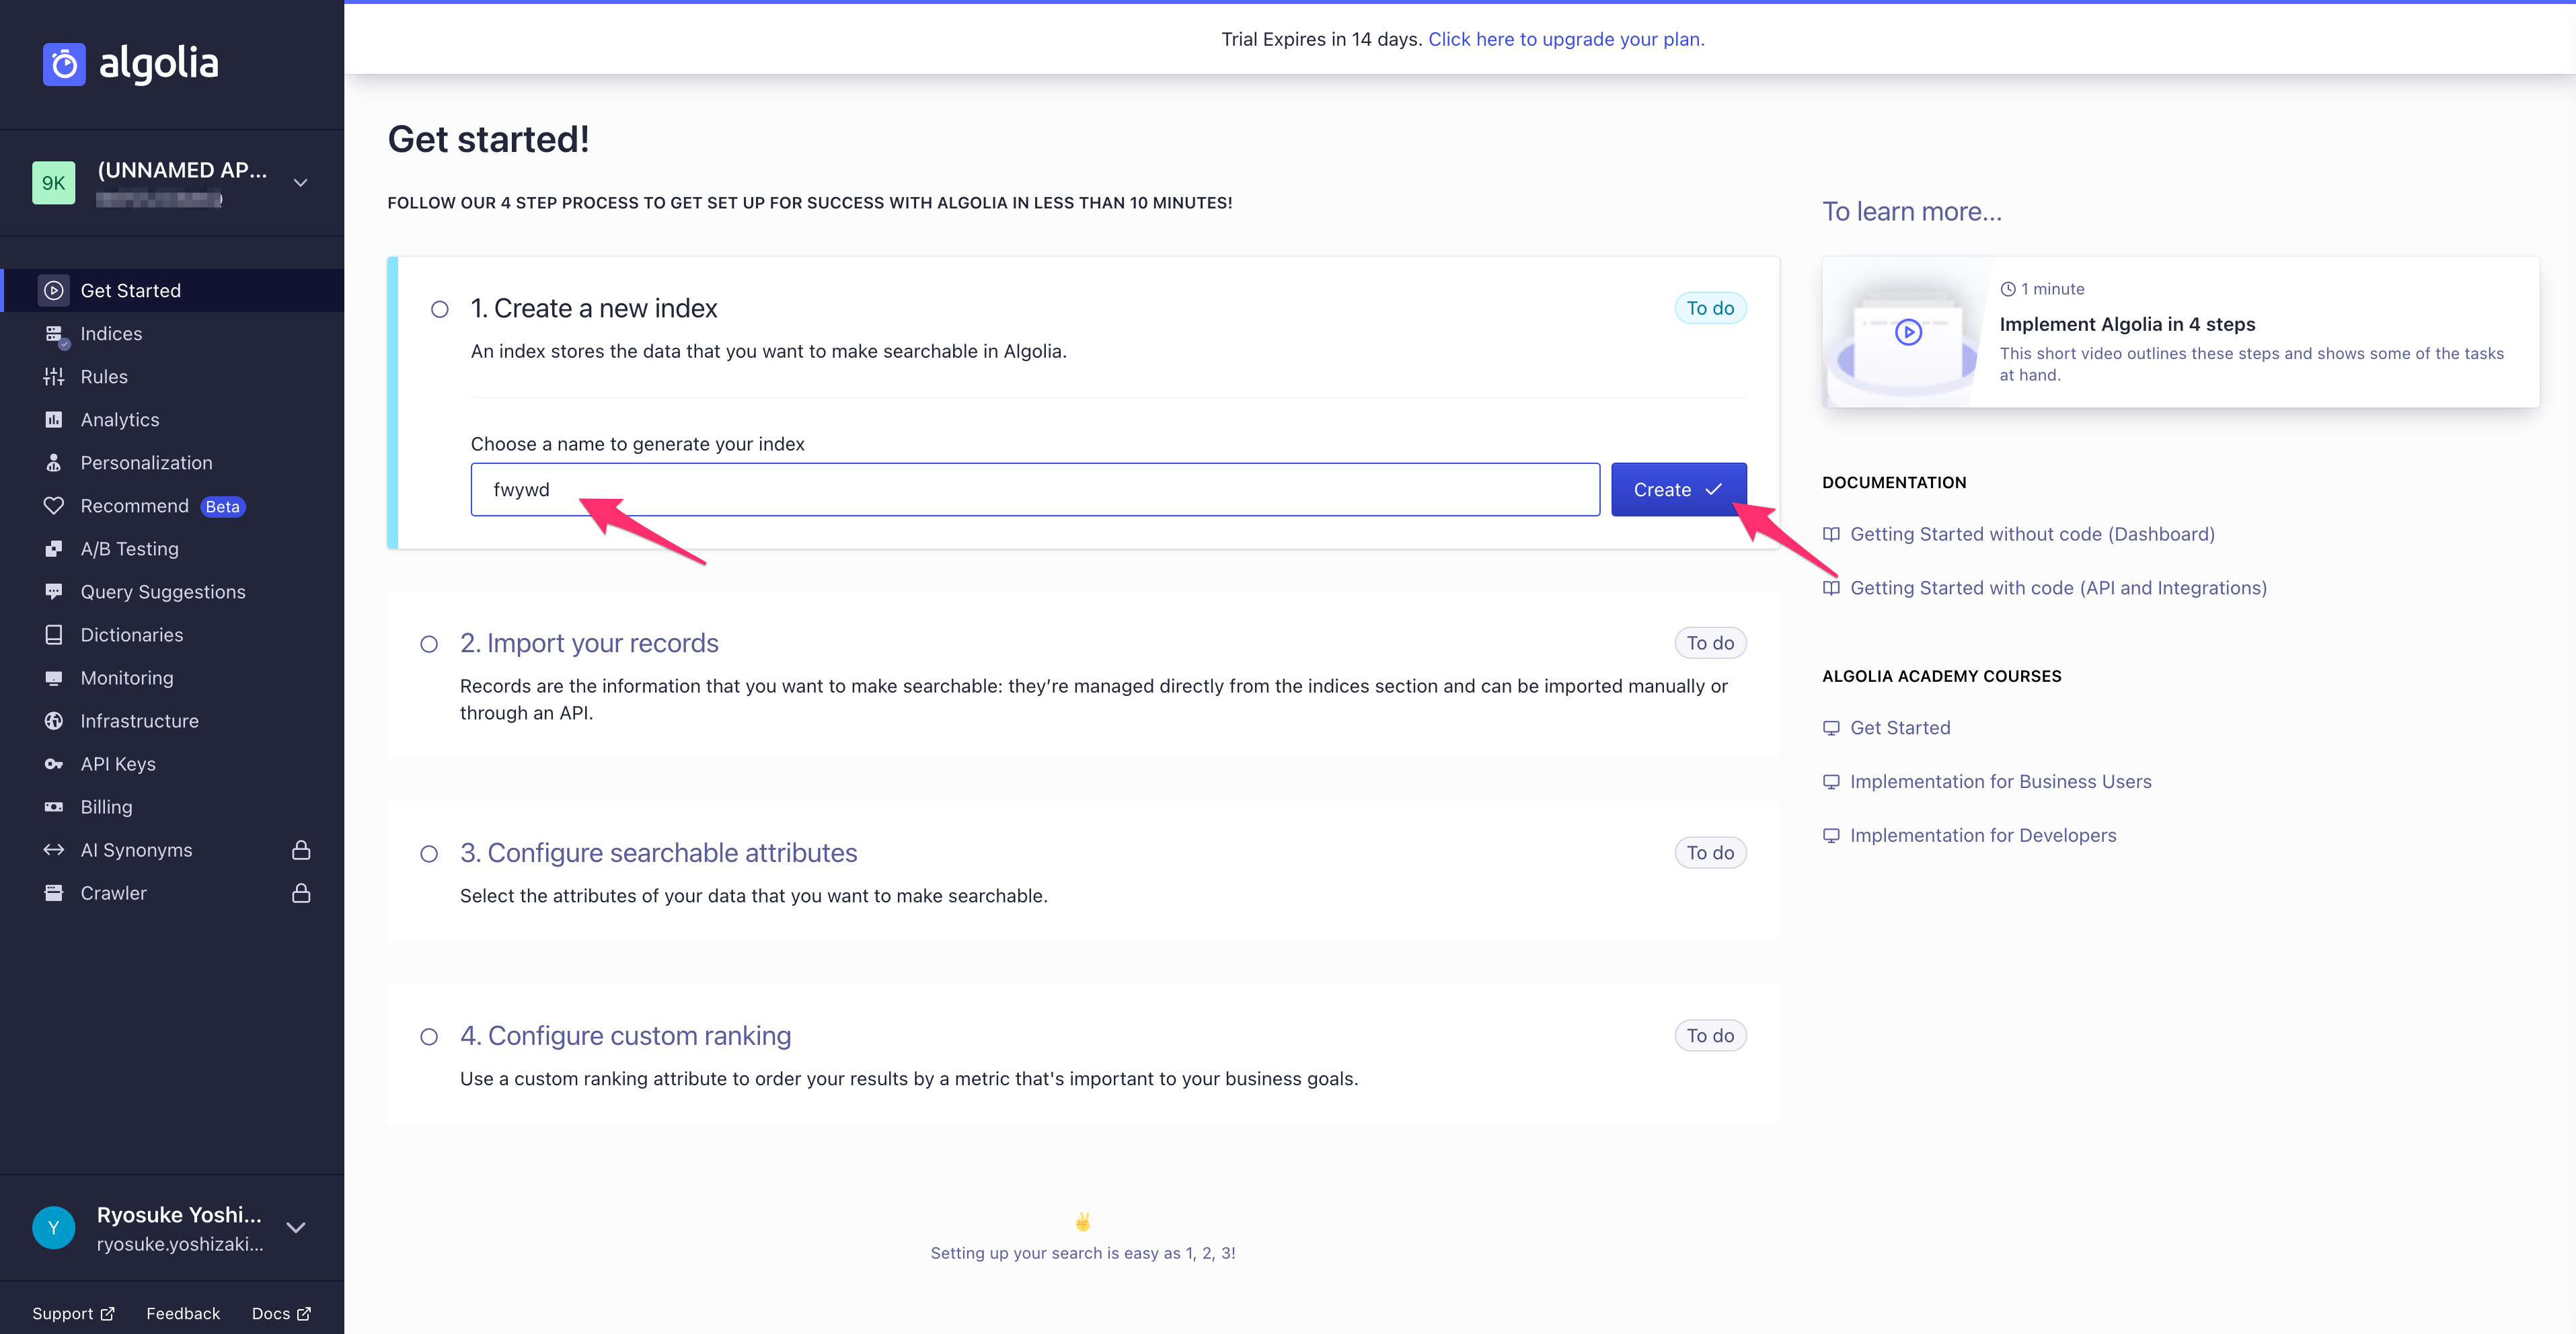
algolia のページからインデックスの名前を指定して作成しましょう。
インデックスの追加にはいくつかの方法があり、JSON ファイルを手動でアップロードすることもできます。
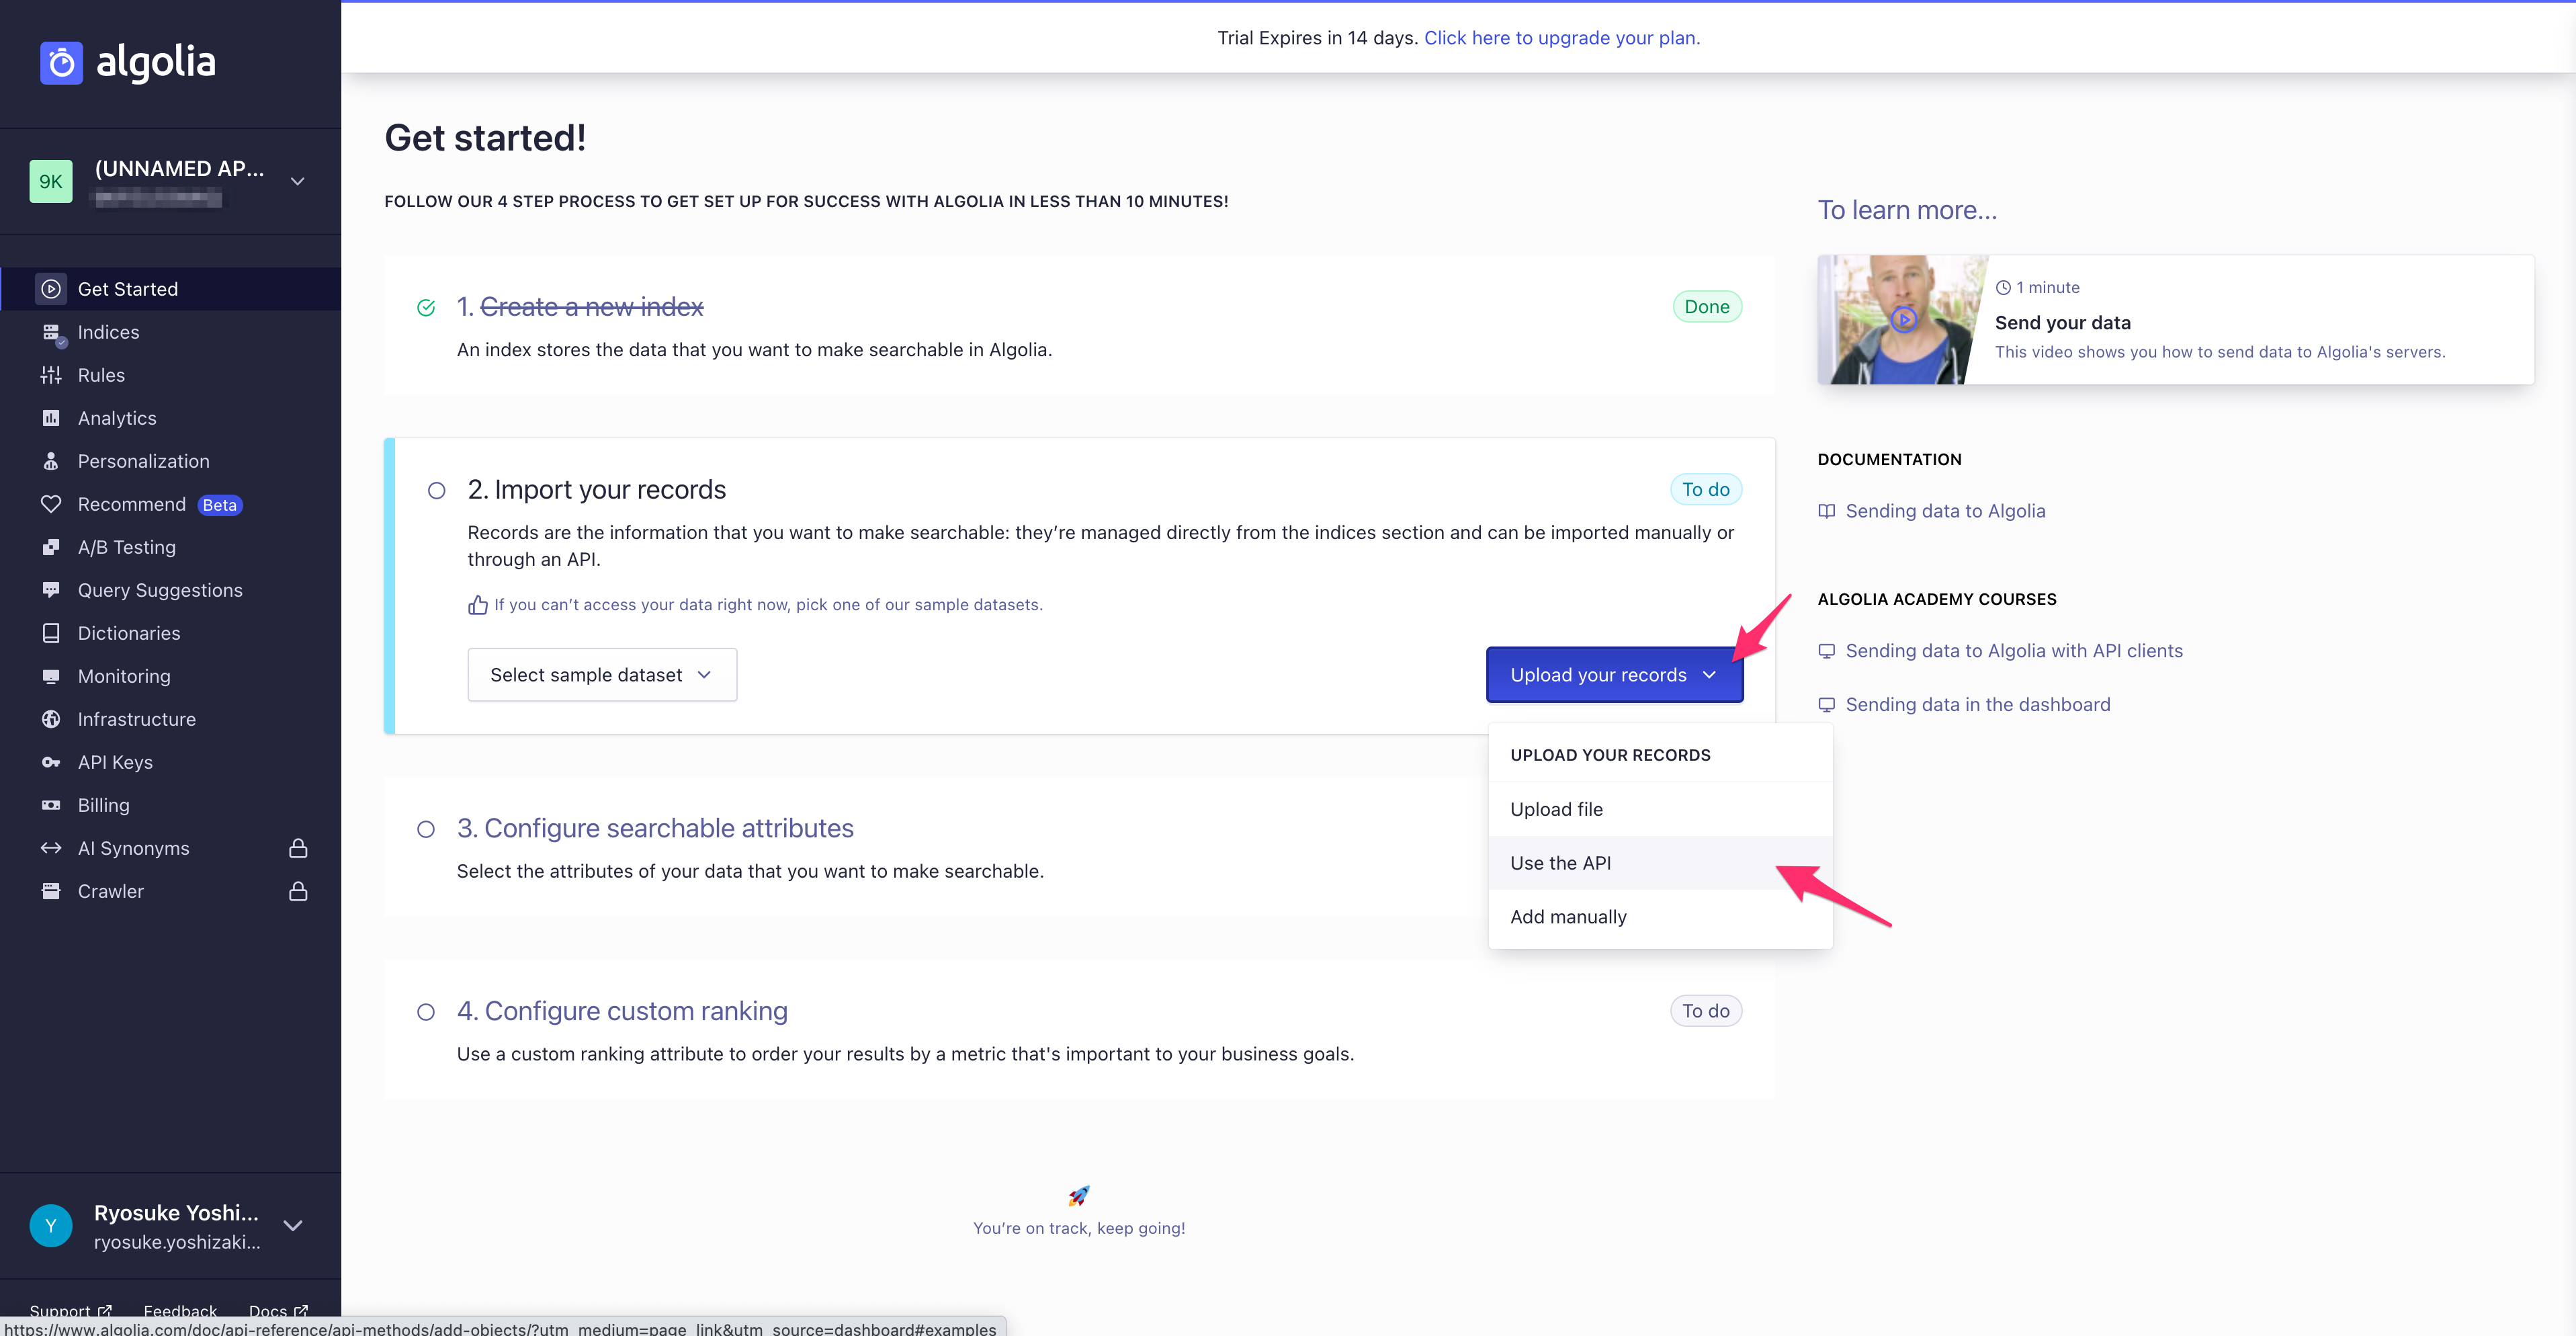
その他にも API 経由での追加もでき、こちらを選択すると、API での追加手順が表示されます。
今後ビルドのタイミングで自動的にインデックスの追加を行う運用を考えると API 経由が望ましいため、今回はこちらを選択します。
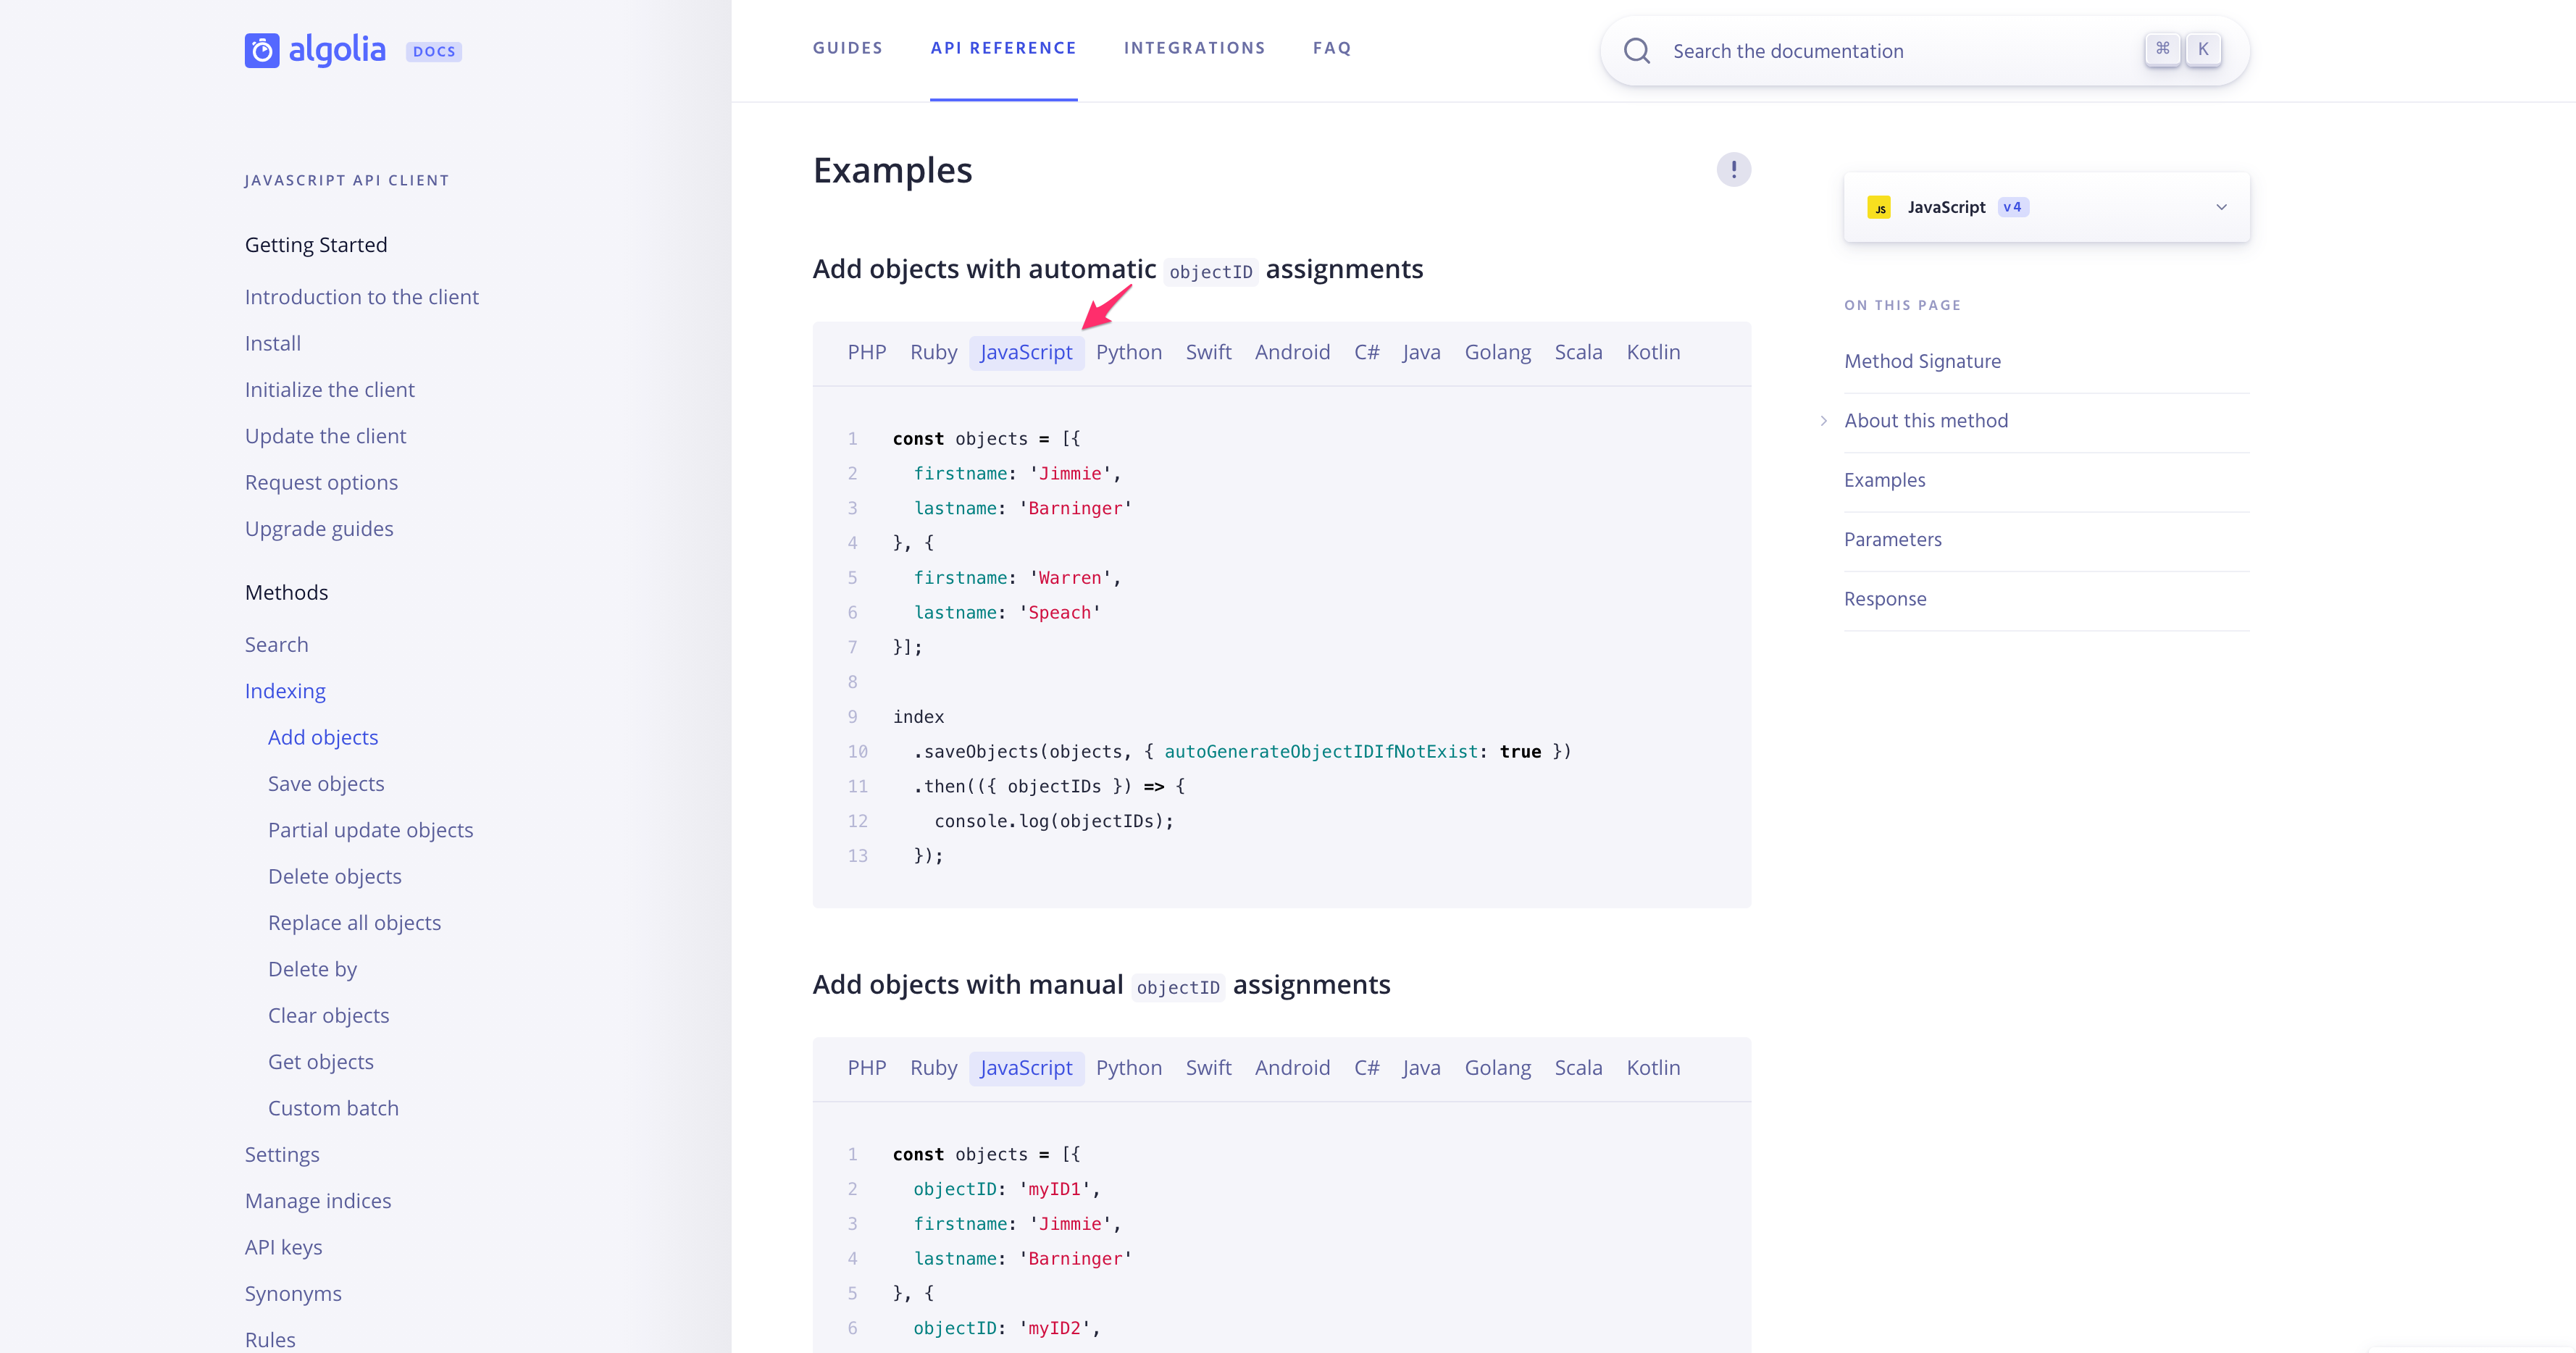
インデックスの形式
作成するインデックスは以下のような形式を目標とします。
ここで、
ここで、
objectID が Algolia 特有のもので、それ以外は必要に応じて変更することができます。{ "objectID": "記事ID", "url": "記事URL", "title": "タイトル", "description": "記事概要", "content": "MarkdownをPlainTextに変換した記事本文" }
objectID を指定しない場合は自動で生成することもできますが、指定しておく方が運用上楽です。その理由は、記事を作成するたびにインデックスの差分を Algolia 側に通知しないといけないのですが、差分を抽出するコードを実装するよりも、すべての記事を Algolia に伝えるコードをかいておいて、
objectID が同じであれば変更分は追加や更新がされて、それ以外の重複分は無視されるので楽です。差分だけ送る方が API の通信量を削減できますが、その辺りはリファクタリングのタイミングで良いでしょう。
インデックスに必要な情報の整形
fwywd のトップページは現状 SSG で構成しており、
まずはインデックスに必要な情報の整形を行います。
getStaticProps にインデックス情報の整形 + API で情報の送信の機能を実装していきましょう。まずはインデックスに必要な情報の整形を行います。
私は以下のような実装を行いました。
// src/lib/algolia.ts

import removeMd from 'remove-markdown';

export const generateIndex = async (): Promise<void> => {
  // ローカル or ヘッドレス CMS 経由で記事の情報を取得
  // 各自で実装が必要
  const posts = async getPosts(...);

  // posts のプロパティ例
  //   id, title, description, content
  const objects = posts.map((post) => {
    return {
      objectID: post.id,
      url: `https://fwywd.com/${post.id}`,
      title: post.title,
      description: post.description,
      content: removeMd(post.content),  // markdown => plaintext
    };
  });

  // 内容の確認
  console.log(objects)
};
ここで、Markdown のファイルを読み込んで
post.content に格納しており、alogolia では Platin Text の形式が望ましいため、remove-markdown をインストールして利用しています。# npm の場合 npm install --save-dev remove-markdown # yarn の場合 yarn add --dev remove-markdown
こちらをトップページの
getStaticProps に追加して、トップページにアクセスし、ログを確認してみましょう。// src/page/index.tsx ... import { generateIndex } from 'lib/algolia'; ... export default function Index(): JSX.Element { return ( <>...</> ); } export const getStaticProps: GetStaticProps = async () => { await generateIndex(); ... return { props: { ... } }; };
以下のように、表示を確認できれば情報の整形が完了です。
[{
    objectID: 'blog/publish',
    url: 'https://fwywd.com/blog/publish',
    title: '新事業の fwywd をついに公開しました!',
    description: 'みなさん、こんにちは。株式会社キカガク代表取締役会長の吉崎です。新しく開設した fwywd(フュード)へお越しいただきまして、誠にありがとうございます。本日 2021 年 5 月 17 日にキカガクの新事業である fwywd を公開することができました。構想から発表まで約5ヶ月の仕込みがありましたので、発表まで辿り着くことができ、大変嬉しく思います。今日まで支えてくださったキカガクのメンバーに改めてお礼を申し上げます。',
    content: '\n' +
      '事業領域の拡大への一歩\n' +
  ...
}]
API 経由でのインデックスの追加
次に、alogolia の API 経由で整形した情報を送信しましょう。
algolia 用のパッケージが用意されているため、この実装も非常に簡単です。
algolia 用のパッケージが用意されているため、この実装も非常に簡単です。
# npm の場合
npm install --save-dev algoliasearch

# yarn の場合
yarn add --dev algoliasearch
API を使用する場合には API キーが必要となり、algolia のダッシュボード画面から確認することができます。
Appilcation ID と Admin API Key の 2 つが必要となります。
Appilcation ID と Admin API Key の 2 つが必要となります。

この情報を用いて、以下のように API 経由で情報を送信しましょう。
// src/lib/algolia.ts

import removeMd from 'remove-markdown';
import algoliasearch from 'algoliasearch';  // 追加

export const generateIndex = async (): Promise<void> => {
  const posts = async getPosts(...);
  const objects = posts.map((post) => {
    return {
      objectID: post.id,
      url: `https://fwywd.com/${post.id}`,
      title: post.title,
      description: post.description,
      content: removeMd(post.content),
    };
  });

  // 追加
  const client = algoliasearch('Application ID', 'Admin API Key');
  const index = client.initIndex('新規で作成した index の名前:今回の例では fwywd');
  await index.saveObjects(objects, { autoGenerateObjectIDIfNotExist: true });
};
変更を加えたあとに、トップページへアクセスします。
うまく API 経由でインデックスの情報が送信できていれば、以下のように algolia のダッシュボード情報が更新されます。
うまく API 経由でインデックスの情報が送信できていれば、以下のように algolia のダッシュボード情報が更新されます。

getStaticProps に追加したため、Vercel へデプロイする時に自動的に最新のインデックス情報が更新されるようになります。ISR や SSR を使われる方はこの点が異なるため注意が必要です。
また、ヘッドレス CMS を使われる方は Webhook の機能を利用しても良いでしょう。
本番環境でのみインデックス作成
インデックスの作成方法がわかり、実際に API 経由でインデックスのデータを送信することができましたが、現状の実装では無駄があります。
それはローカルの開発環境でもトップページにアクセスするたびにインデックスの情報を送ってしまっています。
本来は本番環境でのビルド時のみで良いため、環境変数の
それはローカルの開発環境でもトップページにアクセスするたびにインデックスの情報を送ってしまっています。
本来は本番環境でのビルド時のみで良いため、環境変数の
NODE_ENV が production のときのみ、インデックス作成および API 経由での情報の送信を行うように条件を分岐しておきましょう。// src/page/index.tsx ... import { generateIndex } from 'lib/algolia'; ... export default function Index(): JSX.Element { return ( <>...</> ); } export const getStaticProps: GetStaticProps = async () => { // 条件分岐を追記 if (process.env.NODE_ENV === 'production') { await generateIndex(); } ... return { props: { ... } }; };
検索画面の UI 実装
最もシンプルな検索画面
公式ページのドキュメントでは、React InstantSearch というパッケージを利用しています。
React InstantSearch は algolia 公式が作っているみたいですね。
# npm の場合
npm install --save-dev react-instantsearch-dom

# yarn の場合
yarn add --dev react-instantsearch-dom
React InstantSearch のページで書かれている Get Started を参考に、最も簡単な UI を作ってみましょう。
検索時に API の情報が必要となるため、下記の画面から確認しておきましょう。

下記のように
Search コンポーネントを作成し、ヘッダー位置に挿入しました。// components/common/Search.tsx import algoliasearch from 'algoliasearch/lite'; import { InstantSearch, SearchBox, Hits } from 'react-instantsearch-dom'; export default function Search(): JSX.Element { const searchClient = algoliasearch('Application ID', 'Search-Only API Key'); const indexName = '新規で作成した index の名前:今回の例では fwywd'; return ( <div> <InstantSearch indexName={indexName} searchClient={searchClient}> <SearchBox /> <Hits /> </InstantSearch> </div> ); }
こちらで結果を確認してみると以下のようにかなりの表示崩れはありますが、API 経由で情報を取得して、一応検索機能も動作していることがわかります。

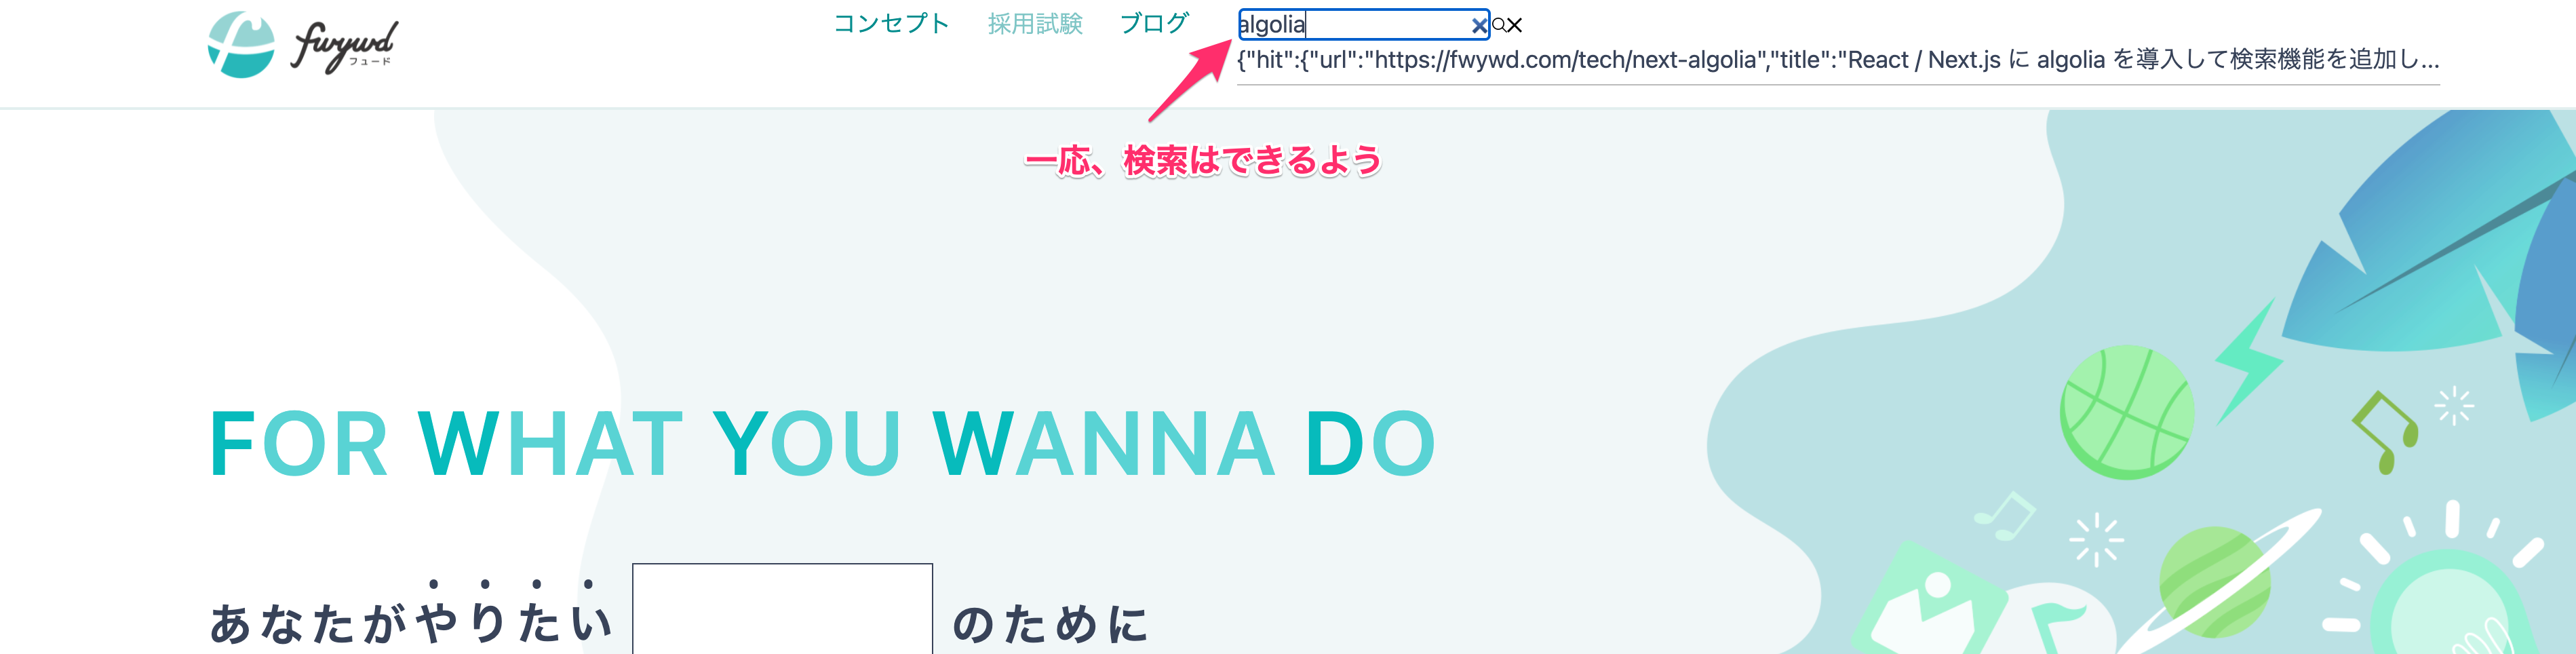
検索結果を加工
検索結果が
ここをどう表現すべきかが少し難しいのですが、色々調査して、
{"hit": {"url": ...} となっており、現状では検索結果として使いにくいため、まずはタイトルだけを抽出して、その URL をリンクとして設定できるようにしましょう。ここをどう表現すべきかが少し難しいのですが、色々調査して、
Hits コンポーネントの引数に hitComponent を指定すると良いことがわかり、以下のように書くところに辿り着きました。補足:環境変数
ここから API キーなどは.envファイルに格納して参照しています。
Admin API Keyのみサーバーサイドで隠蔽したいため、NEXT_PUBLIC_を外しています。 参考記事:Next.js における環境変数 (env) の基本的な設定方法
# .env.development

# 追記
NEXT_PUBLIC_ALGOLIA_APPLICATION_ID='Application ID'
NEXT_PUBLIC_ALGOLIA_INDEX='IndexName'
NEXT_PUBLIC_ALGOLIA_SEARCH_API_KEY='Search API Key'
ALGOLIA_ADMIN_API_KEY='Admin API Key'
// src/components/common/Search.tsx

import algoliasearch from 'algoliasearch/lite';
import { hitComponent } from 'components/common/HitComponent';
import { InstantSearch, SearchBox, Hits } from 'react-instantsearch-dom';

export default function Search(): JSX.Element {
  const searchClient = algoliasearch(
    process.env.NEXT_PUBLIC_ALGOLIA_APPLICATION_ID || '',
    process.env.NEXT_PUBLIC_ALGOLIA_SEARCH_API_KEY || '',
  );
  const indexName = process.env.NEXT_PUBLIC_ALGOLIA_INDEX || '';

  return (
    <div>
      <InstantSearch indexName={indexName} searchClient={searchClient}>
        <SearchBox />
        <Hits hitComponent={hitComponent} />
      </InstantSearch>
    </div>
  );
}
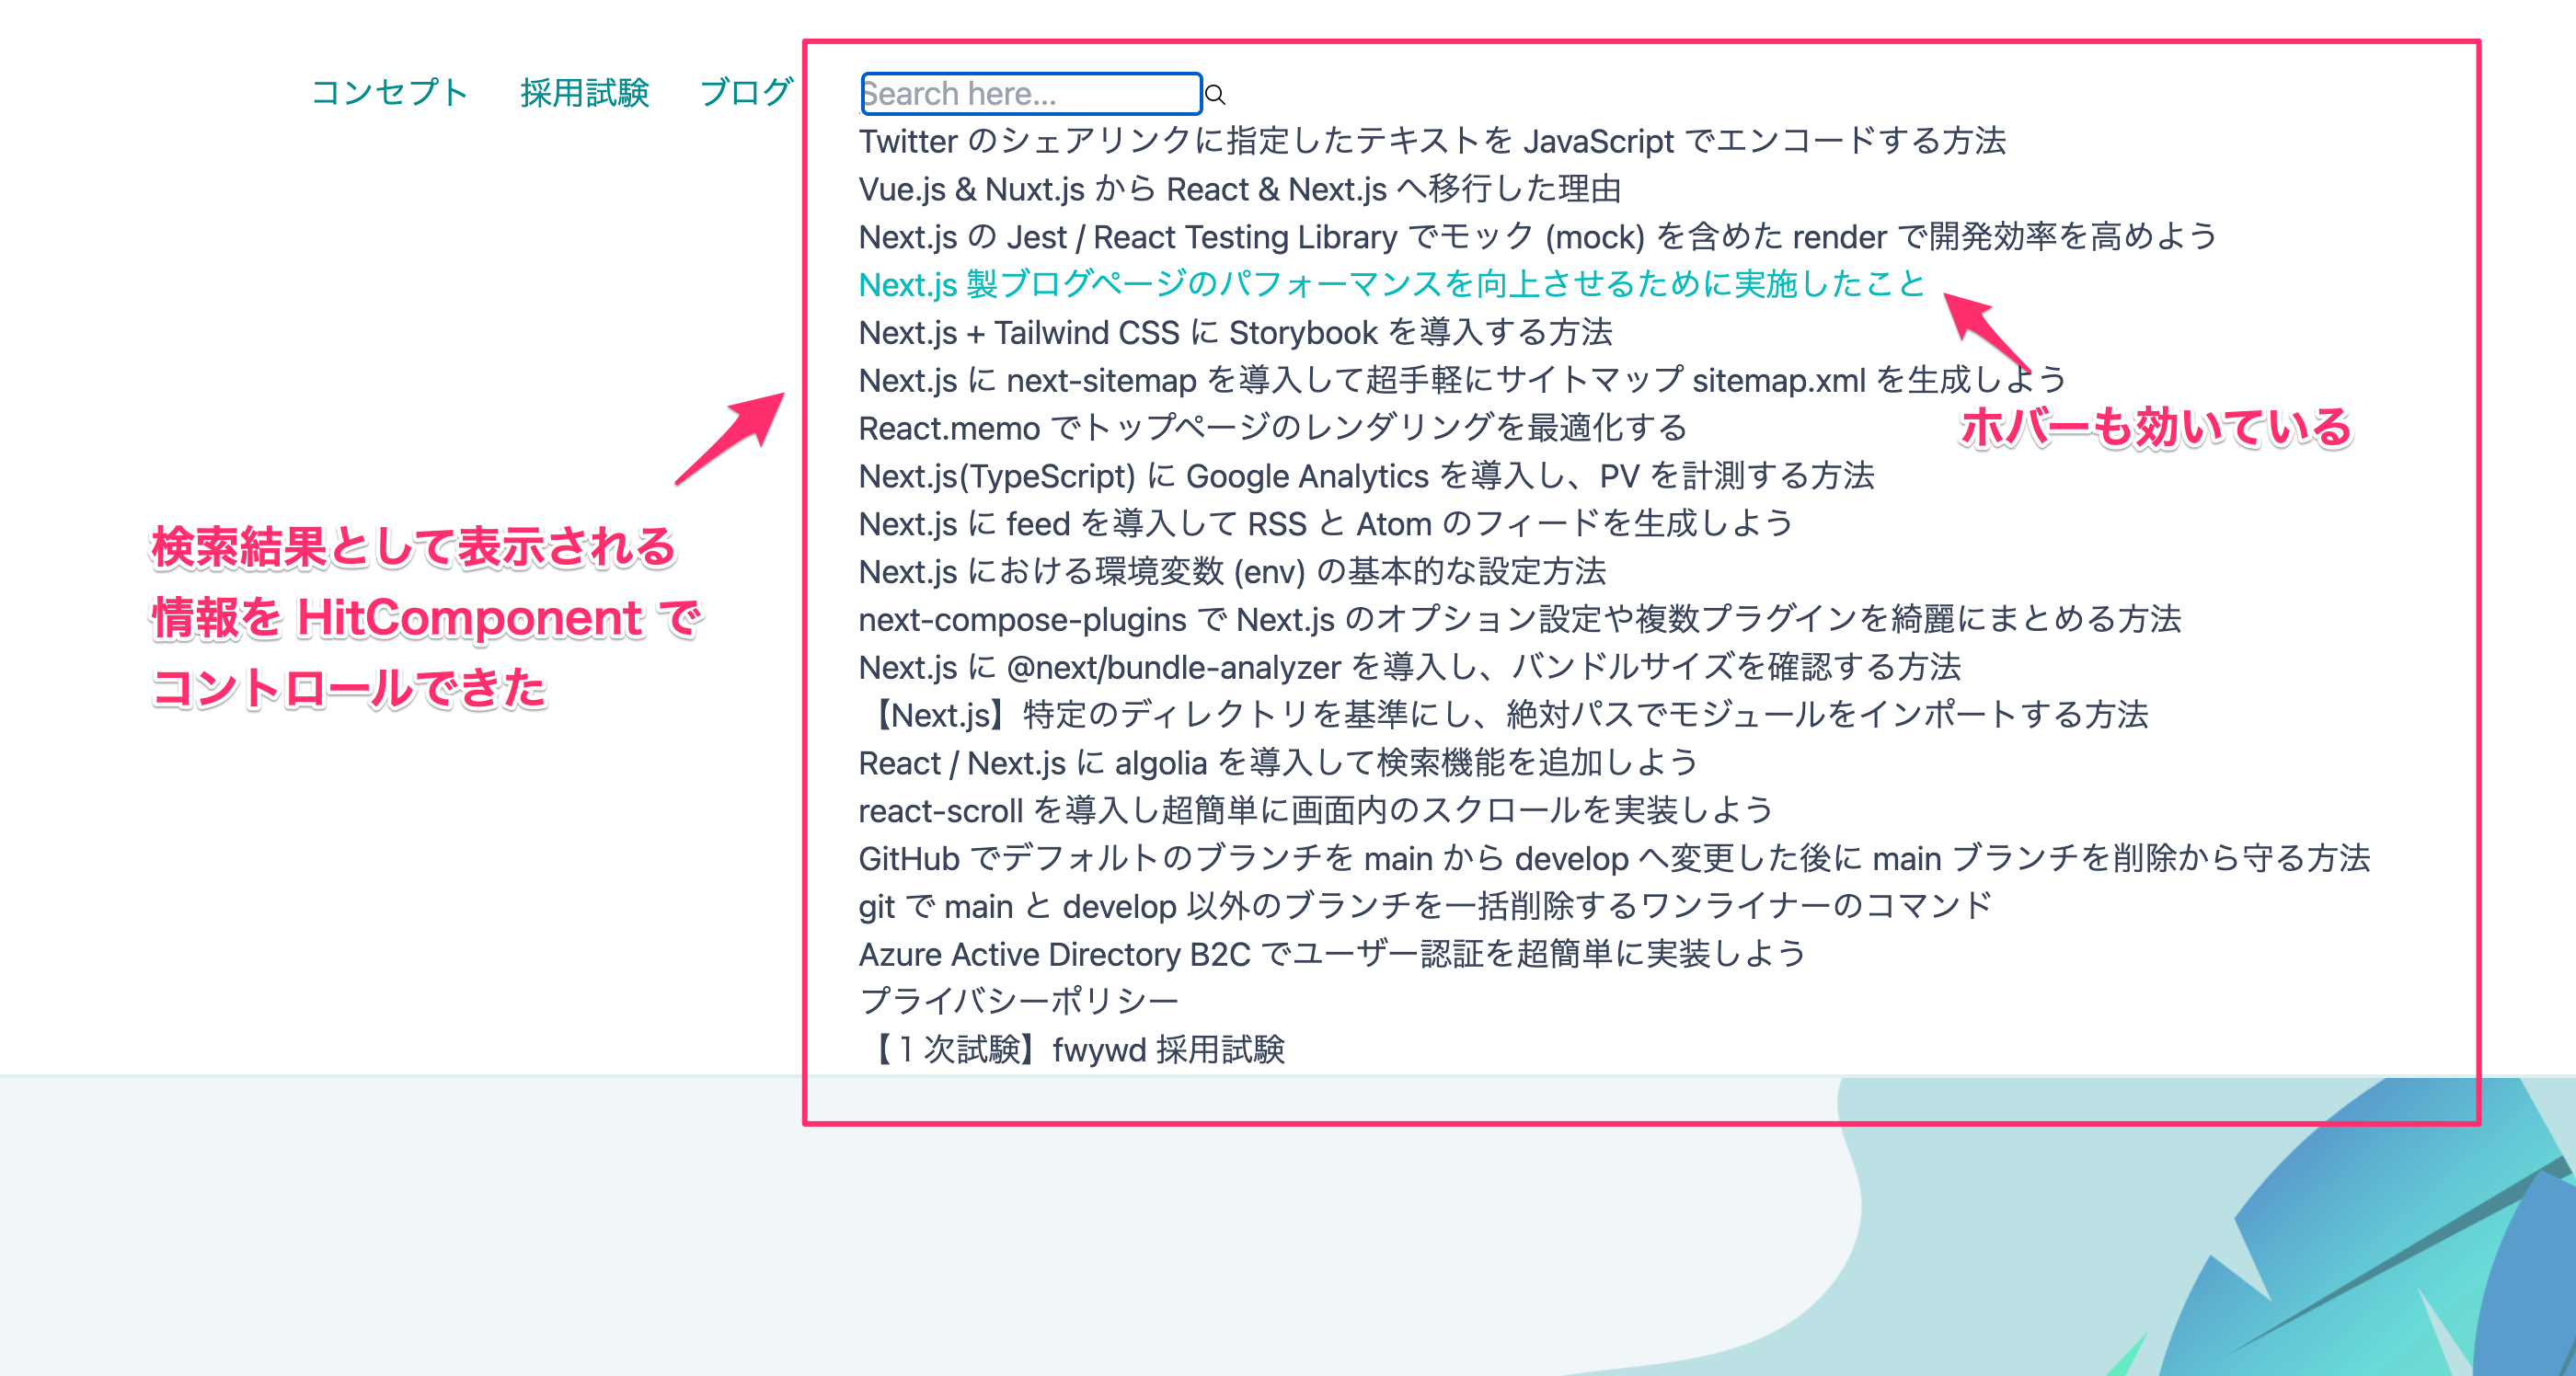
ここで使用している
hitComponent が検索結果に対して操作ができるもので、以下のように定義しています。// src/components/common/HitComponent import Link from 'next/link'; import { Hit } from 'react-instantsearch-core'; interface HitDoc { objectID: string; url: string; title: string; description: string; content: string; } interface Props { hit: Hit<HitDoc>; } interface HitComponentProps extends Props { onClick: () => void; } function HitComponent({ hit }: HitComponentProps): JSX.Element { return ( <div> <Link href={hit.url}> <a className="hover:text-[#06bbbc]">{hit.title}</a> </Link> </div> ); } export const hitComponent = ({ hit }: Props): JSX.Element => ( <HitComponent hit={hit} onClick={() => null} /> );
Hits コンポーネントの引数がちょっと特殊であるため最初はわかりにくいかも知れませんが、一度設定してしまえば、あとは HitComponent を編集すれば OK です。以下のように、タイトルのみが表示されるようになりました。
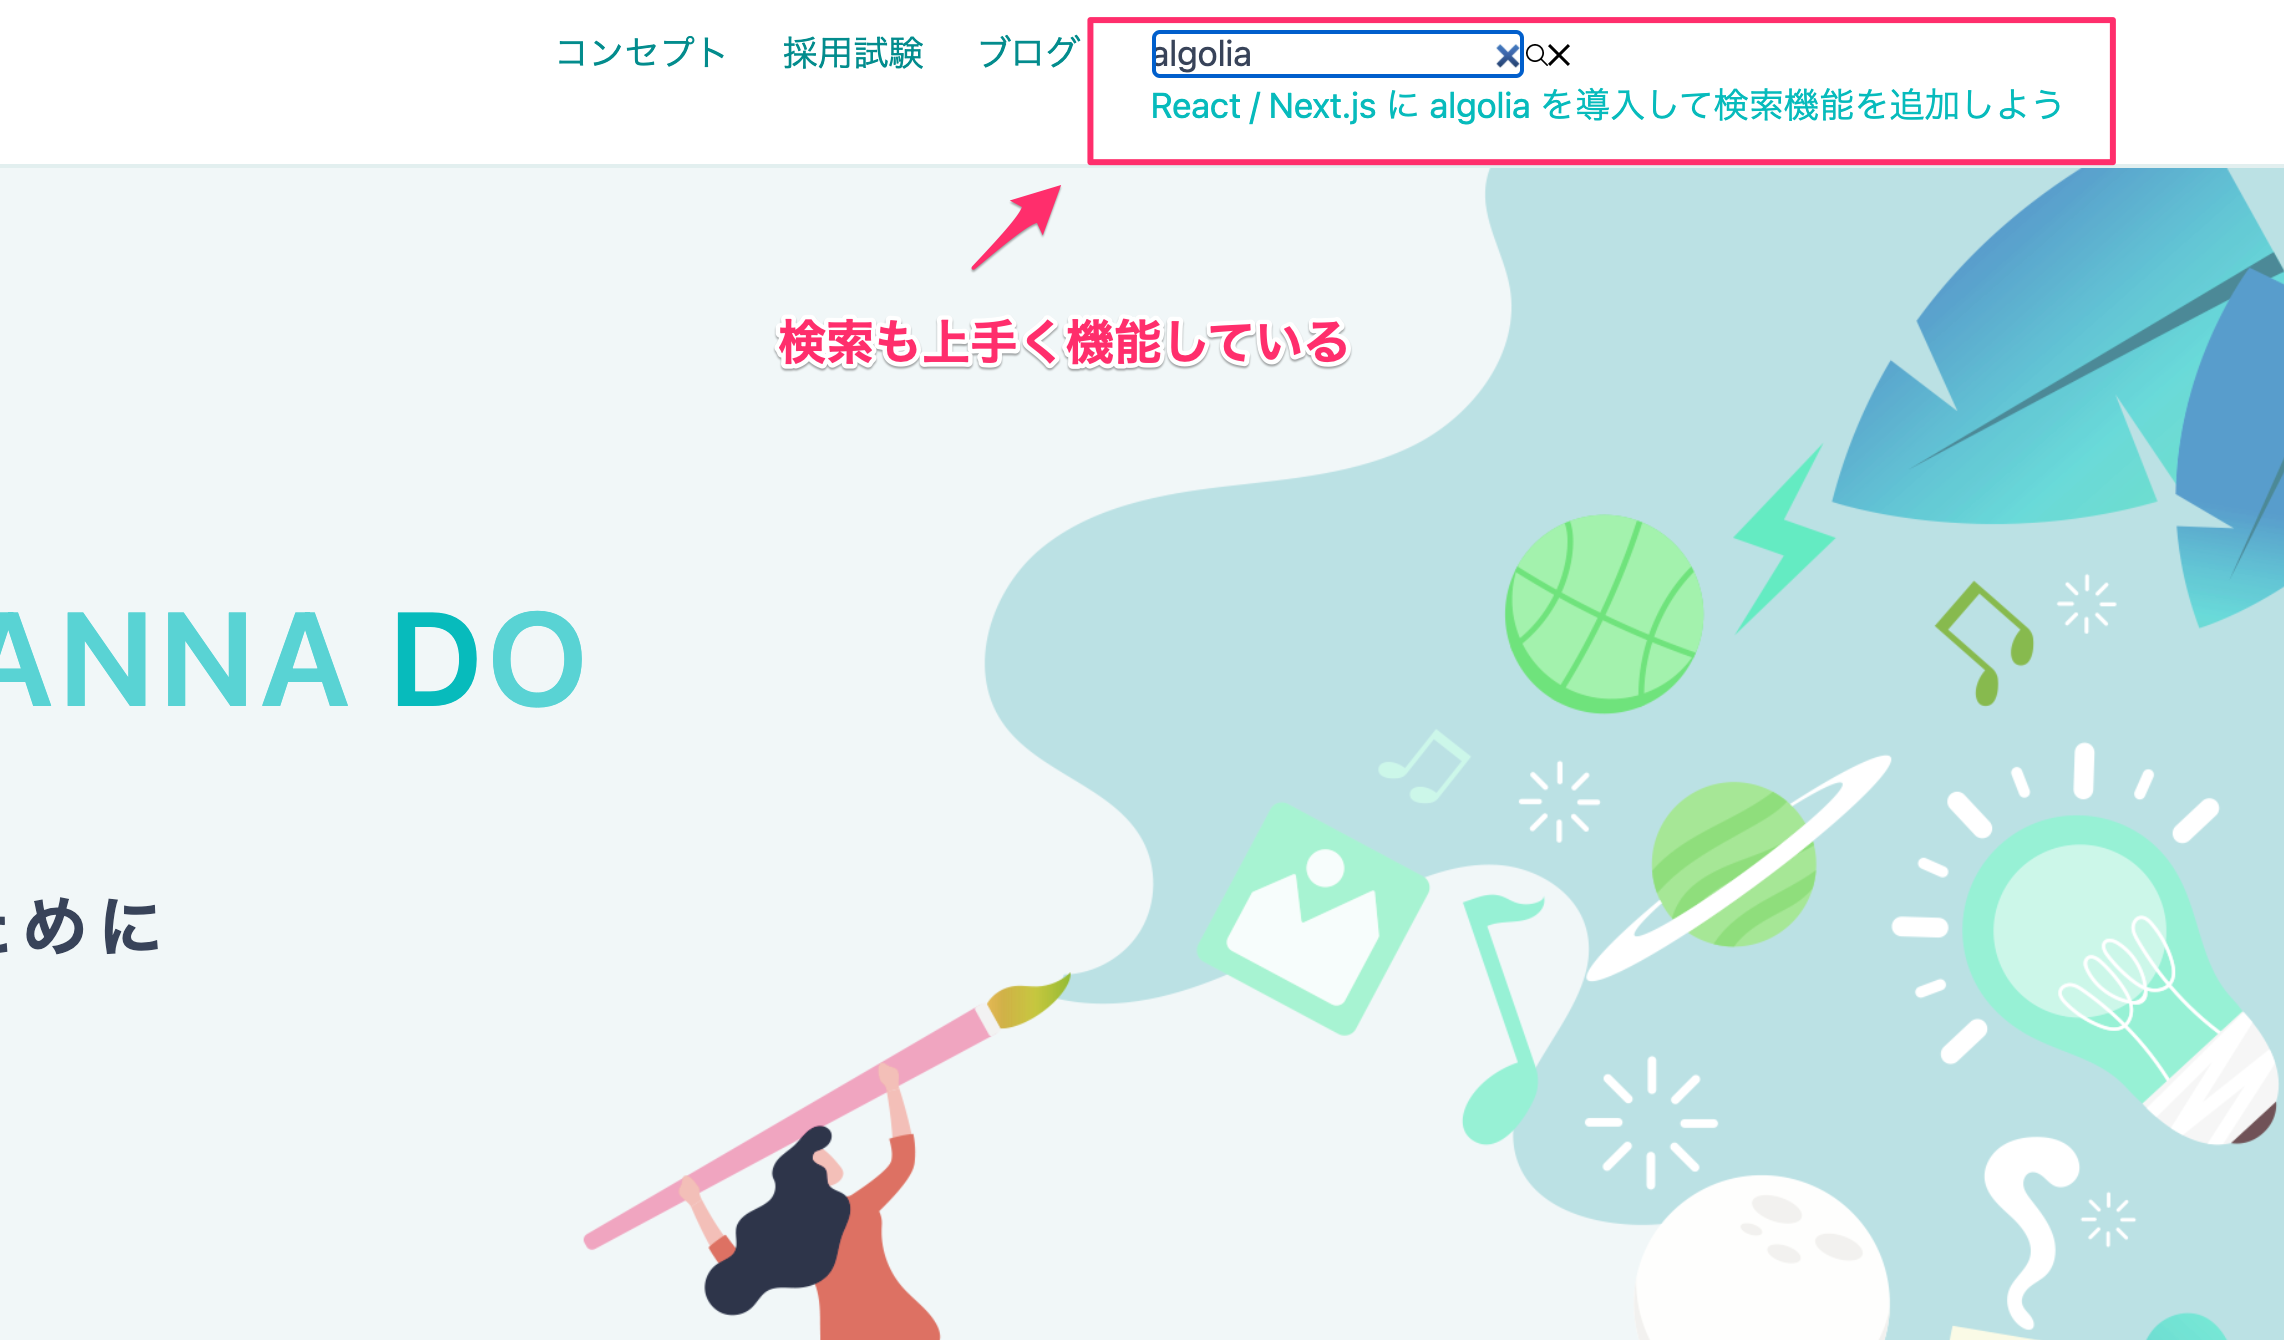
少しずつ形になってきました。
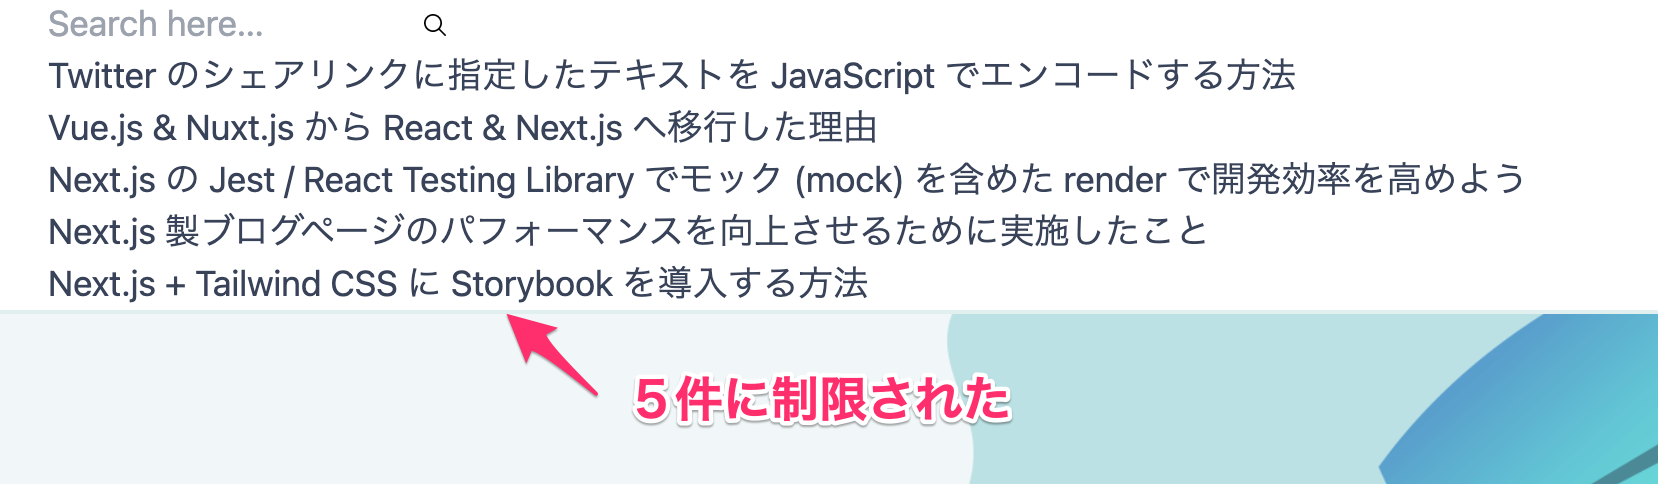
検索結果のヒット数を制限
現状では、ヒットした全てが表示されてしまっているため、上位5件の表示に制限してみましょう。
Configure コンポーネントを追加するだけでとても簡単です。// src/components/common/Search.tsx import algoliasearch from 'algoliasearch/lite'; import { hitComponent } from 'components/common/HitComponent'; import { InstantSearch, SearchBox, Hits, Configure } from 'react-instantsearch-dom'; export default function Search(): JSX.Element { const searchClient = algoliasearch( process.env.NEXT_PUBLIC_ALGOLIA_APPLICATION_ID || '', process.env.NEXT_PUBLIC_ALGOLIA_SEARCH_API_KEY || '', ); const indexName = process.env.NEXT_PUBLIC_ALGOLIA_INDEX || ''; return ( <div> <InstantSearch indexName={indexName} searchClient={searchClient}> <Configure hitsPerPage={5} /> {/* <== 追記 */} <SearchBox /> <Hits hitComponent={hitComponent} /> </InstantSearch> </div> ); }
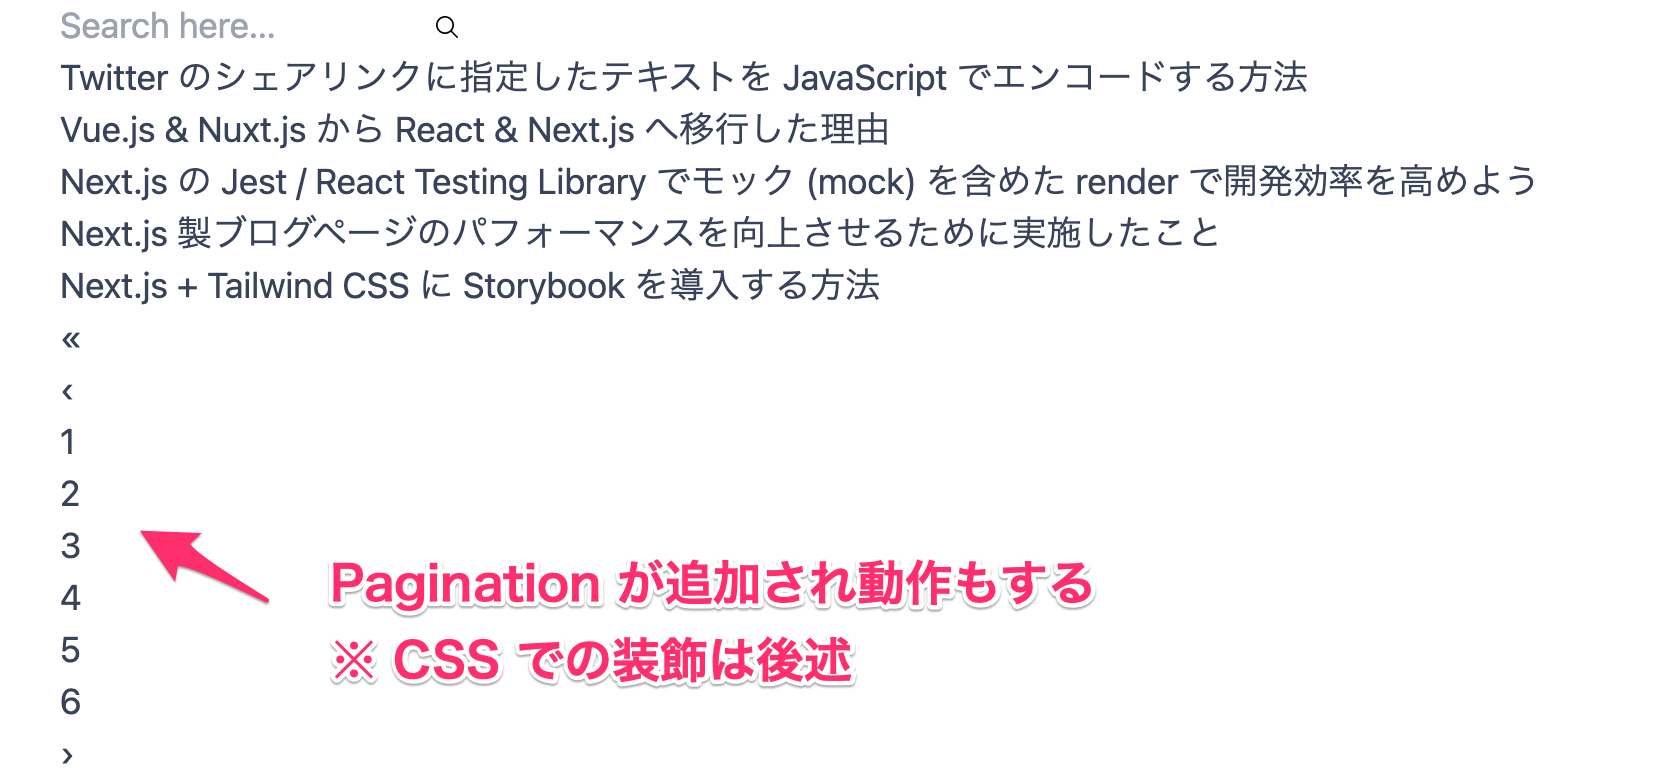
ページネーションの設定
検索結果を制限した関係で上位 5 件しか表示されなくなりました。
5 件目以降の検索結果にアクセスするためにページネーションを追加しましょう。
こちらも
5 件目以降の検索結果にアクセスするためにページネーションを追加しましょう。
こちらも
Pagination コンポーネントを追加するだけで良いため簡単です。// src/components/common/Search.tsx import algoliasearch from 'algoliasearch/lite'; import { hitComponent } from 'components/common/HitComponent'; import { InstantSearch, SearchBox, Hits, Configure, Pagination } from 'react-instantsearch-dom'; export default function Search(): JSX.Element { const searchClient = algoliasearch( process.env.NEXT_PUBLIC_ALGOLIA_APPLICATION_ID || '', process.env.NEXT_PUBLIC_ALGOLIA_SEARCH_API_KEY || '', ); const indexName = process.env.NEXT_PUBLIC_ALGOLIA_INDEX || ''; return ( <div> <InstantSearch indexName={indexName} searchClient={searchClient}> <Configure hitsPerPage={5} /> <SearchBox /> <Hits hitComponent={hitComponent} /> <Pagination /> {/* <== 追記 */} </InstantSearch> </div> ); }
CSS を適用
それぞれの役割が少しずつ把握できてきたところで、表示崩れを解消するための CSS を適用しましょう。
標準の CSS が用意されているため、以下のようにインストールしましょう。
標準の CSS が用意されているため、以下のようにインストールしましょう。
# npm の場合
npm install instantsearch.css

# yarn の場合
yarn add instantsearch.css
これで
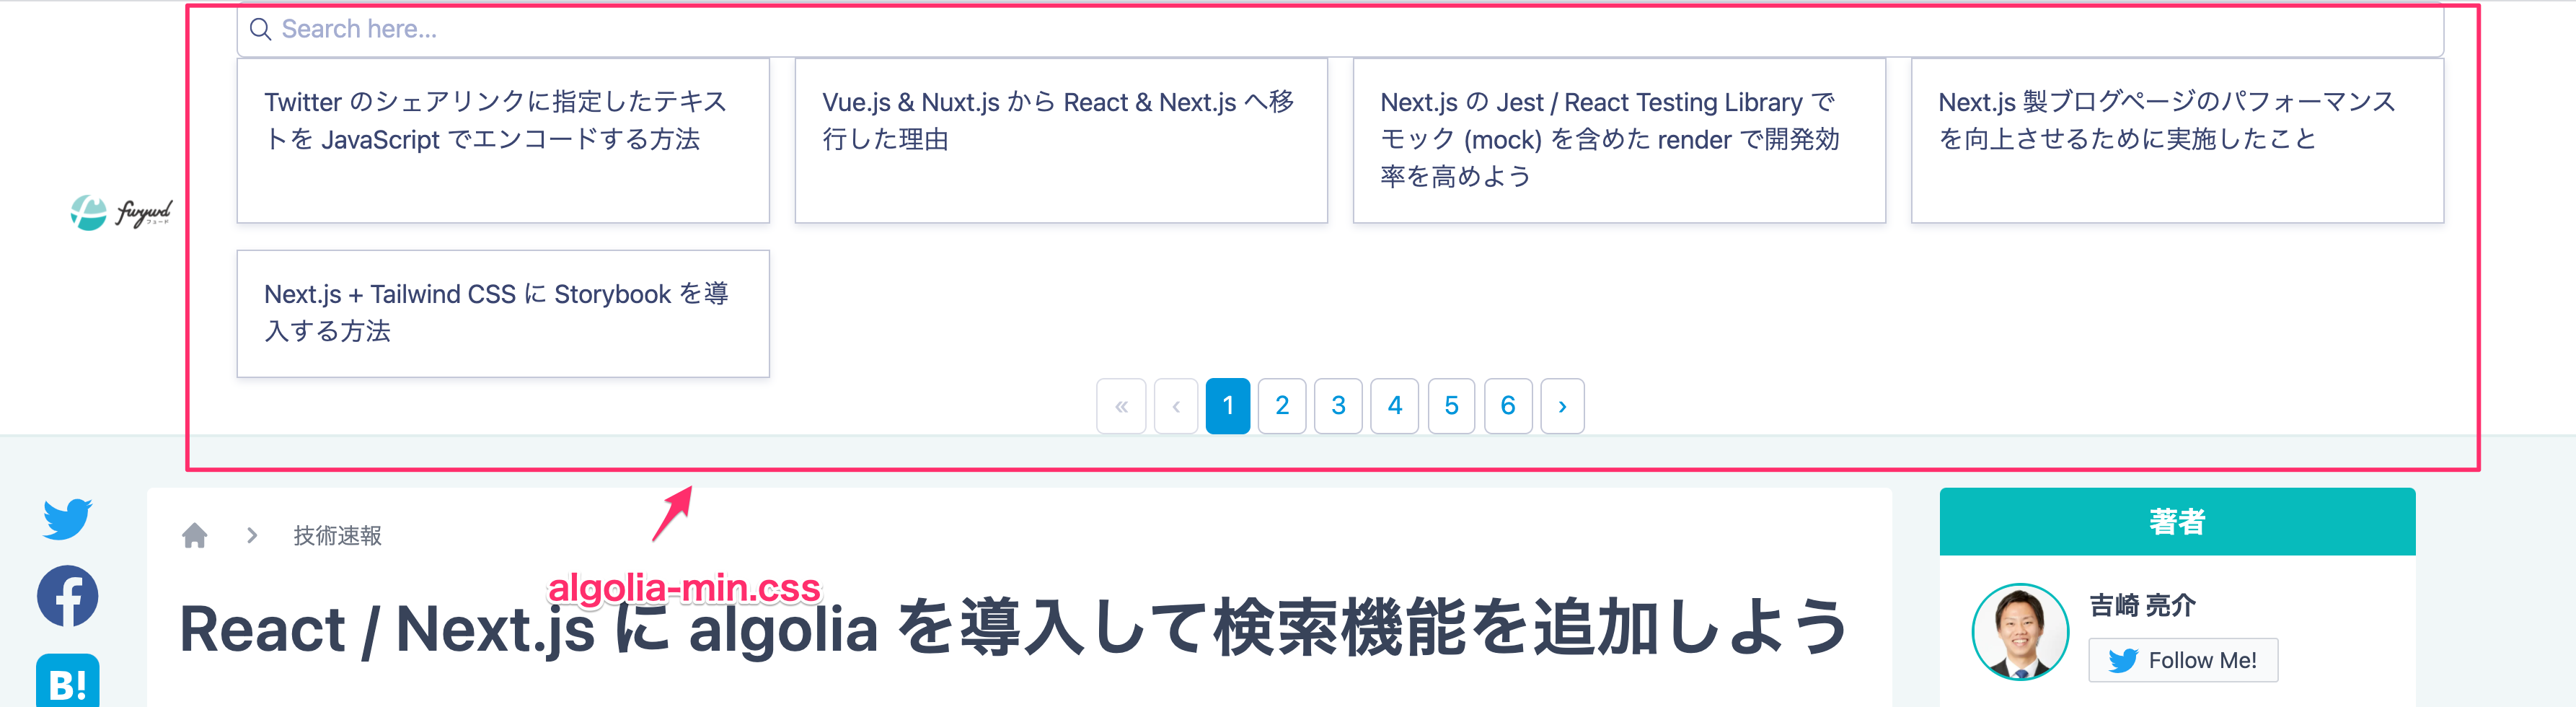
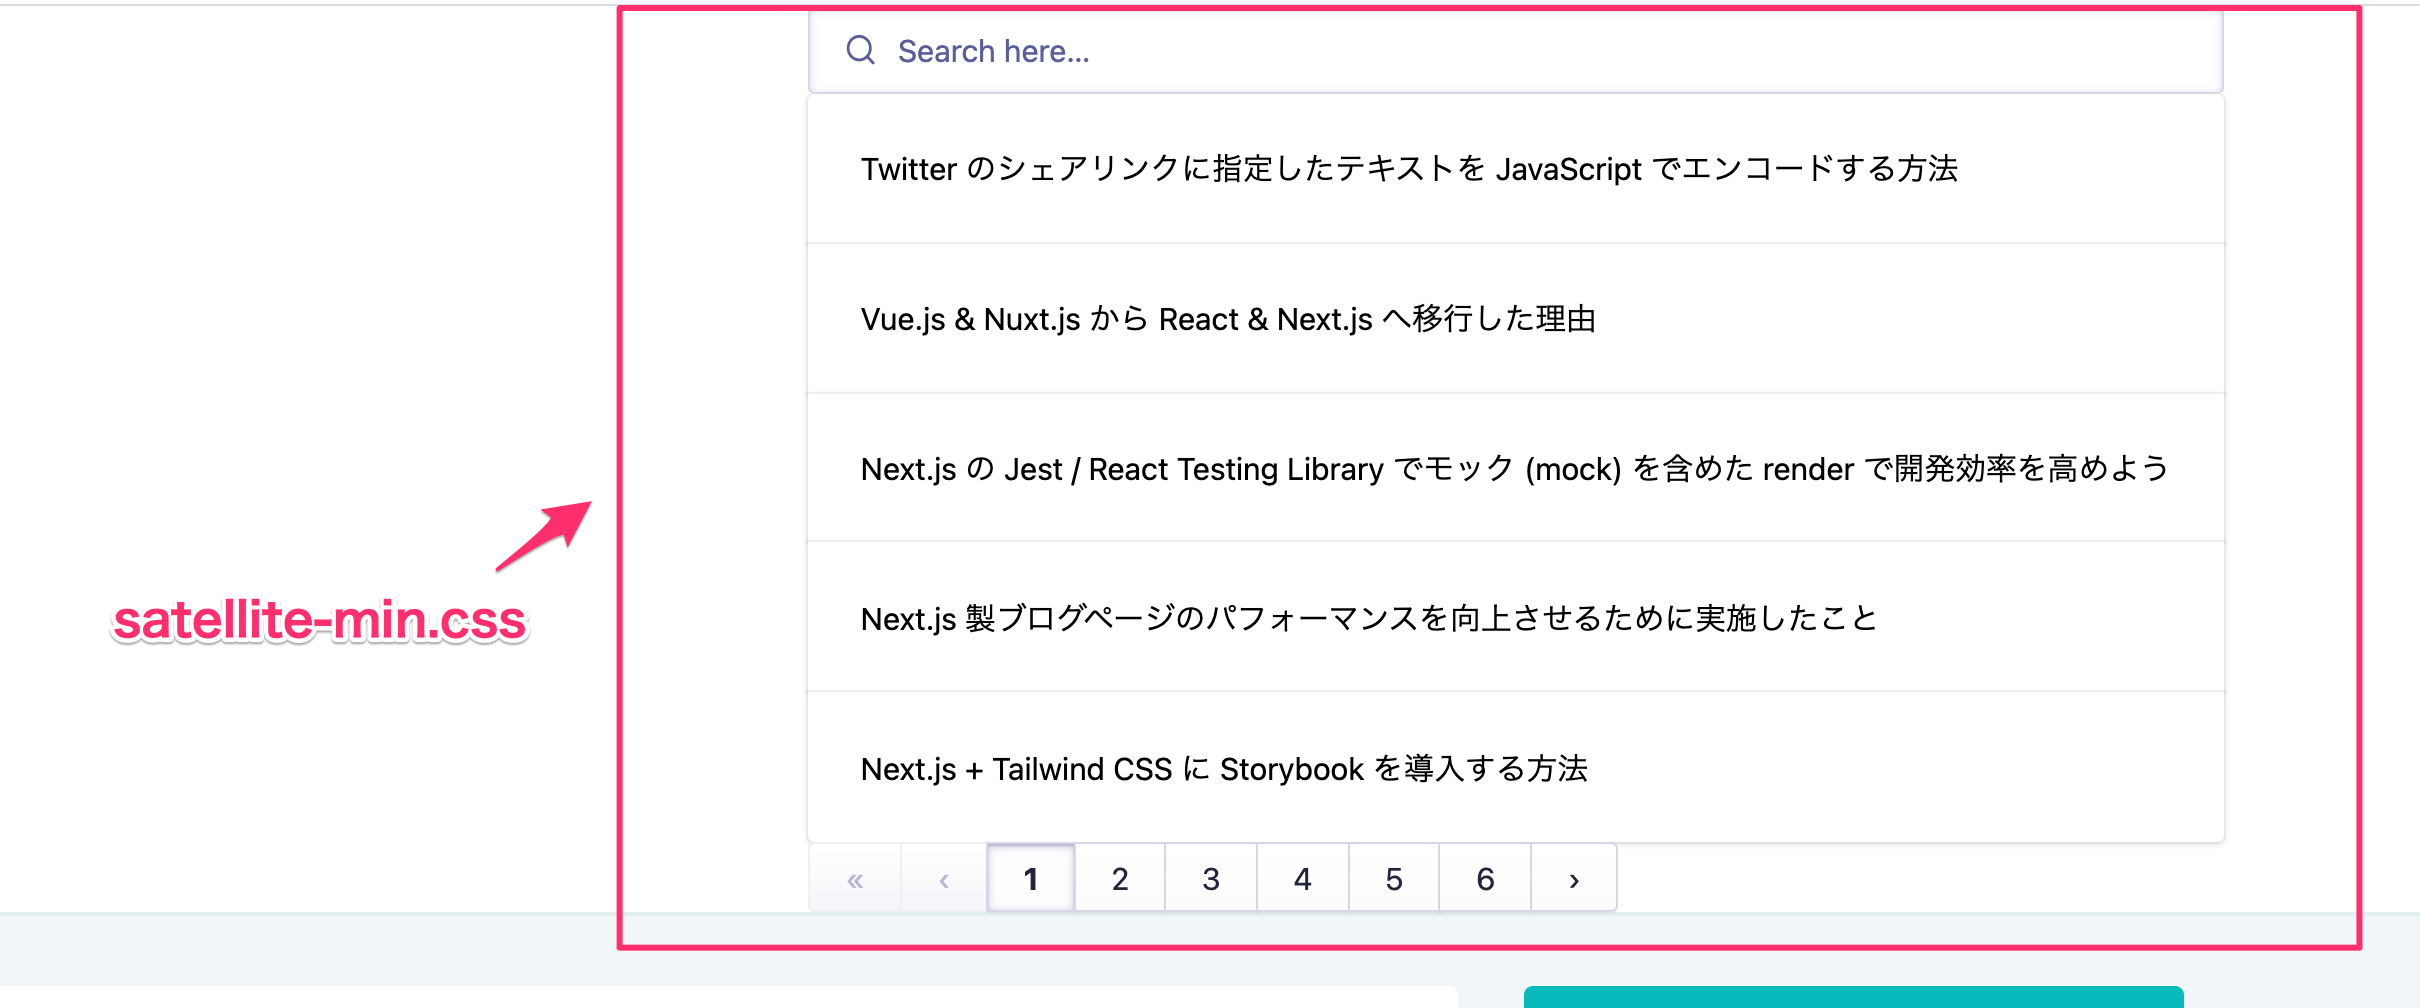
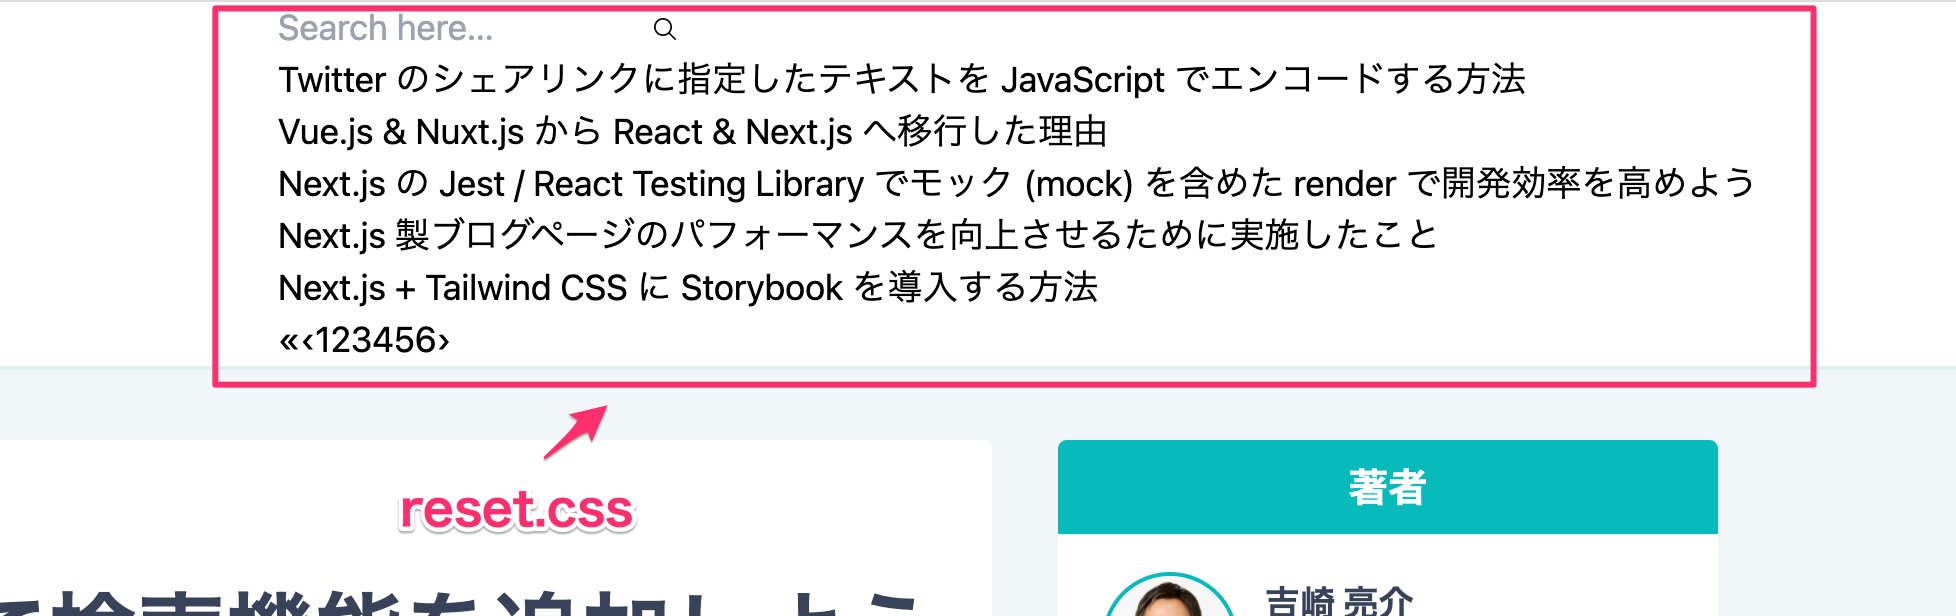
node_modules/instantsearch.css 下に CSS を含んだパッケージがインストールされます。標準的な
全て準備したい人向けの
algolia.css、別パターンの satellite.css が用意されています。全て準備したい人向けの
reset.css もあります。
それぞれにファイルを最小化 min 版がありますので、こちらを使うと良いでしょう。// src/components/common/Search.tsx import algoliasearch from 'algoliasearch/lite'; import { hitComponent } from 'components/common/HitComponent'; import { InstantSearch, SearchBox, Hits, Configure, Pagination } from 'react-instantsearch-dom'; import 'instantsearch.css/themes/algolia-min.css'; // <== 追記:使いたいスタイルに合わせて変更 export default function Search(): JSX.Element { const searchClient = algoliasearch( process.env.NEXT_PUBLIC_ALGOLIA_APPLICATION_ID || '', process.env.NEXT_PUBLIC_ALGOLIA_SEARCH_API_KEY || '', ); const indexName = process.env.NEXT_PUBLIC_ALGOLIA_INDEX || ''; return ( <div> <InstantSearch indexName={indexName} searchClient={searchClient}> <Configure hitsPerPage={5} /> <SearchBox /> <Hits hitComponent={hitComponent} /> <Pagination /> </InstantSearch> </div> ); }
参考にした記事では
これはテーマの CSS を上書きしたい場合に必要であり、詳しい理由はまた必要な場面で紹介しますのでご安心ください。
Search のコンポーネント自体で読み込むのではなく、_app.tsx でグローバルに読み込んでいました。これはテーマの CSS を上書きしたい場合に必要であり、詳しい理由はまた必要な場面で紹介しますのでご安心ください。
UI の詳細なカスタマイズ
初期状態で検索結果を表示しない
現状では初期状態の空文字に対しても検索を行っています。
空文字では検索を行わないように設定を行います。
空文字では検索を行わないように設定を行います。
詳細な設定の場合は別途
@algolia/* で定義されているパッケージが必要となります。# npm の場合 npm install --save-dev @algolia/client-search # yarn の場合 yarn add --dev @algolia/client-search
まずは検索に関する設定を行うための雛形を作成しておきます。
// src/components/common/Search.tsx

import { MultipleQueriesQuery } from '@algolia/client-search'; // <== 追記
import algoliasearch from 'algoliasearch/lite';
import { hitComponent } from 'components/common/HitComponent';
import { InstantSearch, SearchBox, Hits, Configure, Pagination } from 'react-instantsearch-dom';
import 'instantsearch.css/themes/satellite-min.css';

export default function Search(): JSX.Element {
  const indexName = process.env.NEXT_PUBLIC_ALGOLIA_INDEX || '';
  const algoliaClient = algoliasearch(
    process.env.NEXT_PUBLIC_ALGOLIA_APPLICATION_ID || '',
    process.env.NEXT_PUBLIC_ALGOLIA_SEARCH_API_KEY || '',
  ); // <== 名称を変更

  // こちらに設定を追記していく
  const searchClient = {
    ...algoliaClient,
    search(requests: MultipleQueriesQuery[]) {
      return algoliaClient.search(requests);
    },
  };

  return (
    <div>
      <InstantSearch indexName={indexName} searchClient={searchClient}>
        <Configure hitsPerPage={5} />
        <SearchBox />
        <Hits hitComponent={hitComponent} />
        <Pagination />
      </InstantSearch>
    </div>
  );
}
そして、空文字
書き方のお作法は以下の公式ページを参考にしており、思いつきで書いたわけではありません。
!params?.query の場合には検索結果が何もないとモックした情報 mock を送ります。書き方のお作法は以下の公式ページを参考にしており、思いつきで書いたわけではありません。
// src/components/common/Search.tsx

import { MultipleQueriesQuery } from '@algolia/client-search';

import algoliasearch from 'algoliasearch/lite';
import { hitComponent } from 'components/common/HitComponent';
import { InstantSearch, SearchBox, Hits, Configure, Pagination } from 'react-instantsearch-dom';
import 'instantsearch.css/themes/satellite-min.css';

export default function Search(): JSX.Element {
  const indexName = process.env.NEXT_PUBLIC_ALGOLIA_INDEX || '';
  const algoliaClient = algoliasearch(
    process.env.NEXT_PUBLIC_ALGOLIA_APPLICATION_ID || '',
    process.env.NEXT_PUBLIC_ALGOLIA_SEARCH_API_KEY || '',
  );

  // 検索結果なしのモック情報
  const mock = {
    hits: [],
    nbHits: 0,
    nbPages: 0,
    page: 0,
    processingTimeMS: 0,
  };

  // 空文字の場合は何もない情報をモックして渡す
  const searchClient = {
    ...algoliaClient,
    search(requests: MultipleQueriesQuery[]) {
      if (requests.every(({ params }) => !params?.query)) {
        return Promise.resolve(mock);
      }
      return algoliaClient.search(requests);
    },
  };

  return (
    <div>
      <InstantSearch indexName={indexName} searchClient={searchClient}>
        <Configure hitsPerPage={5} />
        <SearchBox />
        <Hits hitComponent={hitComponent} />
        <Pagination />
      </InstantSearch>
    </div>
  );
}
参考記事では
特に今のところは問題がありませんが、また問題があれば参考記事の形式に合わせようと思います。
Promise.resolve の中を map で配列を返すように指定していましたが、無駄なページネーションが表示されるため、この点は変更しています。特に今のところは問題がありませんが、また問題があれば参考記事の形式に合わせようと思います。

ここで、
searchClient 周りも情報が多くなってきたため、管理がしやすいように切り出しておきましょう。// src/lib/searchClient.ts import { MultipleQueriesQuery } from '@algolia/client-search'; import algoliasearch from 'algoliasearch/lite'; export const indexName = process.env.NEXT_PUBLIC_ALGOLIA_INDEX || ''; export const algoliaClient = algoliasearch( process.env.NEXT_PUBLIC_ALGOLIA_APPLICATION_ID || '', process.env.NEXT_PUBLIC_ALGOLIA_SEARCH_API_KEY || '', ); // 空文字の場合は何もない情報をモックして渡す export const searchClient = { ...algoliaClient, search(requests: MultipleQueriesQuery[]) { if (requests.every(({ params }) => !params?.query)) { return Promise.resolve(mock); } return algoliaClient.search(requests); }, }; // 検索結果なしのモック情報 const mock = { hits: [], nbHits: 0, nbPages: 0, page: 0, processingTimeMS: 0, };
// src/component/common/Search.tsx

import { hitComponent } from 'components/common/HitComponent';
import { indexName, searchClient } from 'lib/searchClient';
import { InstantSearch, SearchBox, Hits, Configure, Pagination } from 'react-instantsearch-dom';
import 'instantsearch.css/themes/satellite-min.css';

export default function Search(): JSX.Element {
  return (
    <div>
      <InstantSearch indexName={indexName} searchClient={searchClient}>
        <Configure hitsPerPage={5} />
        <SearchBox />
        <Hits hitComponent={hitComponent} />
        <Pagination />
      </InstantSearch>
    </div>
  );
}
だいぶスッキリと書くことができました。
検索結果が残る問題を解消
内部リンクを利用する
Link コンポーネントで遷移をさせると、ページ遷移後も検索結果が残ってしまうことがあります。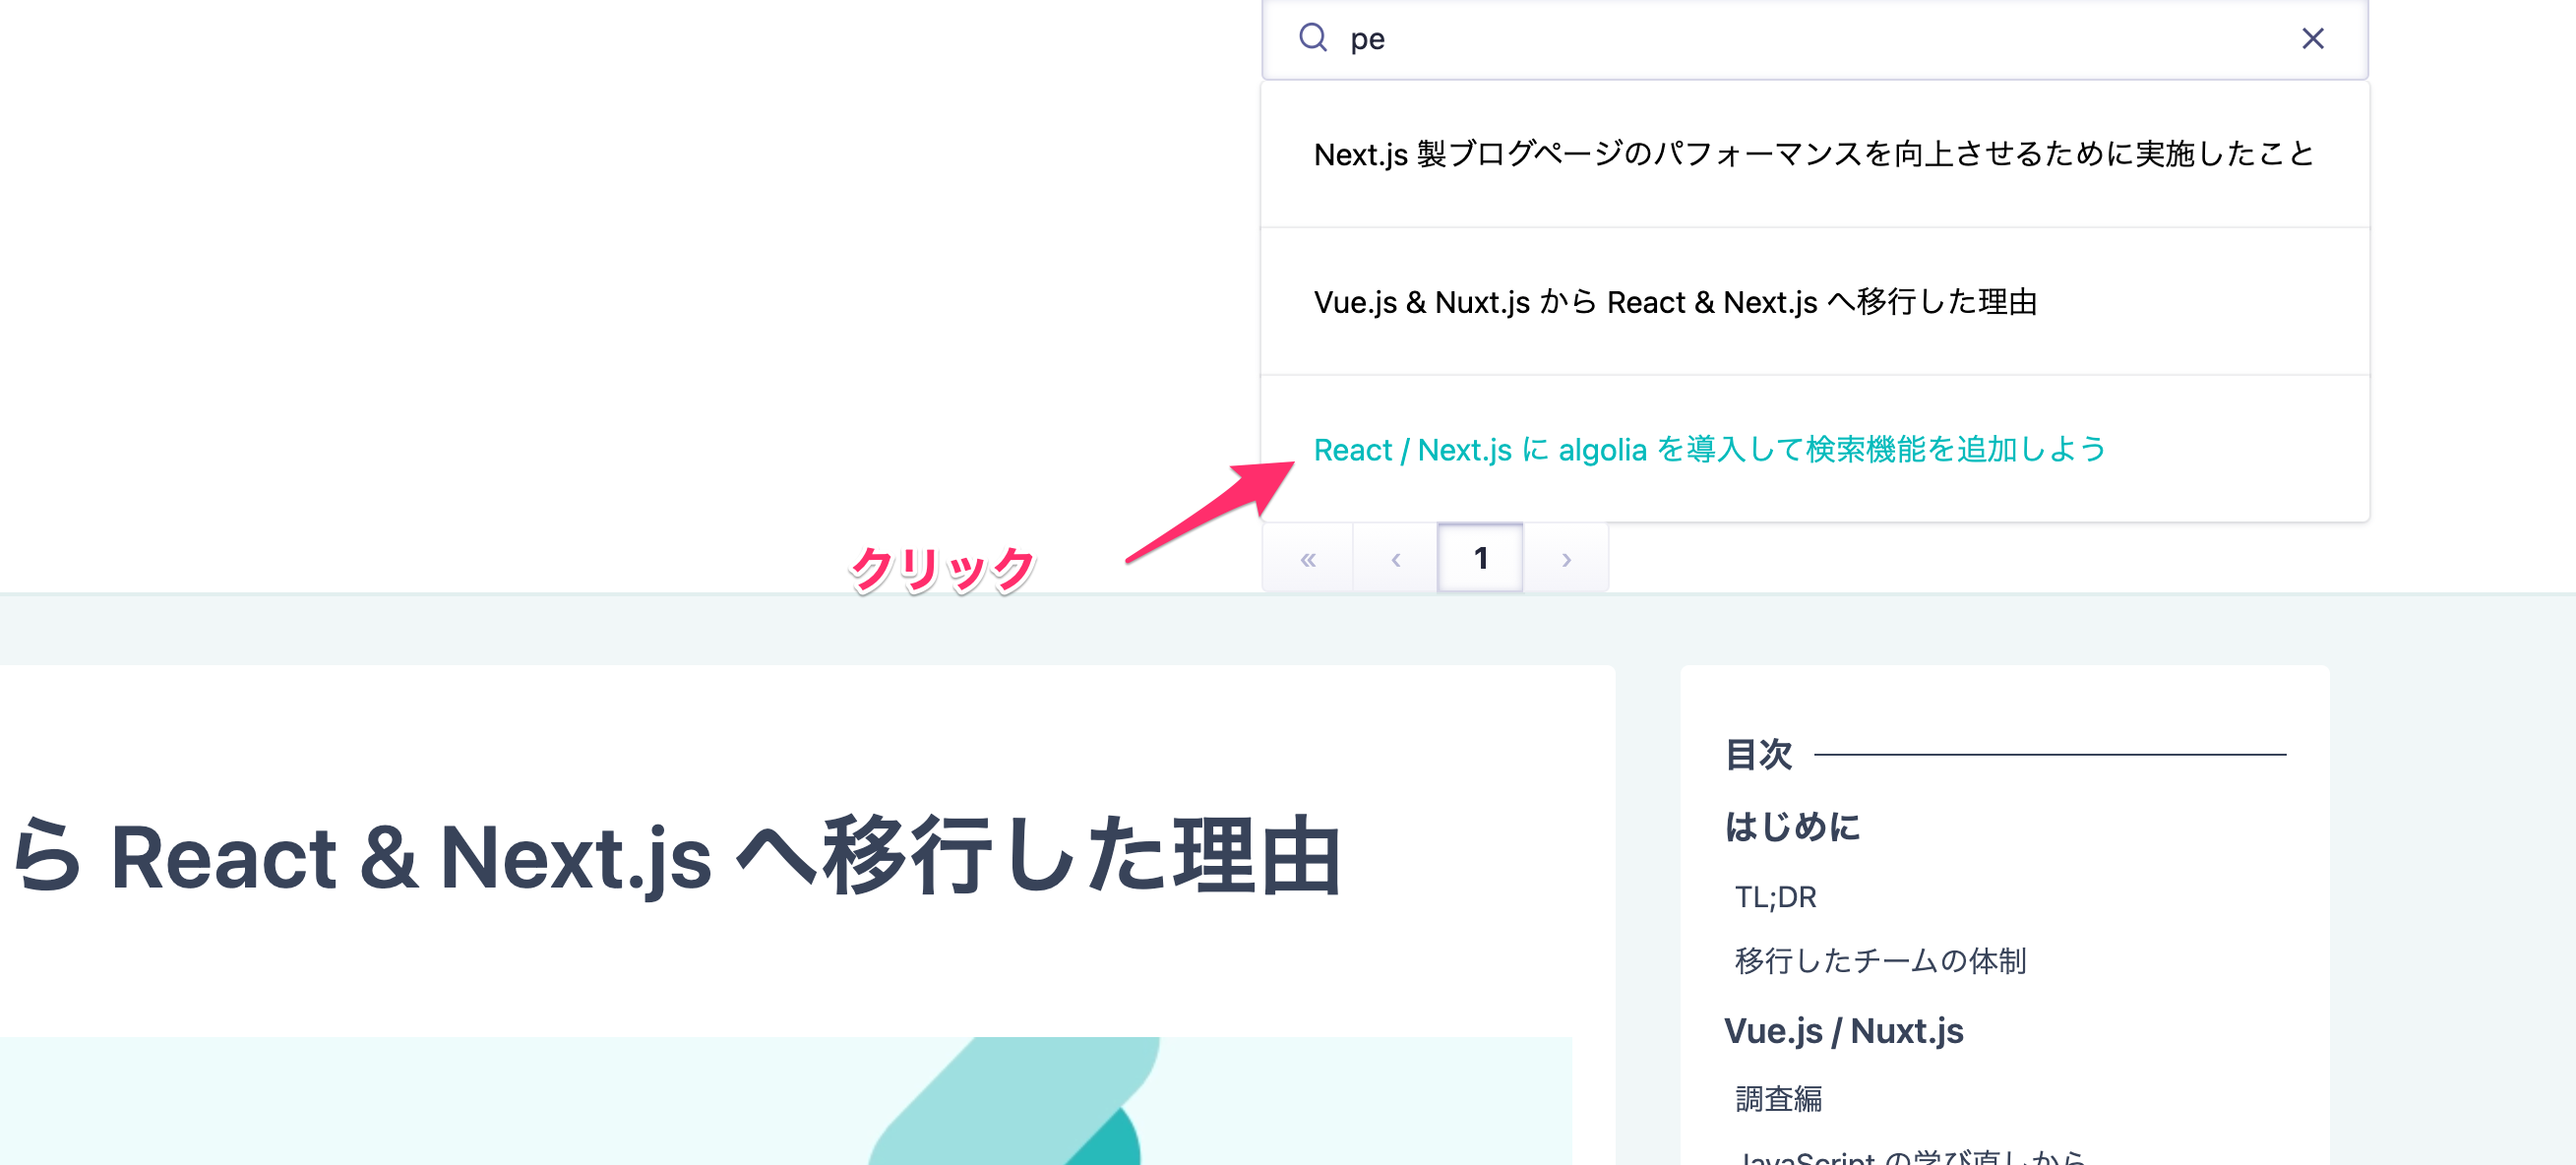
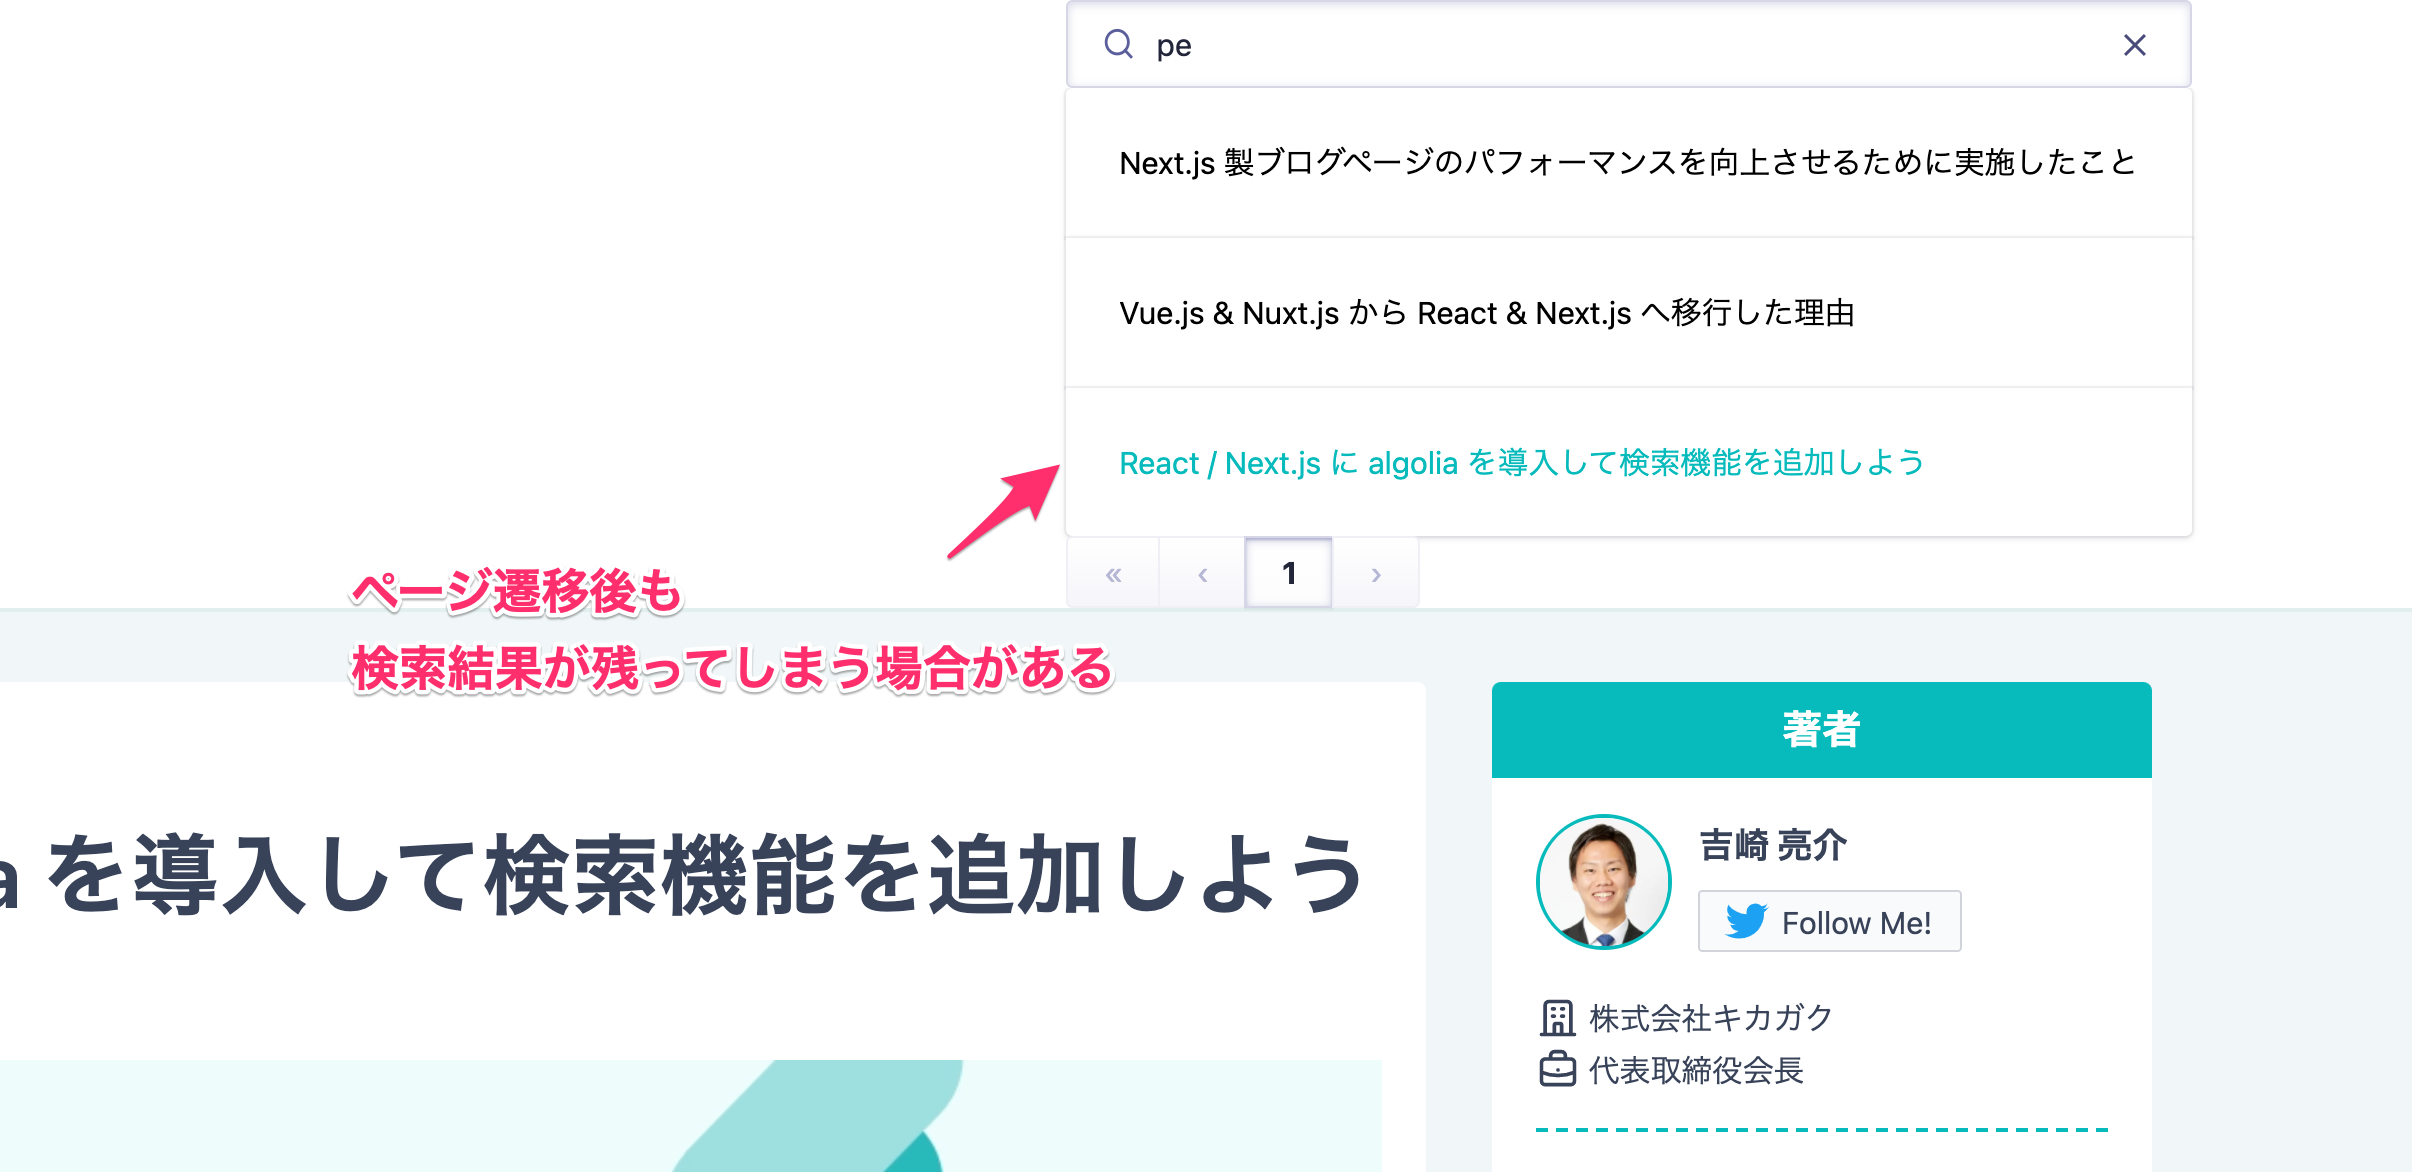
こちらの参考記事いわく、
connectSearchBox を利用すると良さそうです。まずは全体の雛形を作っていきます。
Hits コンポーネントを SearchResult コンポーネント内に格納しただけで、特に動作の変更はまだありません。// src/component/common/Search.tsx import { indexName, searchClient } from 'lib/searchClient'; import { InstantSearch, SearchBox, Configure, Pagination } from 'react-instantsearch-dom'; import 'instantsearch.css/themes/satellite-min.css'; import { SearchResult } from './HitComponent'; // <== 変更 export default function Search(): JSX.Element { return ( <div> <InstantSearch indexName={indexName} searchClient={searchClient}> <Configure hitsPerPage={5} /> <SearchBox /> <SearchResult /> {/* Hits => SearchResult */} <Pagination /> </InstantSearch> </div> ); }
// src/components/common/HitComponent.tsx

import Link from 'next/link';
import { Hit } from 'react-instantsearch-core';
import { Hits, connectSearchBox } from 'react-instantsearch-dom';

interface HitDoc {
  objectID: string;
  url: string;
  title: string;
  description: string;
  content: string;
}

interface Props {
  hit: Hit<HitDoc>;
}

interface HitComponentProps extends Props {
  onClick: () => void;
}

function HitComponent({ hit }: HitComponentProps): JSX.Element {
  return (
    <div>
      <Link href={hit.url}>
        <a className="hover:text-[#06bbbc]">{hit.title}</a>
      </Link>
    </div>
  );
}

// 初期の雛形
export const SearchResult = connectSearchBox(({ refine, currentRefinement }) => {
  const hitComponent = ({ hit }: Props): JSX.Element => (
    <HitComponent hit={hit} onClick={() => null} />
  );

  return <Hits hitComponent={hitComponent} />;
});
ここから、少し飛躍がありますが、以下のように変更していきます。
// src/components/common/HitComponent.tsx

import Link from 'next/link';
import { useEffect, useState, useCallback } from 'react'; // 追加
import { Hit } from 'react-instantsearch-core';
import { Hits, connectSearchBox } from 'react-instantsearch-dom';

interface HitDoc {
  objectID: string;
  url: string;
  title: string;
  description: string;
  content: string;
}

interface Props {
  hit: Hit<HitDoc>;
}

interface HitComponentProps extends Props {
  onClick: () => void;
}

function HitComponent({ hit, onClick }: HitComponentProps): JSX.Element {
  return (
    <div>
      <Link href={hit.url}>
        <button className="hover:text-[#06bbbc]" onClick={onClick}>
          {hit.title}
        </button>
      </Link>
    </div>
  );
}

export const SearchResult = connectSearchBox(({ refine, currentRefinement }) => {
  // refine: function => 現状のクエリを変更
  // currentRefinement: string => 現状のクエリ

  const [isShow, setShow] = useState<boolean>(false);

  // マウント時に実行
  useEffect(() => {
    // !! は currentRefinement が空文字か判定 (true or false)
    setShow(!!currentRefinement); // => 空文字は表示しないようにセットされる
  }, [currentRefinement]); // currentRefinement に変化があれば再度実行

  // リセットと同時に useCallback でメモ化して無駄なレンダリングを防ぐ
  const handleResetSearchWords = useCallback(() => {
    refine(''); // クエリを空文字に指定してリセット
  }, [refine]);

  const hitComponent = ({ hit }: Props): JSX.Element => (
    <HitComponent hit={hit} onClick={handleResetSearchWords} />
  );

  if (!isShow) return null;
  return <Hits hitComponent={hitComponent} />;
});
それぞれの役割はコメントアウトしておきました。
また、
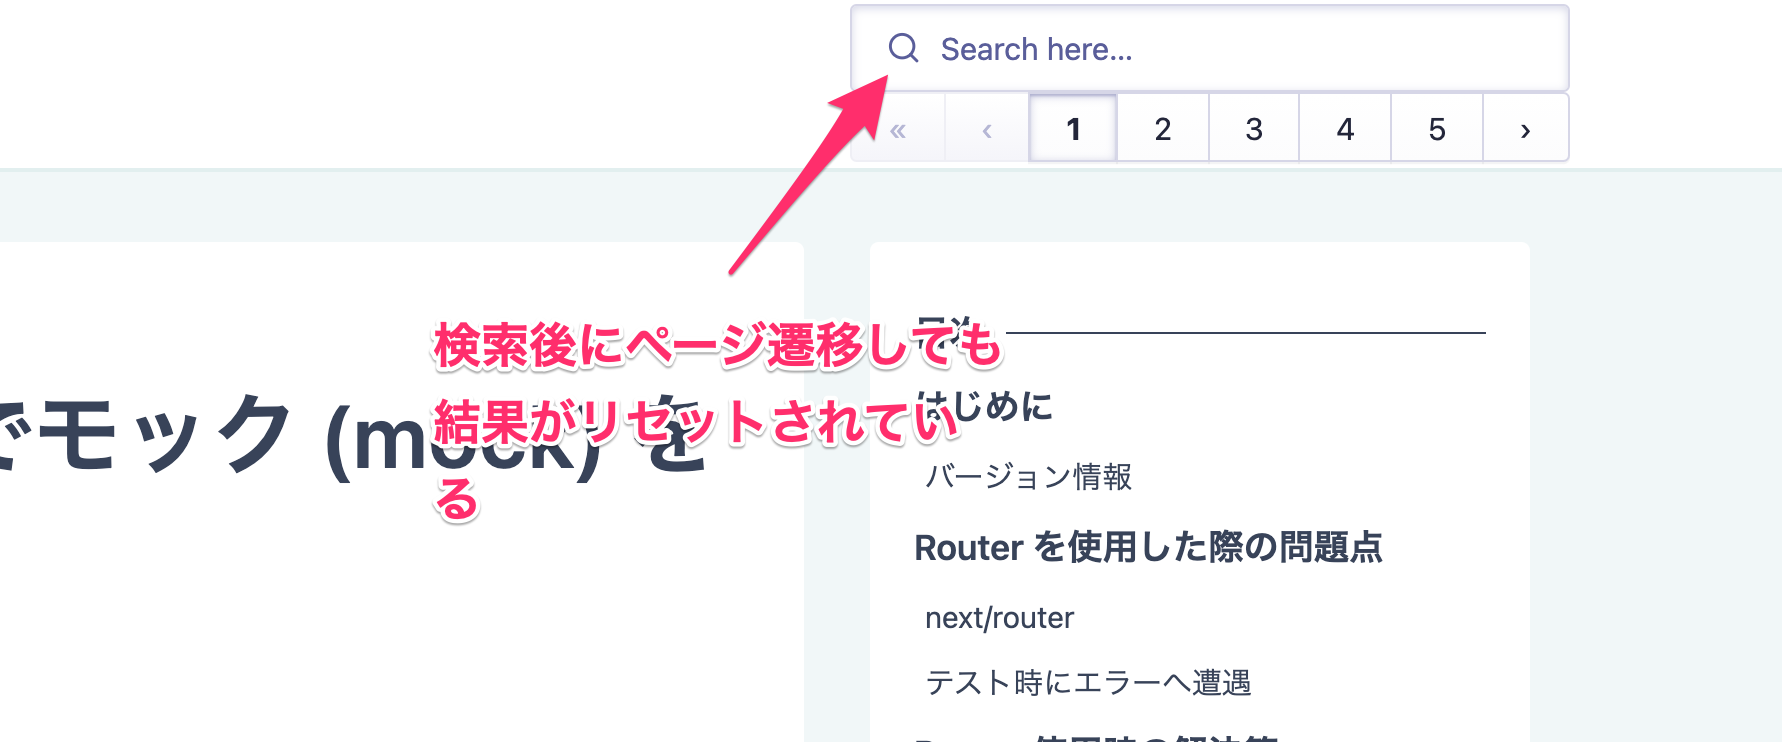
connectSearchBox の引数 refine と currentRefinement は公式ページから役割を確認しました。少し手間がかかる方法ですが、検索結果をマウント時にリセットすることができました。
補足 最終的な成果物にはLinkコンポーネントを使わずにaタグでの遷移に切り替えており、この処理は動作的には必要なくなりました。
ただし、もう状態管理など少し込みいった実装を行えば、この方法のまま進めることができ、こちらがベストですので知っておいて損はありません。
ただし、不要なページネーションが設定されてしまっています。
そこで、
そこで、
Pagination コンポーネントも SearchResult コンポーネントに包含してしまいましょう。以下が最終的な全体像です。
HitComponent.tsx から SearchResult.tsx にファイル名を変更しているところも注意です。// src/components/common/Search.tsx import SearchResult from 'components/common/SearchResult'; import { indexName, searchClient } from 'lib/searchClient'; import { InstantSearch, SearchBox, Configure } from 'react-instantsearch-dom'; import 'instantsearch.css/themes/satellite-min.css'; export default function Search(): JSX.Element { return ( <div> <InstantSearch indexName={indexName} searchClient={searchClient}> <Configure hitsPerPage={5} /> <SearchBox /> <SearchResult /> </InstantSearch> </div> ); }
// src/components/common/SearchResult.tsx

import Link from 'next/link';
import { useEffect, useState, useCallback } from 'react';
import { Hit } from 'react-instantsearch-core';
import { Hits, connectSearchBox, Pagination } from 'react-instantsearch-dom';

interface HitDoc {
  objectID: string;
  url: string;
  title: string;
  description: string;
  content: string;
}

interface Props {
  hit: Hit<HitDoc>;
}

interface HitComponentProps extends Props {
  onClick: () => void;
}

function HitComponent({ hit, onClick }: HitComponentProps): JSX.Element {
  return (
    <div>
      <Link href={hit.url}>
        <button className="hover:text-[#06bbbc]" onClick={onClick}>
          {hit.title}
        </button>
      </Link>
    </div>
  );
}

const SearchResult = connectSearchBox(({ refine, currentRefinement }) => {
  const [isShow, setShow] = useState<boolean>(false);

  useEffect(() => {
    setShow(!!currentRefinement);
  }, [currentRefinement]);

  const handleResetSearchWords = useCallback(() => {
    refine('');
  }, [refine]);

  const hitComponent = ({ hit }: Props): JSX.Element => (
    <HitComponent hit={hit} onClick={handleResetSearchWords} />
  );

  if (!isShow) return null;
  return (
    <>
      <Hits hitComponent={hitComponent} />
      <Pagination /> {/* 追加 */}
    </>
  );
});

export default SearchResult;
これでページネーションが不要に表示される問題も解決されました。
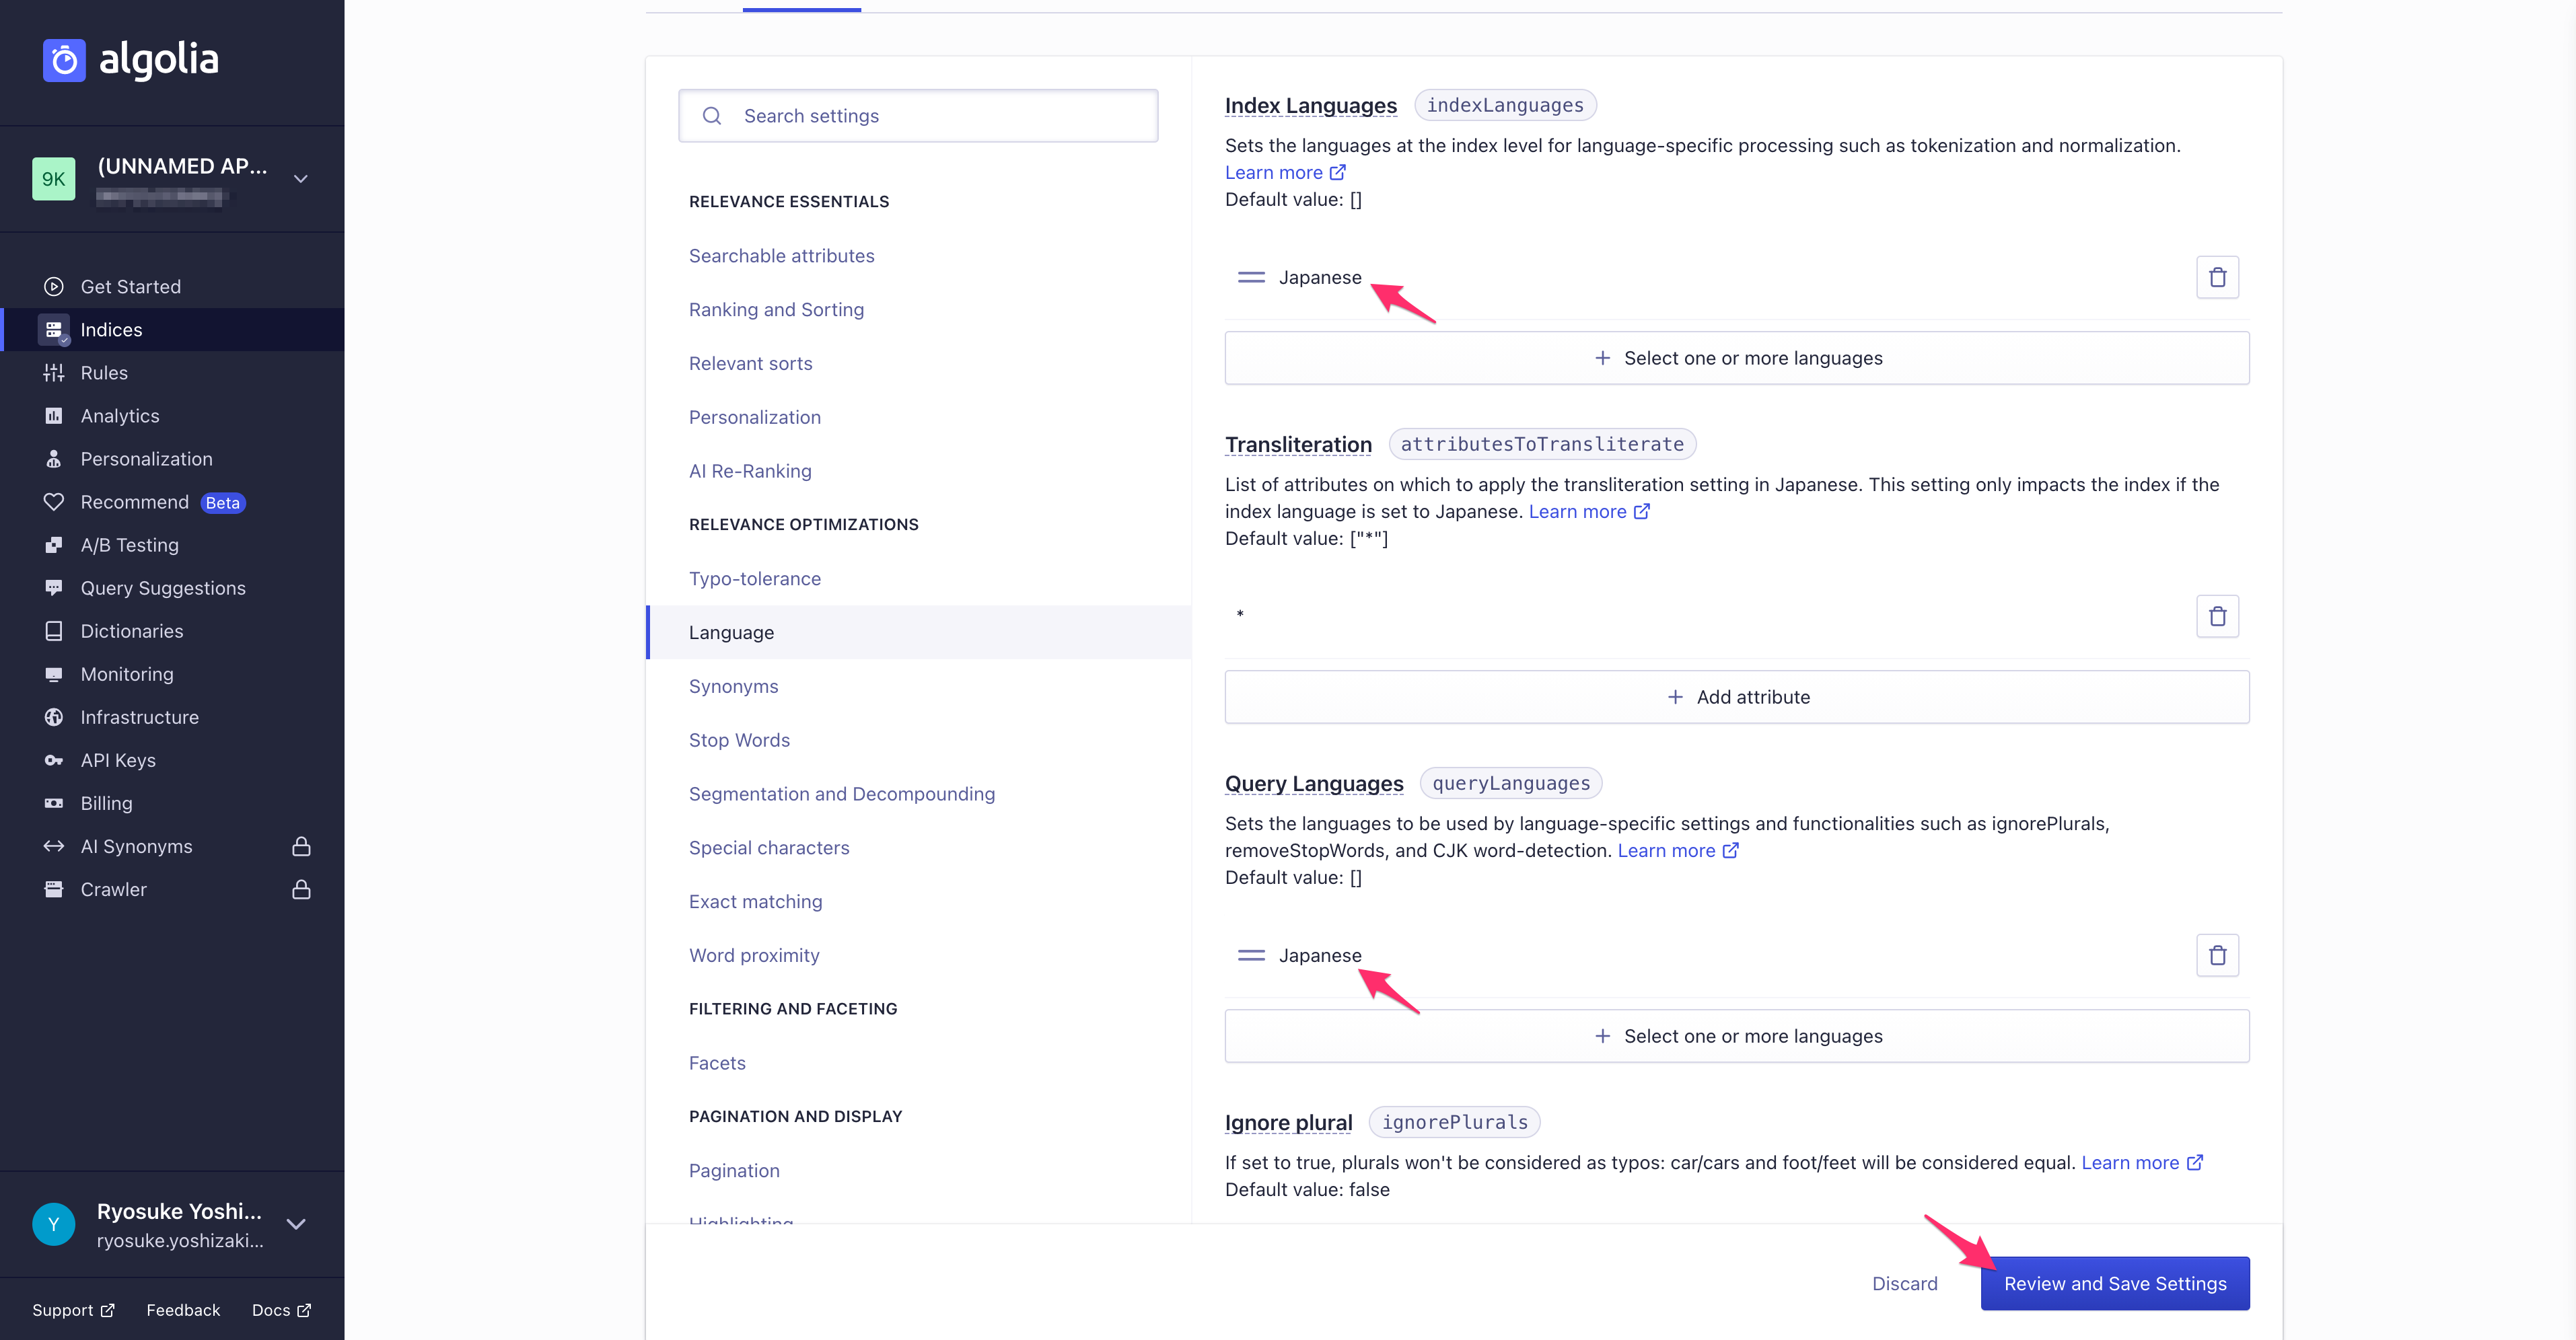
検索対象の設定
ここで少し実装から離れて algolia の設定を見直しましょう。
検索に使用する対象が定義したインデックスの全てになっていますが、今回はその中でも
この動機として、
検索に使用する対象が定義したインデックスの全てになっていますが、今回はその中でも
title と description のみを検索対象として絞ってみましょう。この動機として、
content まで入れてしまうと React や Next.js といった用語がどのような記事でも必ず入ってしまうため、検索の質が落ちてしまうためです。content を含めるかどうかは規模によっても変わってくるため、その状況に合わせて検討しましょう。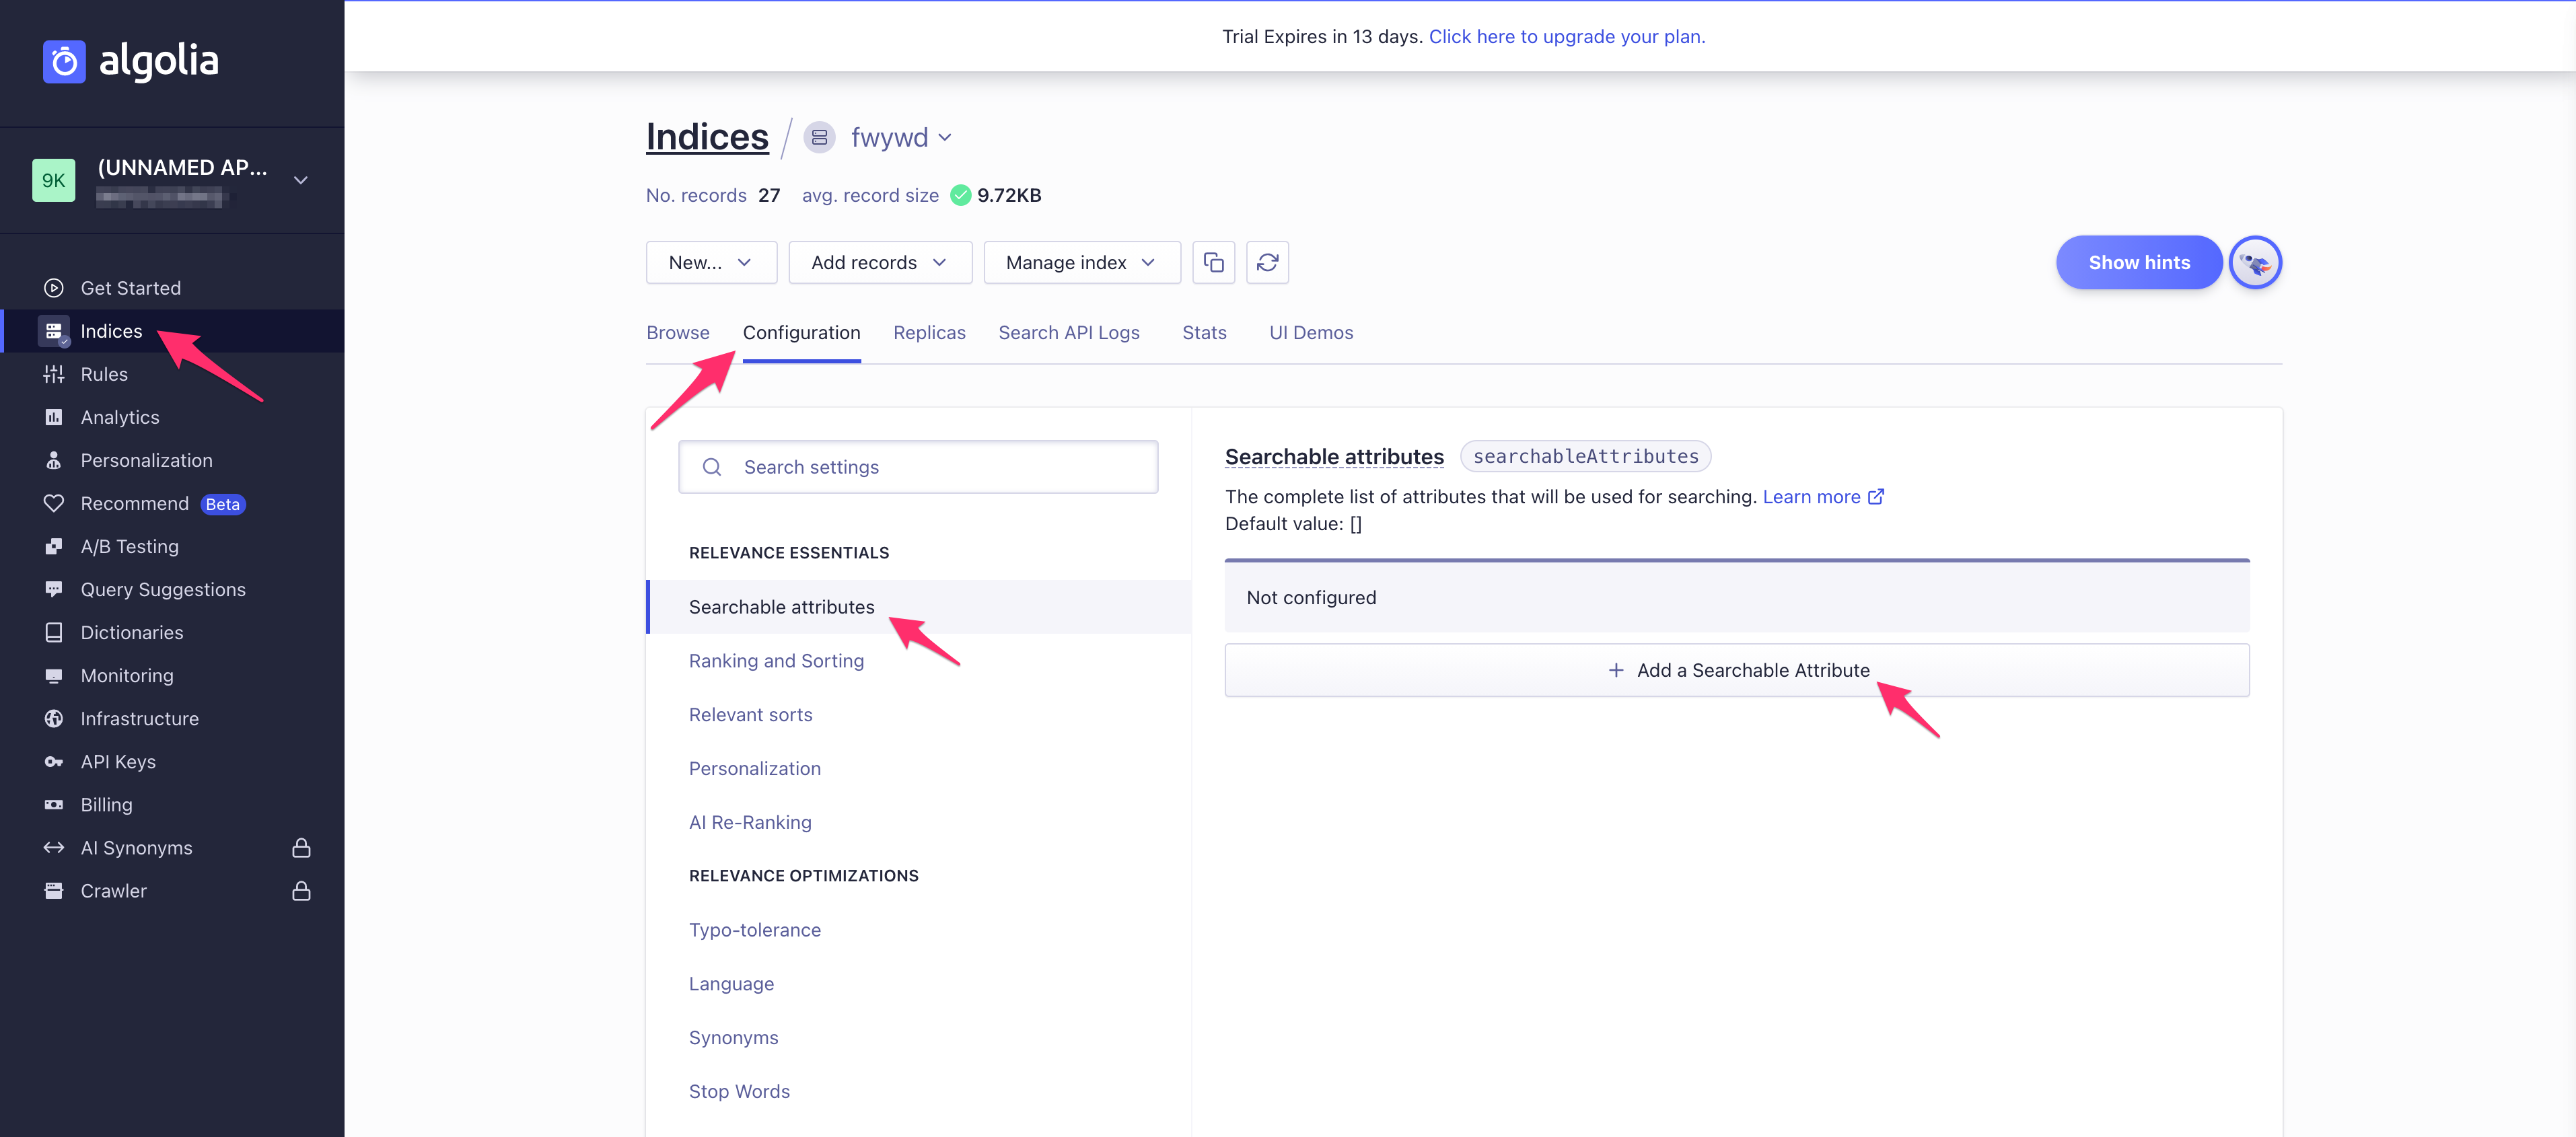


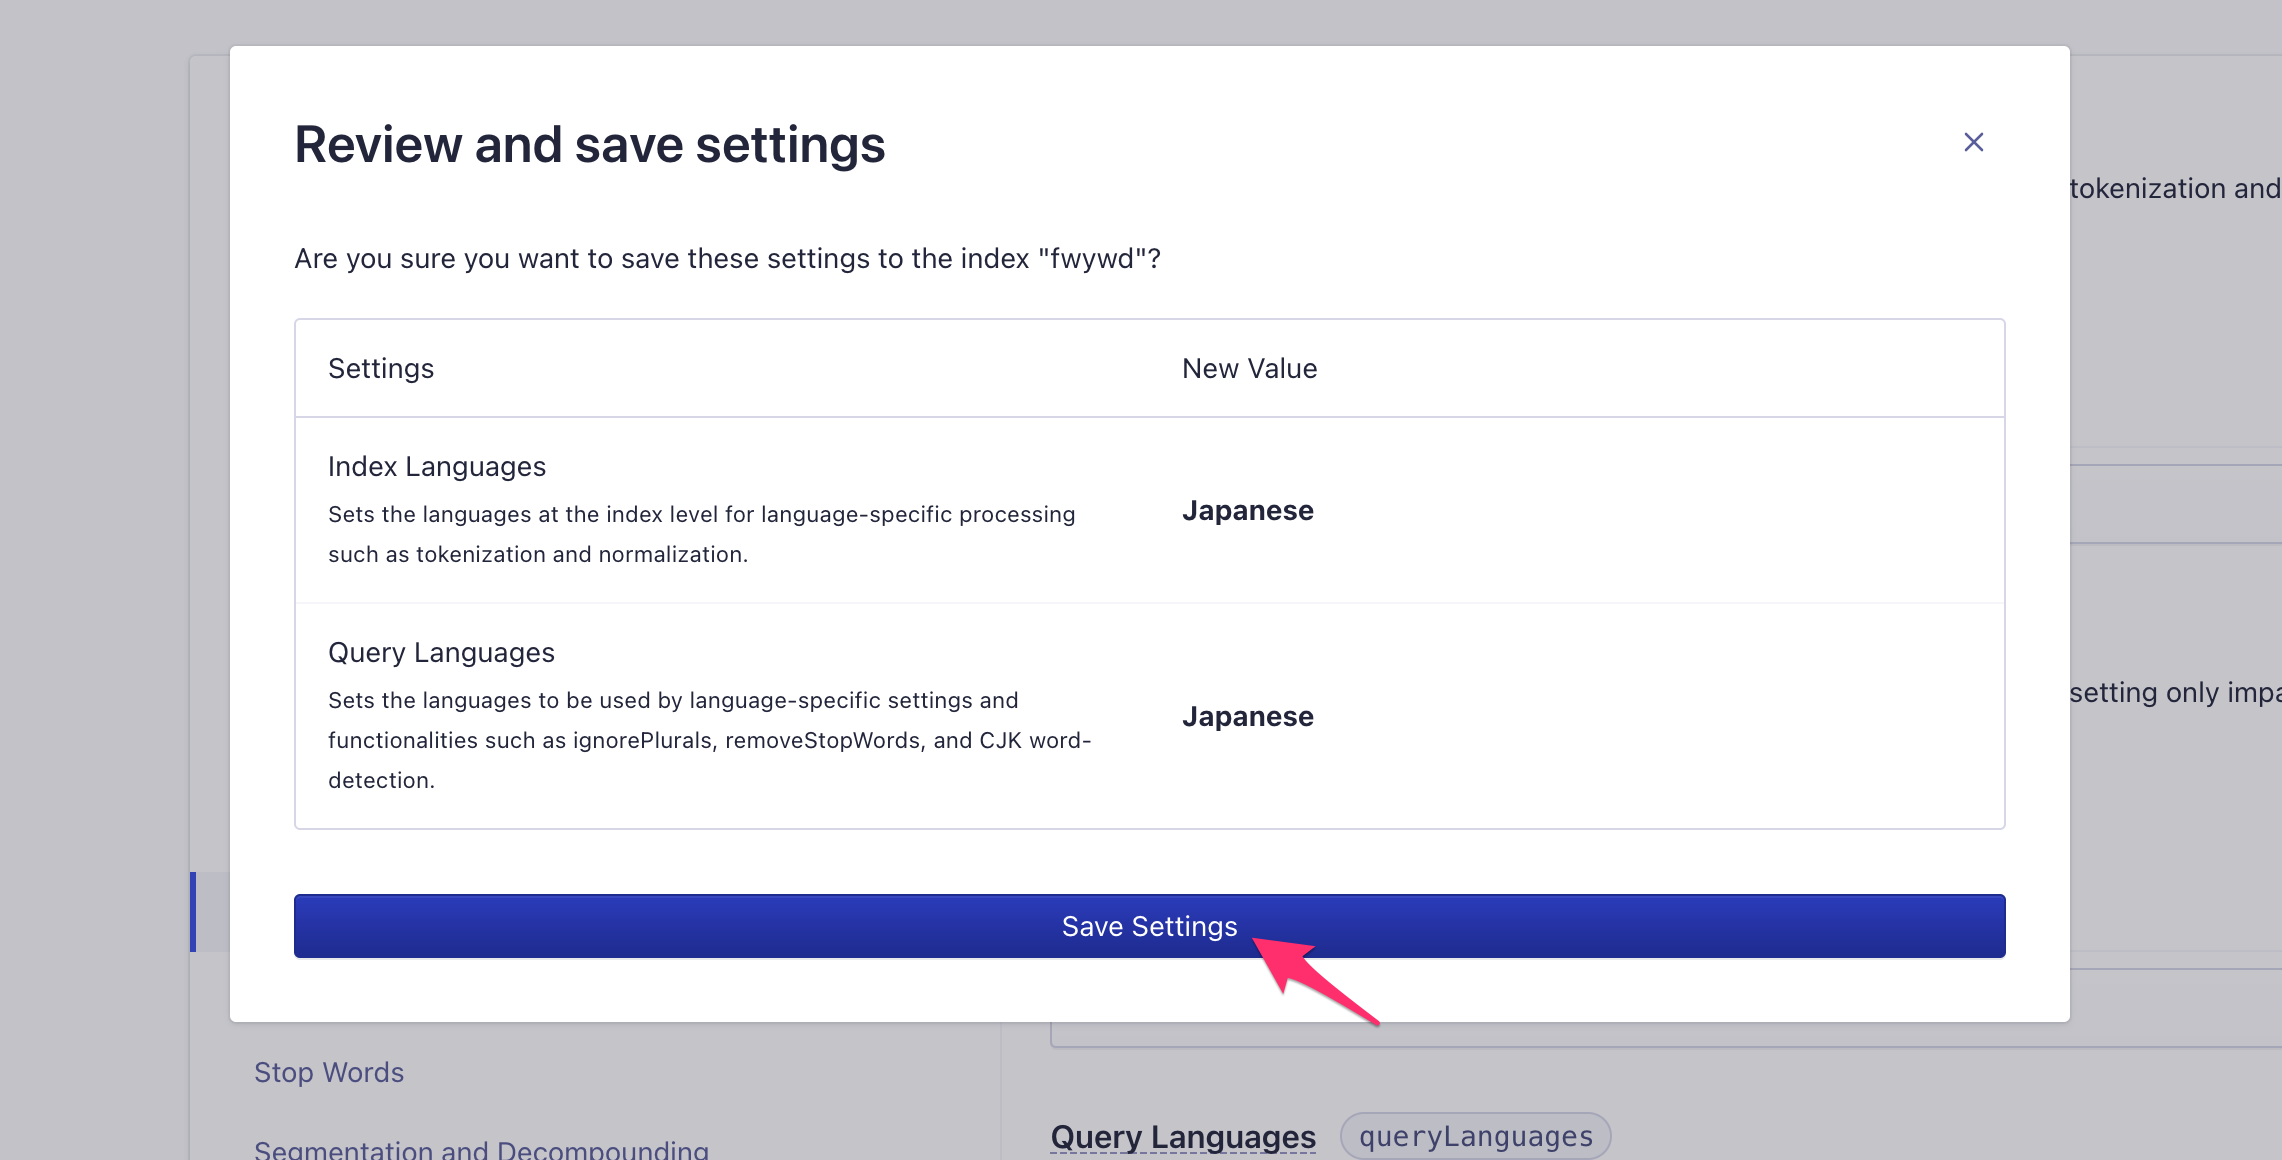
また、検索の言語を日本語にも設定しておくと良いでしょう。

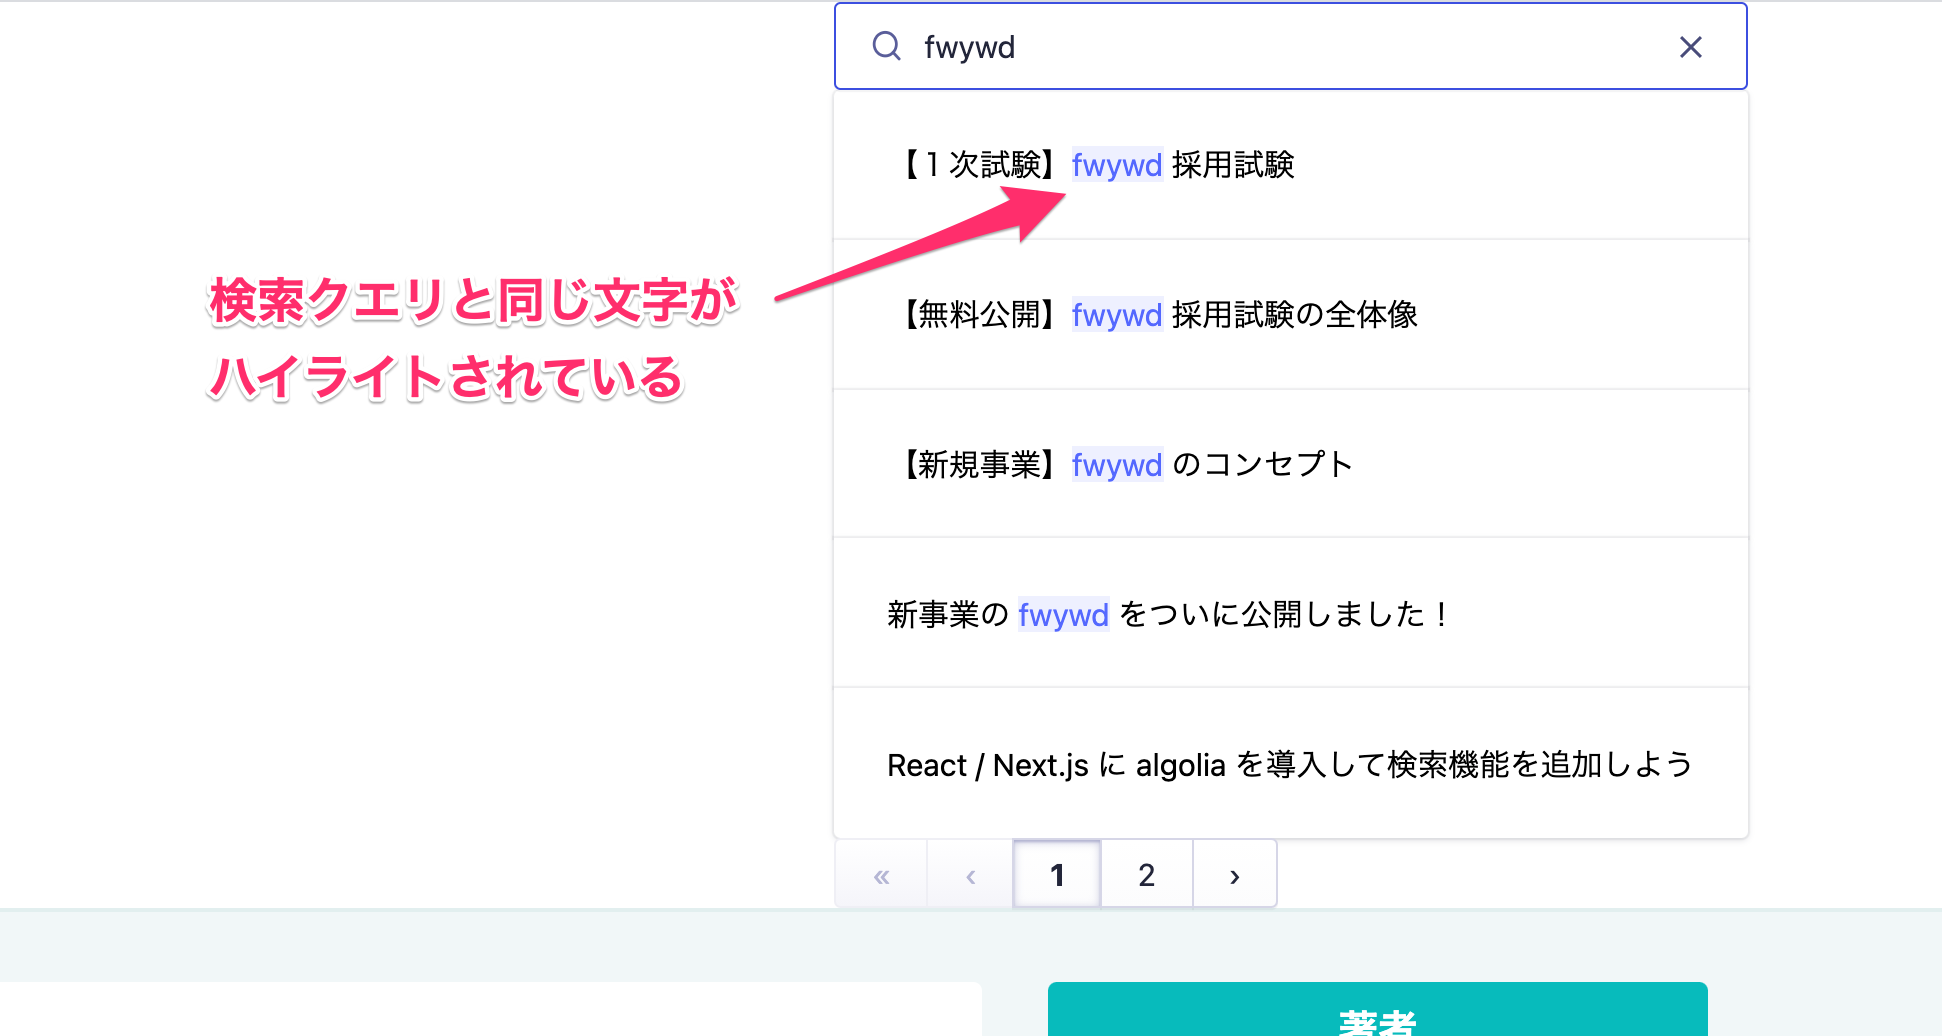
検索クエリをハイライト
検索クエリと該当している箇所の色を変更するといったハイライトも
Highlight コンポーネントで簡単に実装できます。// 変更箇所 function HitComponent({ hit, onClick }: HitComponentProps): JSX.Element { return ( <div> <Link href={hit.url}> <button className="hover:text-[#06bbbc]" onClick={onClick}> <Highlight attribute="title" hit={hit} /> {/* <== title の属性を表示 */} </button> </Link> </div> ); }
全体像はこちらです。
// src/components/common/SearchResult.tsx

import Link from 'next/link';
import { useEffect, useState, useCallback } from 'react';
import { Hit } from 'react-instantsearch-core';
import { Hits, connectSearchBox, Pagination, Highlight } from 'react-instantsearch-dom';

interface HitDoc {
  objectID: string;
  url: string;
  title: string;
  description: string;
  content: string;
}

interface Props {
  hit: Hit<HitDoc>;
}

interface HitComponentProps extends Props {
  onClick: () => void;
}

function HitComponent({ hit, onClick }: HitComponentProps): JSX.Element {
  return (
    <div>
      <Link href={hit.url}>
        <button className="hover:text-[#06bbbc]" onClick={onClick}>
          <Highlight attribute="title" hit={hit} />
        </button>
      </Link>
    </div>
  );
}

const SearchResult = connectSearchBox(({ refine, currentRefinement }) => {
  const [isShow, setShow] = useState<boolean>(false);

  useEffect(() => {
    setShow(!!currentRefinement);
  }, [currentRefinement]);

  const handleResetSearchWords = useCallback(() => {
    refine('');
  }, [refine]);

  const hitComponent = ({ hit }: Props): JSX.Element => (
    <HitComponent hit={hit} onClick={handleResetSearchWords} />
  );

  if (!isShow) return null;
  return (
    <>
      <Hits hitComponent={hitComponent} />
      <Pagination /> {/* 追加 */}
    </>
  );
});

export default SearchResult;
これで簡単にハイライトが実装できました。
ハイライトの色などを変更したい場合は、属性を確認して aloglia の CSS を上書きすれば OK です。
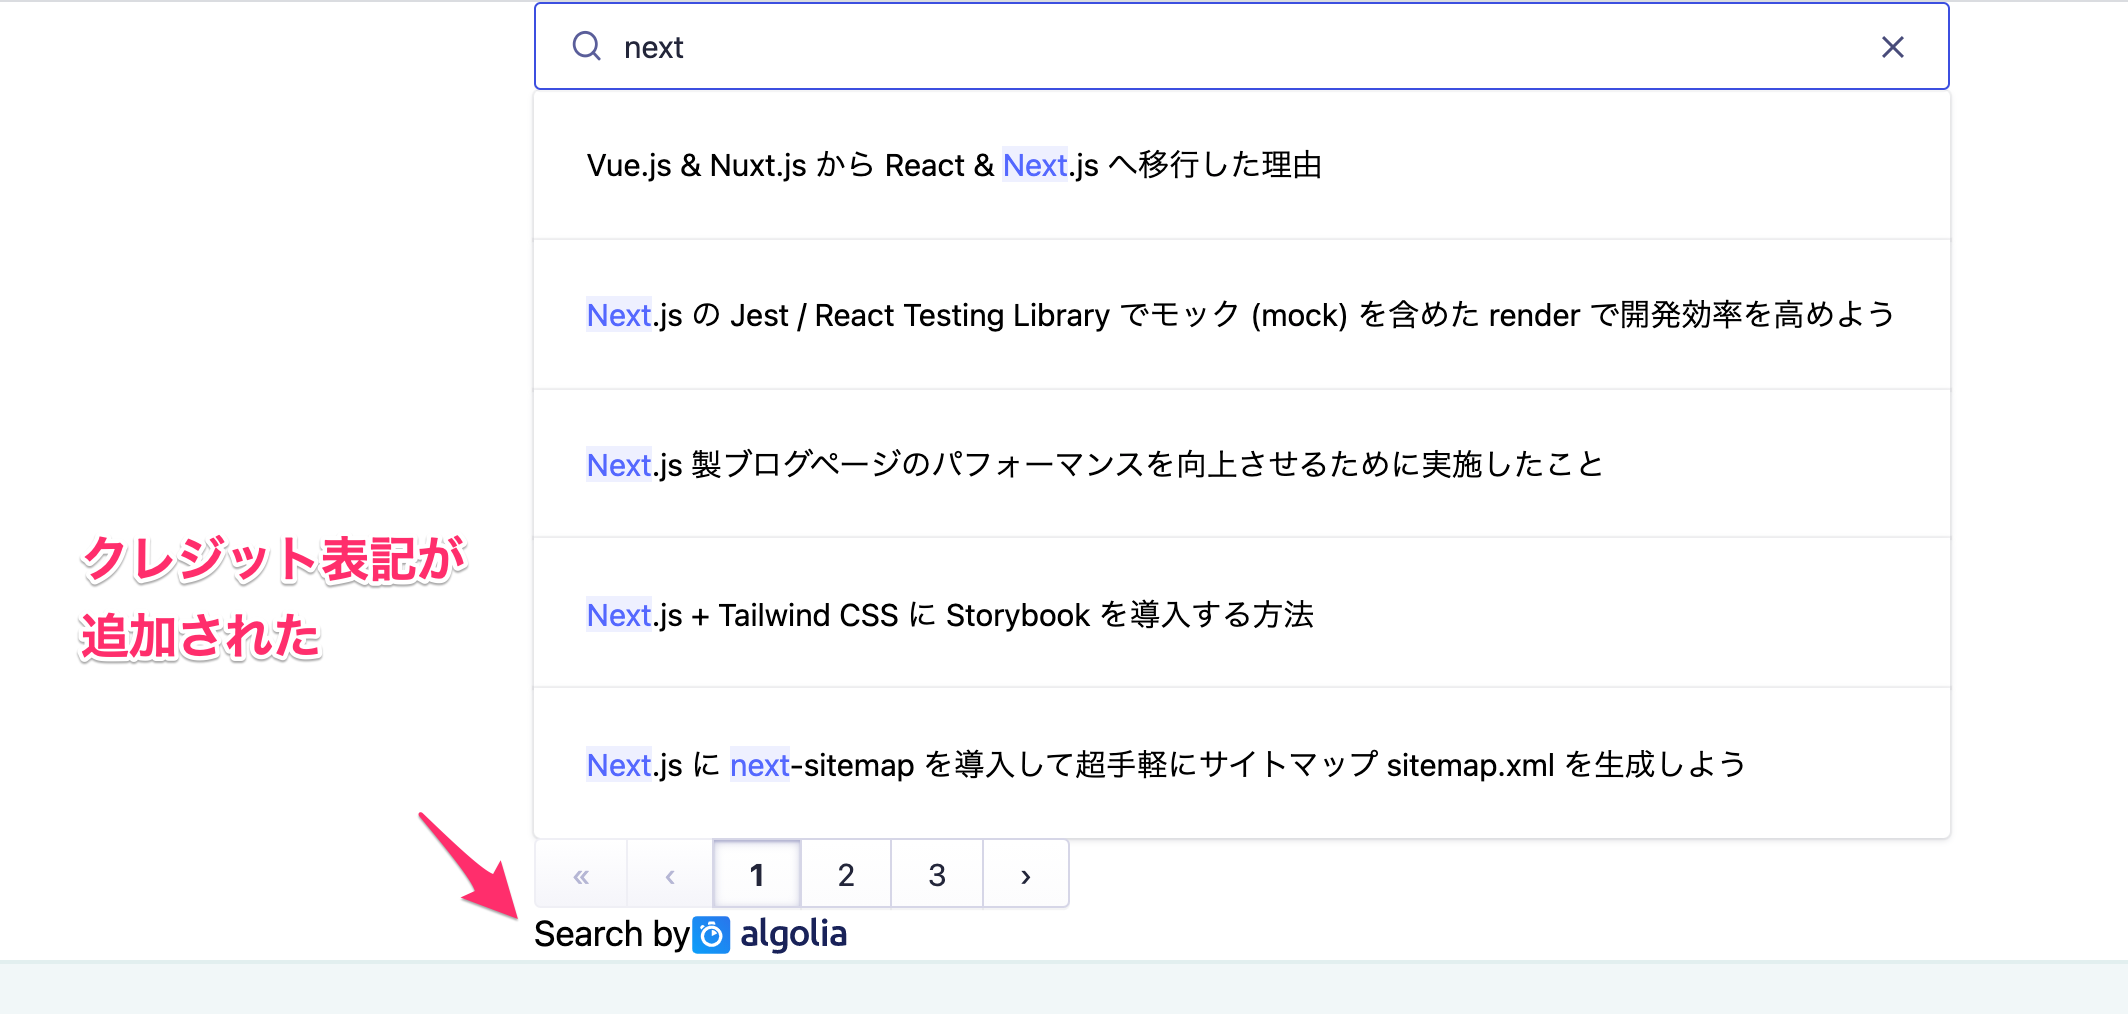
無料版は algolia のロゴを表示必須
algolia では無料版を使用している人は algolia のクレジット表示が必要です。
Algolia requires that you use this widget if you only use your free usage credits, or are on a Community or Free legacy plan.
こちらも
注意点として
PowerdBy コンポーネントが用意されているため、そちらを追加するだけです。注意点として
Search コンポーネント内に追加すると検索されていない時も表示されてしまうため、SearchResult コンポーネントないに追記しておくと良いでしょう。// 変更点 return ( <> <Hits hitComponent={hitComponent} /> <Pagination /> <PoweredBy /> {/* 追加 */} </> );
全体像はこちらです。
// src/components/common/SearchResult.tsx

import Link from 'next/link';
import { useEffect, useState, useCallback } from 'react';
import { Hit } from 'react-instantsearch-core';
import { Hits, connectSearchBox, Pagination, Highlight, PoweredBy } from 'react-instantsearch-dom';

interface HitDoc {
  objectID: string;
  url: string;
  title: string;
  description: string;
  content: string;
}

interface Props {
  hit: Hit<HitDoc>;
}

interface HitComponentProps extends Props {
  onClick: () => void;
}

function HitComponent({ hit, onClick }: HitComponentProps): JSX.Element {
  return (
    <div>
      <Link href={hit.url}>
        <button className="hover:text-[#06bbbc]" onClick={onClick}>
          <Highlight attribute="title" hit={hit} />
        </button>
      </Link>
    </div>
  );
}

const SearchResult = connectSearchBox(({ refine, currentRefinement }) => {
  const [isShow, setShow] = useState<boolean>(false);

  useEffect(() => {
    setShow(!!currentRefinement);
  }, [currentRefinement]);

  const handleResetSearchWords = useCallback(() => {
    refine('');
  }, [refine]);

  const hitComponent = ({ hit }: Props): JSX.Element => (
    <HitComponent hit={hit} onClick={handleResetSearchWords} />
  );

  if (!isShow) return null;
  return (
    <>
      <Hits hitComponent={hitComponent} />
      <Pagination />
      <PoweredBy /> {/* 追加 */}
    </>
  );
});

export default SearchResult;
モーダルウィンドウを表示
Tailwind CSS を確認していただくとわかる通り、ヘッダー内で検索の処理を行うよりも、モーダルウィンドウに飛ばしてから検索結果を表示することが多いと思います。
今回もヘッダーに検索画面を置いている以上、ヘッダーが伸び縮みしてしまい表示崩れが起こっていました。
少し手間がかかりますが、モーダルウィンドウ内で検索画面を表示できるようにしていきましょう。
モーダルウィンドウの準備
fwywd(フュード) のチームは Tailwind CSS をメインで使用しており、Tailwind CSS では Headless UI というパッケージで分離してモーダルウィンドウなどが簡単に実装できるようになっています。
まずは検索画面を押したらモーダルウィンドウが表示されるところまで作っていきましょう。
PageHeader に追加していた Search コンポーネントはモーダルウィンドウ内に移植するため、ひとまず除去して、その位置にこれから紹介する SearchForm を挿入しています。# npm の場合 npm install --save-dev @headlessui/react # yarn の場合 yarn add --dev @headlessui/react
スタイリングも含めて以下のように
Headless UI でのモーダルウィンドウの実装方法に慣れていない方は以下の参考記事を読むと良いでしょう。
Modal 付きの検索ボタンを設定しました。Headless UI でのモーダルウィンドウの実装方法に慣れていない方は以下の参考記事を読むと良いでしょう。
// src/components/common/SearchForm.tsx

import { Dialog, Transition } from '@headlessui/react';
import SearchIcon from 'components/icons/Search';
import { useState, Fragment } from 'react';

export default function SearchForm(): JSX.Element {
  const [isOpen, setIsOpen] = useState<boolean>(false);
  const openModal = () => setIsOpen(true);
  const closeModal = () => setIsOpen(false);

  return (
    <>
      <button
        onClick={openModal}
        className="flex items-center px-4 py-3 text-sm text-gray-500 rounded-full shadow focus:outline-none w-72 hover:bg-[#f1f7f8] hover:text-primary-dark hover:shadow-lg hover:duration-500"
      >
        <SearchIcon />
        <span className="ml-2">記事を検索</span>
      </button>

      <Transition appear show={isOpen} as={Fragment}>
        <Dialog as="div" className="fixed inset-0 z-10 overflow-y-auto" onClose={closeModal}>
          <div className="min-h-screen px-4 text-center">
            <Dialog.Overlay className="fixed inset-0 opacity-50 bg-primary-lightest" />

            <Transition.Child
              as={Fragment}
              enter="ease-out duration-300"
              enterFrom="opacity-0 scale-95"
              enterTo="opacity-100 scale-100"
              leave="ease-in duration-200"
              leaveFrom="opacity-100 scale-100"
              leaveTo="opacity-0 scale-95"
            >
              <div className="inline-block w-full max-w-md p-6 my-8 overflow-hidden text-left align-middle bg-white shadow-xl transition-all transform rounded-2xl">
                <Dialog.Title as="h3" className="text-lg font-medium text-gray-900 leading-6">
                  検索結果
                </Dialog.Title>
                <div className="mt-2">
                  <p className="text-sm text-gray-500">ここに検索結果を挿入していきます 。</p>
                </div>

                <div className="mt-4">
                  <button
                    type="button"
                    className="inline-flex justify-center px-4 py-2 text-sm font-medium text-blue-900 bg-blue-100 border border-transparent rounded-md hover:bg-blue-200 focus:outline-none focus-visible:ring-2 focus-visible:ring-offset-2 focus-visible:ring-blue-500"
                    onClick={closeModal}
                  >
                    閉じる
                  </button>
                </div>
              </div>
            </Transition.Child>
          </div>
        </Dialog>
      </Transition>
    </>
  );
}

これで動作を確認すると以下のように、検索ボタンを押すとモーダルウィンドウが表示されました。
ここに検索結果を追加していきましょう。
ここに検索結果を追加していきましょう。
検索結果と統合して調整
実装したコードの一式は後に回し、最終的に CSS を調整していき、以下のように検索機能を実装できました。
それでは、実装したコード一式です。
最後に細かく調整したため、これまで解説してきたところと少し違っていますので、ぜひそれぞれを確認してみてください。
最後に細かく調整したため、これまで解説してきたところと少し違っていますので、ぜひそれぞれを確認してみてください。
補足1
内部リンクからの検索結果が残る問題を解決してきましたが、その後、モーダルウィンドウがページ遷移後も消えず、泣く泣くLinkコンポーネントを使わずにaタグへと変えました。
コンポーネント間で状態の共有ができればLinkでの実装も可能ですが、useContextが煩わしいため、今回は動作優先としました。
状態管理用の外部パッケージとして Atom などがあり、こちらを使うと非常に簡単ですので、近いうちにこちらでリファクタリングする予定です。
補足2
instantsearch.cssはSearchコンポーネント内で読み込んでいましたが、CSS の上書きをするのであれば_app.tsxで読み込まないといけませんでした。
まず前提として、CSS Modules とは異なり、ビルドを行わない対象の CSS は_app.tsxでグローバルに読み込む必要があります。
algolia で指定されているクラス名に合わせるには CSS Modules が使えないため、必然的に上書き用のalgolia.cssは_app.tsxでグローバルに読み込む必要があります。
Searchコンポーネント内でinstantsearch.cssを読み込むと、_app.tsxの後に読み込まれるため、自作したalgolia.cssで上書きすることができませんでした。
したがって、_app.tsx内でinstantsearch.cssを読み込んだ後に自作したalgolia.cssを読み込むといった方法に限られるようです。
こちらが使用したコード一式になります。
SearchForm をヘッダーに挿入しています。// src/components/common/Search.tsx import SearchResult from 'components/common/SearchResult'; import { indexName, searchClient } from 'lib/searchClient'; import { InstantSearch, SearchBox, Configure } from 'react-instantsearch-dom'; export default function Search(): JSX.Element { return ( <div> <InstantSearch indexName={indexName} searchClient={searchClient}> <Configure hitsPerPage={5} /> <SearchBox /> <SearchResult /> </InstantSearch> </div> ); }
// src/components/common/SearchForm.tsx

import { Dialog, Transition } from '@headlessui/react';
import Search from 'components/common/Search';
import SearchIcon from 'components/icons/SearchIcon';
import { useState, Fragment } from 'react';

export default function SearchForm(): JSX.Element {
  const [isOpen, setIsOpen] = useState<boolean>(false);
  const openModal = () => setIsOpen(true);
  const closeModal = () => setIsOpen(false);

  return (
    <>
      <button
        onClick={openModal}
        className="flex items-center px-4 py-3 text-sm text-gray-500 rounded-full shadow focus:outline-none w-72 hover:bg-[#f1f7f8] hover:text-primary-dark hover:shadow-lg hover:duration-500"
      >
        <SearchIcon />
        <span className="ml-2">記事を検索</span>
      </button>

      <Transition appear show={isOpen} as={Fragment}>
        <Dialog as="div" className="fixed inset-0 z-10 overflow-y-auto" onClose={closeModal}>
          <div className="min-h-screen px-4 text-center">
            <Dialog.Overlay className="fixed inset-0 opacity-50 bg-primary-lightest" />

            <Transition.Child
              as={Fragment}
              enter="ease-out duration-300"
              enterFrom="opacity-0 scale-95"
              enterTo="opacity-100 scale-100"
              leave="ease-in duration-200"
              leaveFrom="opacity-100 scale-100"
              leaveTo="opacity-0 scale-95"
            >
              <div className="inline-block w-full max-w-2xl p-6 my-8 overflow-hidden text-left align-middle bg-white shadow-xl transition-all transform rounded-2xl">
                <Search />
              </div>
            </Transition.Child>
          </div>
        </Dialog>
      </Transition>
    </>
  );
}
// src/components/common/SearchResult.tsx

import { useEffect, useState, useCallback } from 'react';
import { Hit } from 'react-instantsearch-core';
import { Hits, connectSearchBox, Pagination, Highlight, PoweredBy } from 'react-instantsearch-dom';

interface HitDoc {
  objectID: string;
  url: string;
  title: string;
  description: string;
  content: string;
}

interface Props {
  hit: Hit<HitDoc>;
}

interface HitComponentProps extends Props {
  onClick: () => void;
}

function HitComponent({ hit, onClick }: HitComponentProps): JSX.Element {
  return (
    <a href={hit.url}>
      <button onClick={onClick} className="flex justify-start w-full px-5 py-5">
        <Highlight attribute="title" hit={hit} />
      </button>
    </a>
  );
}

const SearchResult = connectSearchBox(({ refine, currentRefinement }) => {
  const [isShow, setShow] = useState<boolean>(false);

  useEffect(() => {
    setShow(!!currentRefinement);
  }, [currentRefinement]);

  const handleResetSearchWords = useCallback(() => {
    refine('');
  }, [refine]);

  const hitComponent = ({ hit }: Props): JSX.Element => (
    <HitComponent hit={hit} onClick={handleResetSearchWords} />
  );

  if (!isShow) return null;
  return (
    <>
      <p className="mt-5 text-sm font-semibold tracking-wider text-gray-500">記事一覧</p>
      <Hits hitComponent={hitComponent} />
      <Pagination />
      <PoweredBy />
    </>
  );
});

export default SearchResult;
// src/components/icons/SearchIcon.tsx

interface Props {
  w?: number;
  h?: number;
}

export default function Search({ w = 6, h = 6 }: Props): JSX.Element {
  return (
    <svg
      xmlns="http://www.w3.org/2000/svg"
      className={`w-${w} h-${h} `}
      fill="none"
      viewBox="0 0 24 24"
      stroke="currentColor"
    >
      <path
        strokeLinecap="round"
        strokeLinejoin="round"
        strokeWidth={2}
        d="M21 21l-6-6m2-5a7 7 0 11-14 0 7 7 0 0114 0z"
      />
    </svg>
  );
}
/* src/styles/algolia.css */

.ais-Hits-list {
  padding: 5px 0;
}

.ais-Hits-item {
  background-color: #fafafa;
  border-radius: 5px;
  box-shadow: none;
  display: block;
  margin: 10px 0;
  padding: 0;
}

.ais-Hits-item:hover {
  background-color: #d9ebeb;
}

.ais-Hits-item:first-of-type,
.ais-InfiniteHits-item:first-of-type {
  border-radius: 5px;
}

.ais-Highlight {
  font-weight: 600;
}

.ais-Highlight-highlighted {
  background-color: transparent;
  color: #06bbbc;
}

.ais-Pagination {
  display: flex;
  justify-content: center;
}

.ais-PoweredBy {
  display: flex;
  justify-content: flex-end;
}

.ais-PoweredBy-text {
  font-size: small;
  margin-right: 5px;
}
src/pages/_app.tsx

...
import 'instantsearch.css/themes/satellite-min.css';
import 'styles/algolia.css';

export default function App({ Component, pageProps }: AppProps): JSX.Element {
  ...
  return <Component {...pageProps} />;
}
おわりに
algolia は検索の機能だけでなく UI まで作り込まれて優秀
ここまで一緒に実装してこられた方、本当にお疲れ様でした。
今回はこれまでで最も長い記事となり、本当に大変だったと思います。
私自身は記事を書きながら検証して実装する遅めのペースでした。
それでも2日あれば終えることができたのは、やはり algolia が使いやすく、UI まで丁寧に作り込まれていたおかげです。
もう少しテストをちゃんと書いたり、まだまだリファクタリングが必要なところですが、まずは動作させてみることが大事ですので、その辺りの優先度は低めにしています。
それでも2日あれば終えることができたのは、やはり algolia が使いやすく、UI まで丁寧に作り込まれていたおかげです。
もう少しテストをちゃんと書いたり、まだまだリファクタリングが必要なところですが、まずは動作させてみることが大事ですので、その辺りの優先度は低めにしています。
本来、検索といった機能を実装しようと思うとかなり大変ですので、この実装コストで UX が向上するのであれば、取り組んでみても良いと思います。
日本語でも記事があったのですが、基本的には成果物ベースでの報告記事が多く、その間を埋めるところに公式ページを見て、ひとつずつ実装してみて...とこの点が結構大変でした。
その代わりに、私以降の人はなるべく調査する時間よりも実装しながら理解に重きを置けるような解説を作りましたので、ぜひご活用いただけますと幸いです。
日本語でも記事があったのですが、基本的には成果物ベースでの報告記事が多く、その間を埋めるところに公式ページを見て、ひとつずつ実装してみて...とこの点が結構大変でした。
その代わりに、私以降の人はなるべく調査する時間よりも実装しながら理解に重きを置けるような解説を作りましたので、ぜひご活用いただけますと幸いです。
新着記事


関連記事


新着記事new
Markdoc (Tailwind UI の Syntax ベース)による Markdown Viewer の実装
2022/08/09▶︎ view more

【Azure App Service | Node.js】GitHub Actions を利用して継続デプロイしてみよう【 トラブルガイド付】
2022/08/06▶︎ view more

ライター直伝!読みやすさに差をつける文章濃縮術
2022/07/28▶︎ view more

井の中の蛙が人の力を引き出す、群に対する教育の設計術 ~ 専門家が怖くて発言できない、こんな世の中に ~
2022/07/28▶︎ view more

想像していたよりもはるか簡単に社長になった話
2022/07/27▶︎ view more
著者